
When your website starts to outgrow your regular web hosting plan, Virtual Private Server (VPS) Hosting gives you the breathing room you need. With VPS Hosting, you get dedicated resources, more control, and better security for your projects.
And the best part is that HostPapa provides a complete list of products based on virtual private servers, allowing businesses and agencies that manage multiple accounts to have a holistic view of their websites.
With VPS, you can fine-tune the server to match your applications, add extra protection, and handle more visitors without the instability that often comes with basic web hosting.
HostPapa VPS Hosting presents a strong choice for growing businesses that want more power without managing physical hardware on their own. HostPapa combines managed services, easy-to-use tools like cPanel, and fast infrastructure so you can focus on your website and customers, not on server maintenance.
In this VPS Hosting guide, we walk through what VPS Hosting is, when it makes sense to upgrade, and how HostPapa’s VPS plans fit different business needs.
You’ll also learn how to choose the right plan, what technical specifications to look at, and how to think about server location. By the end, you’ll be ready to make a confident decision about your VPS Hosting setup and take your next steps with HostPapa.
- What Is VPS Hosting & When Do You Need It?
- Choosing Your HostPapa VPS Hosting Plan: Managed or Unmanaged VPS Hosting
- Initial HostPapa VPS Setup: Getting Started
- Essential Security Configuration
- What You Need to Know About Domains & SSL on VPS Hosting
- Website Deployment on a VPS Hosting Plan
- Backup & Monitoring Setup
- Ongoing Maintenance Best Practices
What Is VPS Hosting & When Do You Need It?
VPS Hosting uses virtualization technology to split a powerful physical server into several smaller virtual servers. Each VPS acts like its own dedicated machine with its own operating system (usually Linux), resources, and configuration, even though it shares the underlying hardware. This gives you more control than simple web hosting plans, without the higher cost and complexity of a full dedicated server, which in turn has its own benefits for growing businesses.
Compared with simple web hosting, VPS Hosting delivers better performance and stability because your RAM, CPU, and storage allocation are reserved for your account.
On busy days, other websites on the same physical server do not compete for your resources in the same way they do with standard web hosting, so your website can stay fast and responsive.
When Is the Time for a VPS Hosting Plan?
It’s a good time to upgrade to VPS Hosting when you start seeing higher and more consistent traffic, run an eCommerce store, or handle sensitive data that must meet stricter standards, such as PCI compliance. These situations often need more bandwidth, stronger isolation, and tighter control over software versions and security configuration.
HostPapa VPS Hosting gives you features that matter at this stage, such as root access for advanced configuration, cPanel for easier day-to-day management, and plans that you can expand as your requirements increase.
For businesses and agencies that have the right knowledge, HostPapa also offers unmanaged VPS Hosting plans with a fraction of the cost of a managed solution.
This mix of flexibility and managed support helps you move from shared hosting to a more powerful environment without needing to become a full-time system administrator.

Choosing Your HostPapa VPS Hosting Plan: Managed or Unmanaged VPS Hosting
Picking the most suitable VPS hosting plan for your business is fundamental, and it involves multiple considerations, such as whether to start with a managed service or to handle server maintenance independently.
When you explore HostPapa VPS plans, you can pick between managed and unmanaged setups, depending on how hands-on you want to be.
Managed VPS is a good fit if you want HostPapa’s team to help with server configuration, monitoring, and various maintenance tasks, while you focus on your website and applications running on top of it.
If you have more technical experience, you can take greater control of updates and server tuning yourself with an unmanaged VPS Hosting plan. Unmanaged VPS Hosting, in turn, reflects in lower pricing.
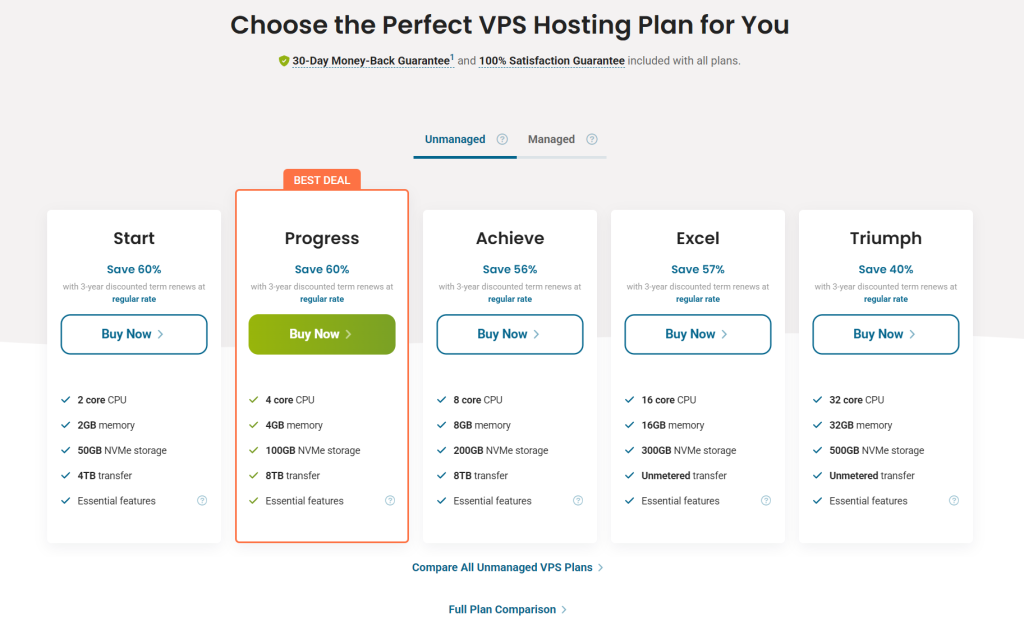
Server Resources & Their Impact
Each plan comes with a specific amount of RAM, CPU cores, storage, and bandwidth, and these numbers have a direct impact on how your website behaves under load.
More RAM helps run databases and multiple applications simultaneously, extra CPU cores help process requests faster, and faster storage, such as SSD or NVMe, offers better read/write speeds, making accessing information faster than traditional drives.
Operating System & Server Location
For most beginners and many small teams, a modern Linux distribution like Ubuntu is a solid operating system choice.
If you work with specific software stacks, you can also consider distributions like AlmaLinux or Debian, but Ubuntu LTS remains a popular, beginner-friendly starting point.
Server location also plays a big part in how fast your website feels to visitors; however, with modern DNS services, your website can get closer to your audience very fast. On the other hand, the closer your VPS is to your main audience, the lower the latency and the faster the pages load.

Initial HostPapa VPS Setup: Getting Started
Setting up your VPS Hosting starts with accessing the server and putting basic security measures in place. This section walks you through the first steps, from logging into HostPapa’s dashboard to establishing a secure connection and protecting your server from common threats.
Step 1: Accessing Your New VPS & Logging Into HostPapa Dashboard
After HostPapa provisions your VPS, you’ll receive a welcome email with login credentials and important server details. Head to the HostPapa client dashboard and navigate to your VPS services section.
Step 2: Connecting via SSH: The Alternative Method
Your dashboard displays your VPS IP address, which is a unique number that identifies your server on the internet, looking something like 198.51.100.45. You’ll also see your SSH port (usually 22 by default) and your root username.
HostPapa provides the initial root password either in the welcome email or through the dashboard’s password reset tool.

Essential Security Configuration
Step 3: Connecting via Secure Shell (SSH)
For Terminal users (Mac, Linux, or Windows Terminal), type this command, replacing the IP address with your actual VPS IP:
ssh root@198.51.100.45 (the IP address is for demonstration purposes only)
Press Enter on your keyboard, and you’ll see a security warning asking if you trust this server. Type yes and press Enter. This only happens on your first connection.
You can read more about connecting via secure shell in our in-depth guide on connecting via SSH to a web server.
Step 4: Creating a Sudo User
Running everything as root is dangerous because a single mistake can break your entire server. Creating a regular user account with sudo privileges (elevated or admin privileges) is far safer.
To do this, create a new user account by replacing the word yourname below with your preferred username:
adduser yourname
You’ll be prompted to set a password and fill in optional information (you can press Enter to skip the extra details).
Step 5: System Updates & Firewall Setup
Keeping your system updated and adding a firewall are two fundamental security practices for any VPS configuration.
New VPS instances often ship with slightly outdated software packages. Update everything to get the latest security patches.
For Ubuntu/Debian, you run the following commands to update the OS:
sudo apt update
sudo apt upgrade -y (this automatically accepts anything new found on the update store)
This downloads the latest package information and installs all available updates.
Step 5.1: Installing & Configuring UFW (Uncomplicated Firewall)
UFW makes firewall management simple for beginners. Most Ubuntu systems include it by default, but if it’s missing, install it with:
sudo apt install ufw
Before enabling UFW, configure it to allow your SSH connection, or you’ll lock yourself out.
Next, you might want to create certain firewall rules to open specific ports on the system. We recommend SSH first (adjust the port number if you changed it in Step 3) by running the following command for the UFW app:
sudo ufw allow 22/tcp
Or for a custom SSH port like 2222:
sudo ufw allow 2222/tcp
In this context, port 80 handles regular HTTP traffic, while port 443 handles encrypted HTTPS connections.

What You Need to Know About Domains & SSL on VPS Hosting
When you move to VPS Hosting, your domain name and SSL certificate work a bit differently than they do on simple web hosting. On the other hand, HostPapa’s cPanel makes setting them up straightforward.
How Your Domain Connects to Your VPS
Your domain name is the web address visitors type to reach your website, and it needs to know where your VPS Hosting server lives on the internet.
The process of identifying and connecting to your server uses DNS records, a large catalog of IP addresses that point to specific locations on the internet.
In HostPapa’s cPanel, your VPS IP address is clearly listed on your dashboard. If you registered your domain with HostPapa, the system often handles DNS updates automatically when you add a domain to your VPS. If your domain is registered elsewhere, you’ll log into that registrar and update the A Record to point to your HostPapa VPS IP address.
HostPapa VPS plans include access to a free SSL certificate service that works perfectly for most websites. In your cPanel control panel, you’ll find the SSL/TLS Status section where you can enable AutoSSL for your domains.
To learn more about cPanel, read our complete guide on the industry-standard web hosting control panel.
When You Might Need Help
While HostPapa makes domain and SSL management accessible through cPanel, sometimes DNS settings at external registrars or specific SSL requirements (like wildcard certificates for multiple subdomains) can get tricky.
In that case, HostPapa’s support team can walk you through domain pointing if you’re stuck, and they can help troubleshoot SSL issues if AutoSSL doesn’t install the first time correctly.
Website Deployment on a VPS Hosting Plan
Getting your website files onto your VPS Hosting and connecting them to a database transforms your server from an empty machine into a working web presence. HostPapa’s cPanel makes this process manageable, whether you’re uploading a custom website or installing a platform like WordPress.
Step 6: Uploading Your Website Using cPanel File Manager or SFTP
HostPapa VPS includes cPanel File Manager, a browser-based tool that lets you upload, edit, and organize files without additional software.
Log in to your cPanel dashboard and click the File Manager icon. Navigate to the public_html folder, which is where website files need to live for visitors to see them.
Alternatively, SFTP (Secure File Transfer Protocol) gives you faster uploads and better control when working with hundreds of files. Popular SFTP clients like FileZilla or Cyberduck connect to your VPS using your server IP address, SSH username, and password.
Step 7: Database Setup for Popular CMS Applications
Most dynamic websites, including WordPress, Joomla, and custom web applications, need a database to store content, user accounts, and settings. Your VPS configuration isn’t complete without connecting your website to a properly configured database.
Manually Connecting Your Website to the Database
Your website needs four pieces of information to connect to the database: database name, username, password, and host (usually localhost on VPS).
For WordPress, locate the wp-config.php file in your website’s root directory. Edit it in cPanel File Manager or via SFTP and find these lines:
- define(‘DB_NAME’, ‘database_name_here’);
- define(‘DB_USER’, ‘username_here’);
- define(‘DB_PASSWORD’, ‘password_here’);
- define(‘DB_HOST’, ‘localhost’);

Backup & Monitoring Setup
Backups protect your work from hardware failures, software bugs, security breaches, and human mistakes. Monitoring alerts you to problems before they become disasters.
Step 8: Implementing Backup Strategy & Setting Up Automated Backups
The 3-2-1 backup rule is a proven data protection framework. Keep three copies of your data: your live website plus two backups.
Store backups on two different media types (like your VPS disk plus external storage or cloud storage). Keep one copy off-site in a different physical location to protect against local disasters like fires or floods.
This strategy protects you from multiple failure scenarios:
- Hardware failure: Your alternate copies on different media save you
- Ransomware: Offline backups can’t be encrypted by attackers
- Natural disasters: Offsite backups survive regional problems
- Accidental deletion: Multiple recovery points let you restore lost files
HostPapa Backup Solutions
HostPapa’s Managed VPS Hosting includes backup support as part of its managed services. Their team can help configure automated backup schedules, set retention policies, and verify backup integrity.
For automated backups through cPanel, use the Backup Wizard tool. Schedule daily or weekly full backups and store them in a remote location via FTP, SFTP, or cloud storage services such as Google Drive or Dropbox. Automated Website Backup from HostPapa provides additional protection with multiple restore points and is available with any hosting plan.
Ongoing Maintenance Best Practices
Your VPS Hosting needs regular attention to stay secure, fast, and reliable. Establishing maintenance routines prevents problems before they affect your website.
Regular System & Software Updates
Security vulnerabilities get discovered constantly, and updates patch them. Log into your VPS via SSH at least monthly and run system updates:
For Ubuntu/Debian:
sudo apt update sudo apt upgrade -y
These commands download security patches and install them automatically. HostPapa’s Managed VPS plans include software update assistance, so their team can handle critical patches if you’re not comfortable running them yourself.
Don’t forget application updates, too. WordPress, plugins, and other software need regular updates through their admin panels or package managers.
Conclusion
Setting up your HostPapa VPS Hosting involves several important steps, from initial SSH connection and security hardening through website deployment, database configuration, and ongoing maintenance. This VPS hosting guide walked you through how to set up a VPS in 2026, showing you the path from an empty server to a secure, functional web hosting environment.
Benefits of HostPapa Managed vs. Unmanaged VPS
Managed VPS Hosting from HostPapa handles server maintenance, security audits, software updates, and troubleshooting so you can focus on your website instead of server administration.
Unmanaged VPS gives you complete control and lower costs but requires technical knowledge to maintain security, updates, and performance yourself. If you’re comfortable with command-line administration and want maximum flexibility, unmanaged works well.
FREQUENTLY ASKED QUESTIONS
How long does VPS setup take?
Basic VPS Hosting setup with cPanel access takes 15-30 minutes after HostPapa provisions your server. SSH security hardening adds another 30-45 minutes. Complete setup, including website deployment, database configuration, and security measures, typically takes 2-4 hours for beginners following this VPS hosting guide.
Can I upgrade my plan later without downtime?
Yes, HostPapa allows VPS plan upgrades with minimal interruption. Their team coordinates resource increases to your existing server when possible, avoiding the need to migrate to a new machine. Contact their support to discuss your upgrade path and any scheduled maintenance windows.
What’s included in HostPapa managed VPS?
HostPapa Managed VPS Hosting includes cPanel/WHM licenses, server boot failure resolution, email configuration, package manager installations, firewall setup and troubleshooting, hardware failure handling, network issue resolution, software upgrades and migrations, custom Apache configurations, DNS configuration, security audits, and script troubleshooting. You retain root access and control your container while HostPapa manages infrastructure, connectivity, storage, and security.
Do I need technical knowledge for HostPapa VPS?
No. Managed VPS requires minimal technical knowledge because HostPapa’s team handles server administration. You’ll use cPanel’s graphical interface for website management. Basic familiarity with file uploading and domain management helps, but you don’t need command-line expertise.