Are you interested in developing WordPress themes or plugins? Or do you want to try a new WordPress version before publishing it? Either way, you’ll need to install WordPress locally on your computer to make these things way easier while having everything in a secure container.
While the website staging we offer at HostPapa is the most preferred option for virtually every user, having the whole environment offline adds a great layer of security and privacy. Software like XAMPP, MAMP and WAMP may have funny names, but they provide an efficient and secure way to host local WordPress sites on your computer. With that software, you’re transforming your computer into a local server powerful enough to run your WordPress site or any other CMS.
In this HostPapa blog, we’ll show you how to create local WordPress sites or any other CMS that needs a database to function correctly. We’ll also provide tips and alternative software you can use to achieve the same results. Let’s get started!
- Why Would You Want to Install WordPress Locally?
- How to Install XAMPP on Your Computer (Windows)
- How to Create a New Database in phpMyAdmin on XAMPP (Windows & macOS)
- How to Download WordPress on Your Local Testing Environment
- How to Install WordPress Locally on Windows Using XAMPP
- How to Install WordPress Locally on macOS Using XAMPP
- Download and Install WordPress Locally on macOS
- Manually Edit the wp-config-sample.php File on Your Test Site
- XAMPP Alternatives to Install WordPress Locally
Why Would You Want to Install WordPress Locally?
So let’s get started. Why would you want to install a new WordPress site on your computer? There can be many reasons, and we’ll go through each of them. Chances are that you searched and reached this blog because you have something particular in mind with your WordPress site.
While a quality web host will give you space on your hosting plan to stage a website, nothing beats a local environment where you have complete control over your software and hardware. It’s like you have your very own private server in your home where you can try various things with your WordPress site. Here are some reasons you might want to install a local development environment on your computer.
- Playing around with a new WordPress version and plugins. Even when you have a staging area on your hosting plan, a local WordPress site allows you to do whatever you want in the installation.
- It’s ideal for designing themes and plugins. The local site will be safer and easier to work on your theme and plugin development. Plus, it’ll be more straightforward to edit files with your favourite programs like Notepad++ or Sublime Text.
- Troubleshooting, perhaps a version of your live site to implement fixes and try out new plugins and themes. Installing WordPress locally can help you learn how it works, what breaks it down and how to fix various issues around the most famous CMS in the world.
- A local WordPress install is safer from prying eyes since it’s an offline version running on a local server. A local site is a fail-proof method if you have a popular site and want to try new things without your visitors noticing.
- A local site is also highly portable. No internet connection is needed, and your WordPress files are stored on your computer. While this can’t guarantee your file’s safety, the same way HostPapa’s Automated Website Backup service does, it’s a good starting point.
How to Install XAMPP on Your Computer (Windows)
Now that you know the importance of a local testing environment, let’s jump into how to install WordPress locally on Windows. The first thing you’ll want is to download XAMPP. This is essentially a software stack – a compilation of all the essential software you’ll need to run a website, all in one package with a handy control panel.
It stands for “Cross-Platform Apache, MariaDB, PHP and Perl,” which are essential components of running any site. PHP and Perl are profound programming languages, Apache is a web server software, and MariaDB is there to save and pull queries from the databases that a CMS like WordPress needs.
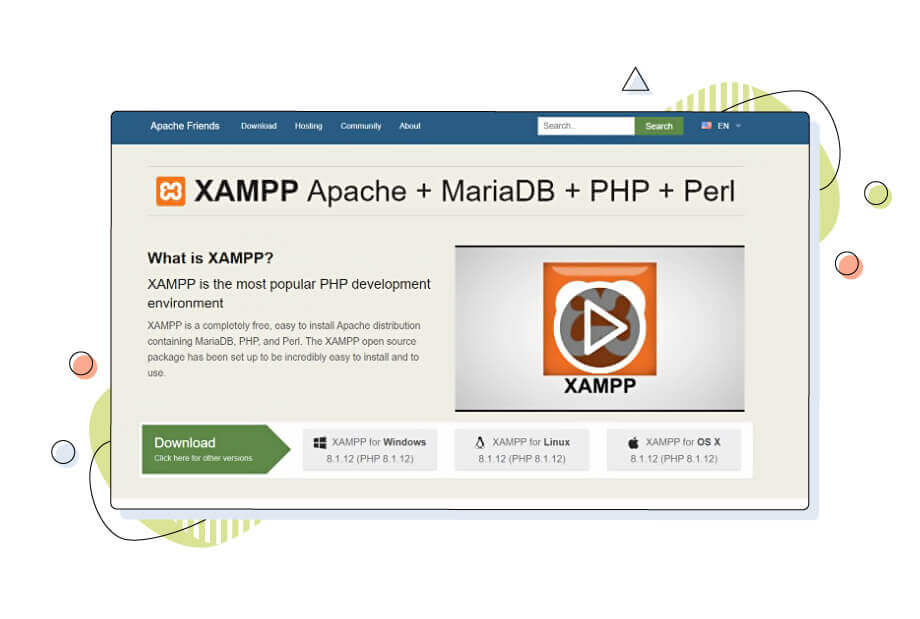
XAMPP is available for three major platforms: Windows, macOS and Linux. Download and install XAMPP from the official website and choose the version according to your operating system.
Once you’ve installed XAMPP, it’s time to install WordPress! You can do this in a few simple steps:
- Go to the XAMPP control panel folder (usually C:/xampp) and start the XAMPP control panel by double-clicking on the xampp-control.exe.
- Once the control panel shows up, start Apache and MySQL modules from the XAMPP control panel by clicking Start on the right-hand side (see the picture below).
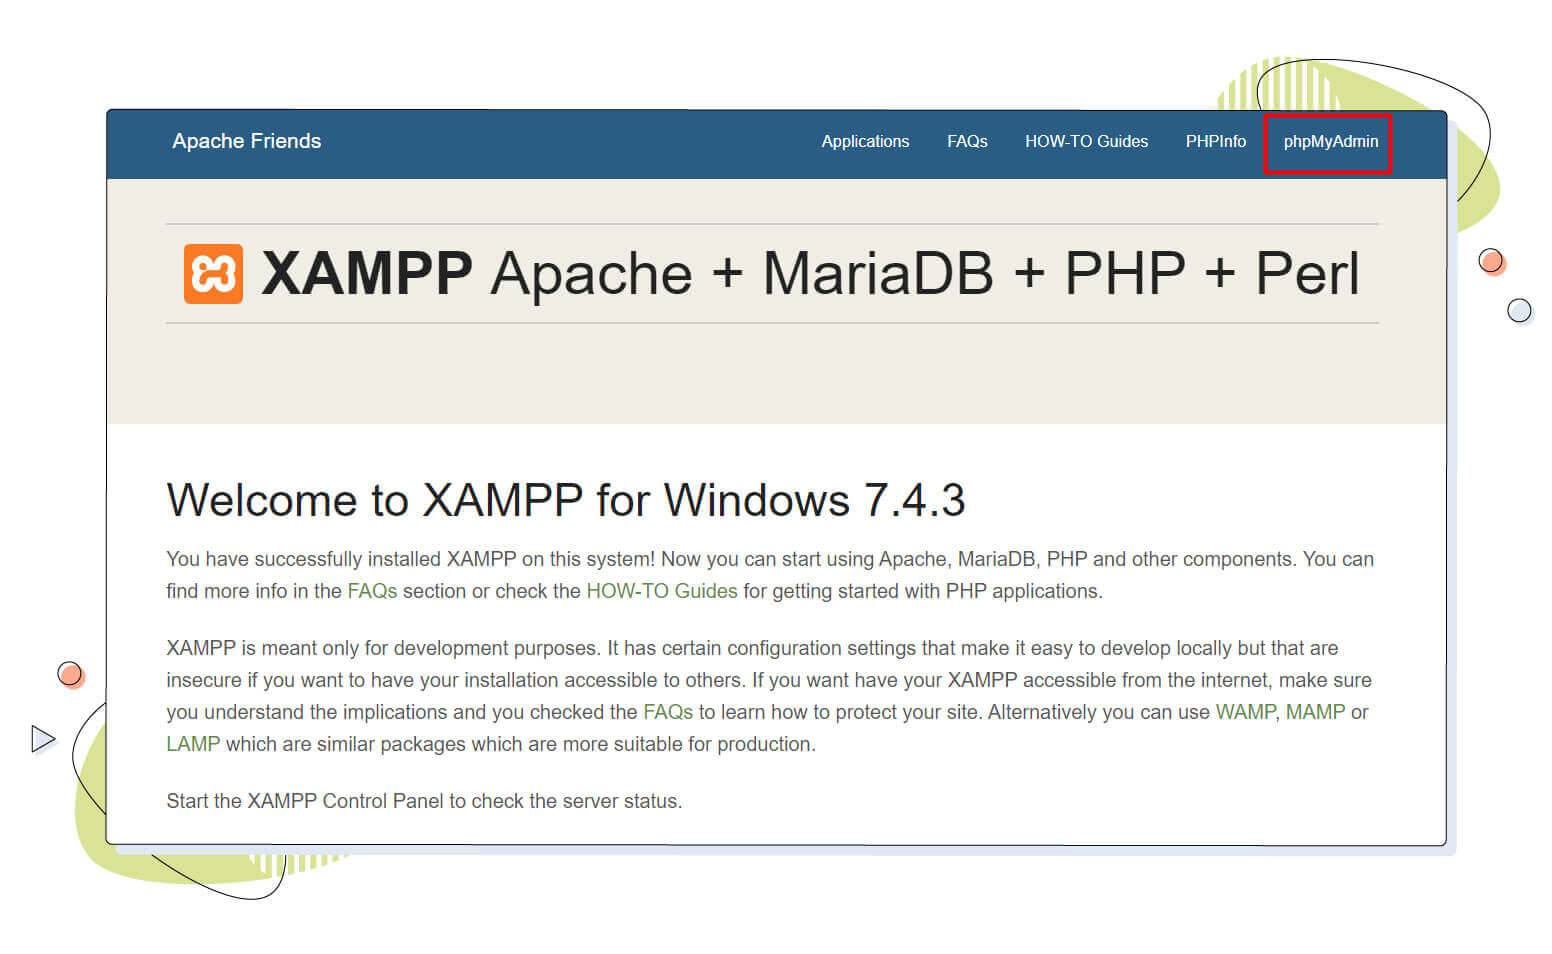
- Locate and open your browser at https://localhost/ to see XAMPP’s homepage.
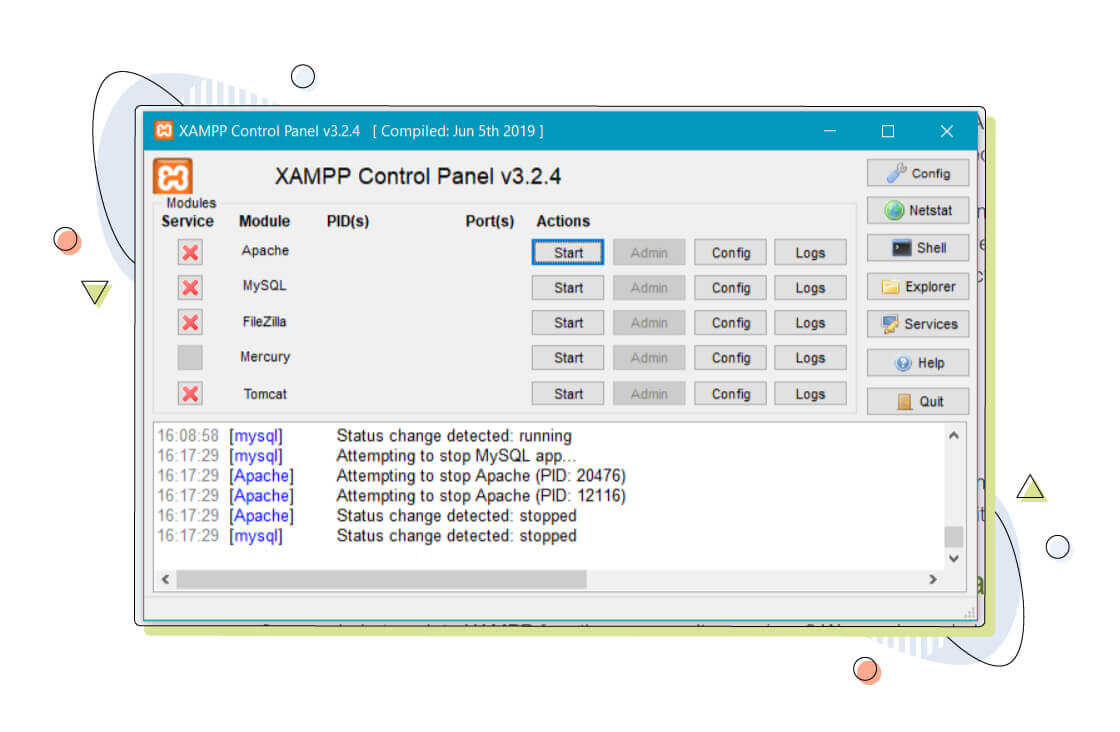
The XAMPP control panel on Windows. All you need to do is click Start on Apache and MySQL to start the services mentioned above. The module names should turn light green, meaning they’re running normally.
How to Create a New Database in phpMyAdmin on XAMPP (Windows & macOS)
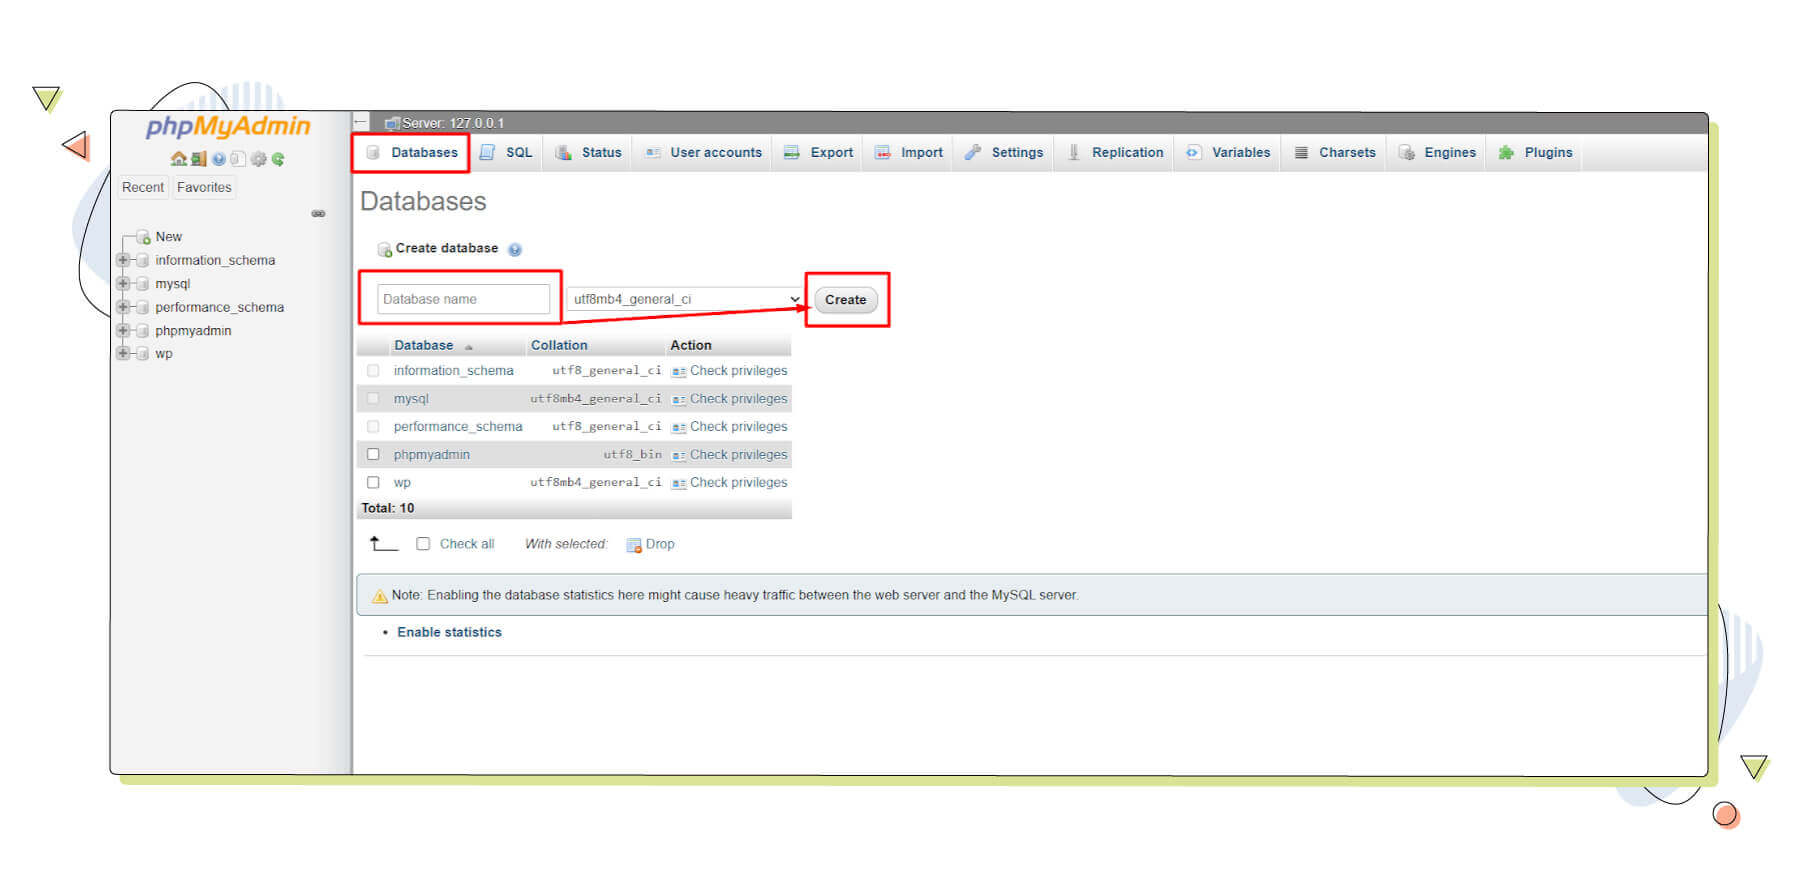
Unlike static HTTP pages, WordPress sites need a MySQL database system to store their data. phpMyAdmin is necessary to manage databases and users. PhpMyAdmin is essentially an interface to configure and manage MySQL databases, much like a graphical user interface in an operating system, and it comes preinstalled on XAMPP.
This step is common in both macOS and Windows users. After going to the https://localhost address using your web browser, click on the phpMyAdmin option on the navigation bar on top.
Once you launch phpMyAdmin, click the Databases tab from the top, choose a name for your database and click “Create.” Set a friendly name, for example, “wp,” to quickly type it in the WordPress installation wizard.
How to Download WordPress on Your Local Testing Environment
Getting a local WordPress site working with XAMPP is pretty simple. After creating your new database, it’s time to download the WordPress zip file and move it into your working directory. The steps you need to have WordPress installed are the following:
- Download WordPress from its official website.
- Extract the downloaded zip file and rename it to something more comfortable like “WordPress” or “wp.” Remember, the folder’s name will be the one to put in your address bar.
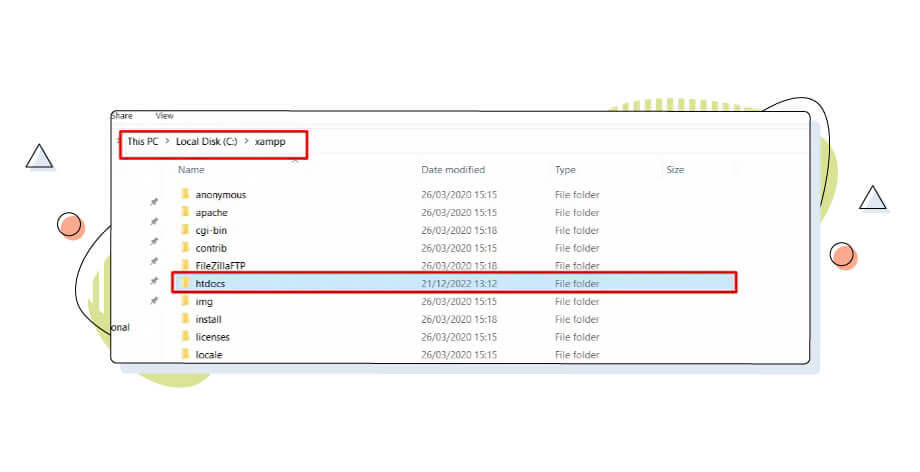
- Move the whole WordPress folder you created to the working XAMPP folder, which is usually in C:/xampp/htdocs. See the following picture for details.
How to Install WordPress Locally on Windows Using XAMPP
Now that you have a database set and your WordPress folder unzipped inside htdocs, you’re onto the next step. Open https://localhost/wordpress (or the name you chose for your unzipped WordPress folder) on your browser and begin the WordPress installation setup. Refer to the official WordPress installation guide for further details.
Fill up all the necessary database details, such as username, password, database name and password, to finish the WordPress installation process. The default XAMPP database credentials should be “root” while the default password is blank. You can change them from the phpMyAdmin interface.
In this step, WordPress will also ask you if you want to “discourage search engines from indexing your website.” In the case of a local test site, it’s recommended to enable this option, albeit to discourage search engines from crawling your website. When it comes to a live site, you shouldn’t rely on this option alone, and you have to invest in hiding your website more effectively.
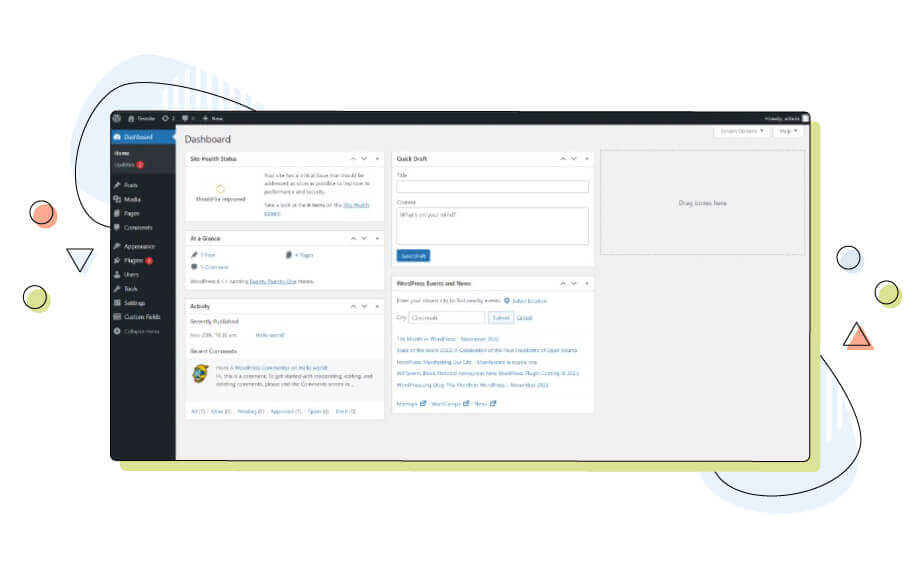
Then, after you pass these steps, you’ll have your WordPress dashboard right in front of you! You can now upload plugins and themes and populate the CMS with content, as you would on a live site. Remember, if you keep the default installation directory, your WordPress folder will be located in C:/xampp/htdocs/wordpress.
How to Install WordPress Locally on macOS Using XAMPP
If you’re using an Apple computer, the process of installing a local WordPress site is very similar since the installer remains the same. By using the macOS version of XAMPP from their official website, you can follow the same steps as the Windows version above to reach the WordPress dashboard in a matter of a few minutes.
The major (and only) difference is that on macOS, your XAMPP installation lies inside your Applications folder. Htdocs is hidden inside the folder named XAMPP in your Applications directory. You can also search for the XAMPP control panel from your launchpad by writing “manager-osx.” The manager has a similar user interface to the Windows version and has separate buttons to enable or disable the Apache and MySQL services on macOS.
Download and Install WordPress Locally on macOS
If you’re a macOS user, the process of getting your WordPress site to work is almost identical. However, instead of XAMPP software, you’ll need to download and install MAMP (My Apache, MariaDB, PHP software stack). Once installed, open the MAMP control panel and click on Start Servers.
- Just like with the Windows version, first, create a database for WordPress using phpMyAdmin from https://localhost/phpmyadmin/.
- After creating the database name, download and unzip WordPress from its official website. Rename the folder to something more comfortable like “WordPress.”
- Move the WordPress folder you created to the working MAMP directory, usually in /Applications/MAMP/htdocs/.
- Start up Apache and MySQL services by clicking Start Servers from the upper left corner of the page.
- Open https://localhost/wordpress (or the name you chose for your unzipped WordPress folder) on your browser, fill up all the necessary details and finish your local WordPress installation.
Manually Edit the wp-config-sample.php File on Your Test Site
In some instances, especially for macOS users, manual editing of the wp-config.php file is necessary to connect your local WordPress files to the MySQL database you created. That being said, it’s not unlikely that you’ll need to edit this specific PHP file on Windows, too, for example, when moving your local WordPress site to another computer.
The wp-config.php is WordPress’ main configuration file containing all the necessary details like Database Name, Database Password, MySQL Hostname, and Authentication Unique Keys. Users might need to manually edit the wp-config sample PHP file on macOS for security reasons. The file is located at the root of your WordPress folder.
To edit the wp-config-sample file, proceed with the following:
- Open the wp-config.php file in the root of your WordPress directory in a text editor like Notepad++ or Sublime Text.
- Replace the following values in the file with the actual values for your test site:
DB_NAME
DB_USER
DB_PASSWORD
DB_HOST
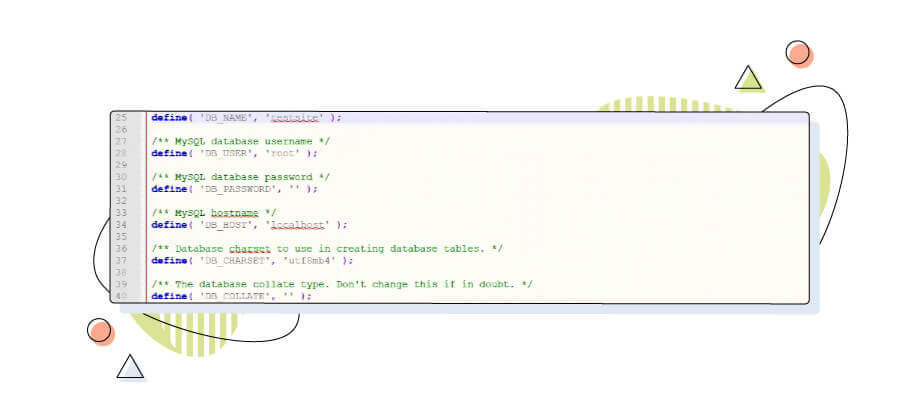
- Once you change the lines, as shown above, save the file and rename it to wp-config.php.
- Upload the file to the root of your WordPress folder on your web server.
- Test the connection to the database by opening your WordPress website in a web browser. If successful, the WordPress installation process will start.
XAMPP Alternatives to Install WordPress Locally
Although XAMPP is a popular choice for creating a local WordPress site (or any other site), many other alternatives are available, providing the same features and flexibility. Depending on your platform and preferences, you can choose from the following alternatives to install WordPress:
- WampServer: This open-source Windows software makes it easy to develop web applications with Apache2, PHP, and MySQL databases. Of course, it also allows you to install WordPress locally.
- Vagrant: Full Stack Developer Course: An open-source command line tool for building and managing virtual machines, Vagrant allows developers to create reproducible and portable development environments. As opposed to the other tools, Vagrant is a more challenging option, and it’s made for developers with more technical knowledge.
- Docker: This open-source platform lets you run apps using containers, making it easy to set up, run, and manage distributed applications, including WordPress sites, on any platform.
- MAMP: The MAMP software stack is an invaluable tool for developing dynamic web applications on macOS. It comes with a free version for non-commercial use. Like XAMPP, you can install WordPress or any other website.
- AMPPS: A free software stack, AMPPS offers a one-click download process for Apache, PHP, and MySQL on Linux, Windows, and macOS and allows you to install WordPress, among many other packages.
Once you’ve chosen the software of your choice, you can simply follow the steps above to install WordPress and get it up and running quickly.
Of course, some tools tend to have different steps to follow, while action and configuration may also vary depending on your platform. However, the basic steps remain more or less the same as described above.
Installing a Local WordPress Site Is Far Easier With XAMPP
The process of installing WordPress locally isn’t difficult at all, and it usually doesn’t take much time. Regardless of your platform or setup, we recommend using XAMPP – among all the other alternatives we discussed above – to get a local version of your website up and running in a matter of minutes.
By being open-source and user-friendly, XAMPP also has massive flexibility options. For instance, you could upgrade the PHP version or any other underlying package to its latest version with some fiddling around its code.
With a local WordPress site, you can test out various new features with a risk-free setup and explore any new updates before you install them on your live website. Also, the whole process is much easier to work with. You can create a new folder in a matter of seconds, move around files as needed and have access to every directory in seconds. This speed advantage is vital when designing and developing plugins and themes for WordPress.
Finally, setting up and installing WordPress locally can prove priceless if you’re new to web development and want to learn the basics of building a theme or plugin from scratch, trying out the latest version of WordPress, or simply want to experiment on your own.