Web developers are very busy people, especially if they’re hired on a freelance basis. Their schedules are jam-packed, and it’s not uncommon for them to be unavailable when you urgently need them.
That can be frustrating.
Now, imagine you’ve just hired this amazing content manager or SEO expert to help you grow your business, only to be delayed by a web developer who is taking weeks to reply to your request to grant them access to your website’s backend.
This delay can sometimes dampen the enthusiasm of other team members.
To prevent this from happening, we’ve created this article as a DIY guide to teach you how to give someone access to your cPanel – no technical knowledge is needed.
But before we dive into the details, did you know that giving people your cPanel details without properly vetting them could increase your chances of getting hacked? This type of incident is called an insider attack, where an individual with authorized access to your cPanel could exploit their privileges to compromise a system.
It could also be caused when an individual with “too much” authorized access is hacked, and through them, a hacker can have access to crucial company data.
Now, the million-dollar question is: If giving someone your cPanel access could lead to a cybersecurity breach, why bother? Read on to find answers to those questions.
Reasons You Should Provide (Limited) Access to Your cPanel
Launching your business’s website is one thing, but consistently scaling its operation is another job of its own.
You simply can’t do it alone. You need to delegate.
Hence, to properly delegate the job of keeping your website up and running, you need to grant limited cPanel access to the following:
- Content managers
- Editors
- SEO experts
- Web developers and designers
- IT administrators
- Database managers and so on
The only safe way to give your employees your cPanel details is by practicing the “least privilege” method as recommended by the National Cybersecurity and Communications Integration Center (NCCIC).
It is a security principle that provides users with only the minimum access they need to perform their tasks. By granting your employees limited cPanel access or the least privilege possible, you reduce their access to confidential information in case they get hacked.
Not only this, but it also makes it easier to track the activities of your employees and helps you monitor the changes going on on your website. Moreover, this is also in line with those industries that have strict regulatory or compliance standards that mandate business owners to follow limited access control rules.
Other than this, providing limited access to your cPanel makes it easier to scale your website’s operations. As also briefly mentioned above, it does this by allowing you to assign specific tasks to different individuals or teams without compromising the security of your website.
How Do You Determine the Correct Level of cPanel Access to Grant a User?
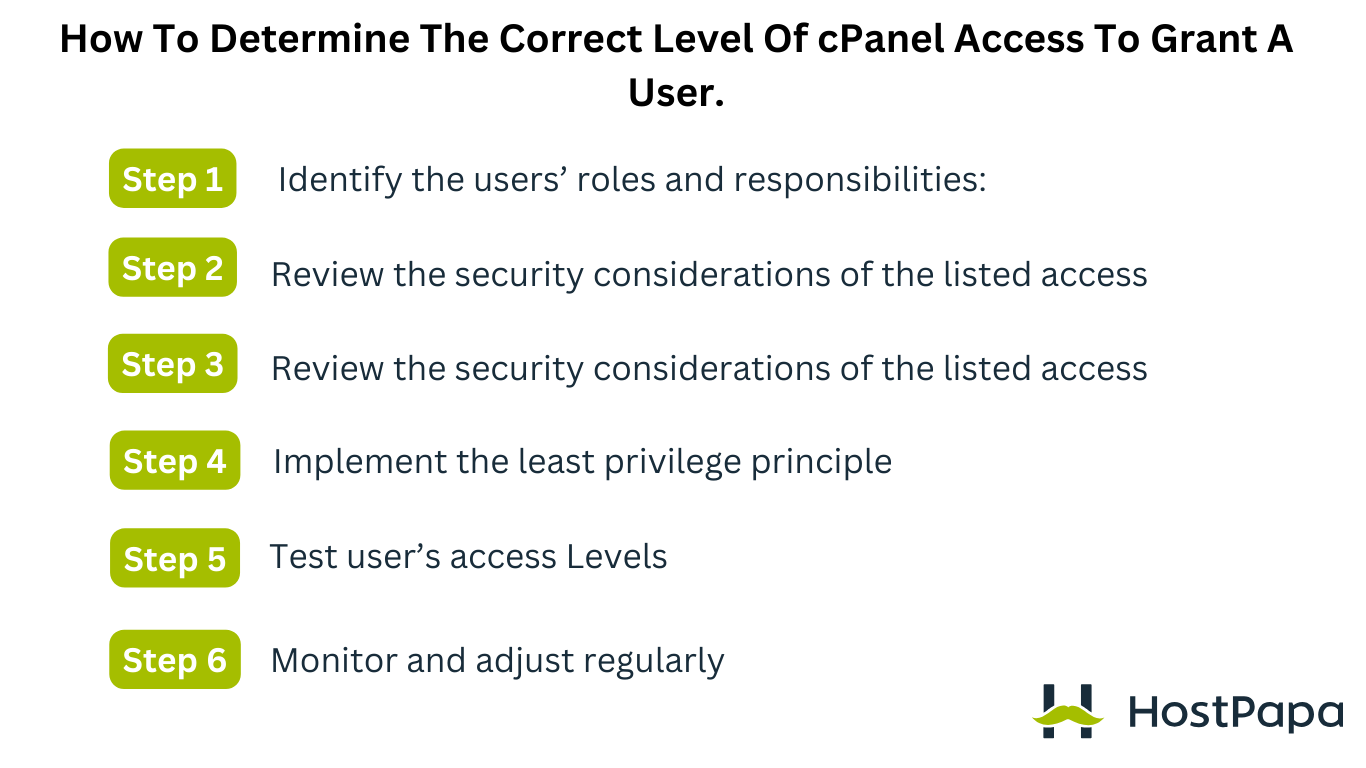
Now, how do you determine the least privileged access you need to give to each user or employee?
Here’s how:
| Step | Description |
| Identify the users’ roles and responsibilities | Ask the user to write down a list of the work they need to do on your web server. Also, ask them to write down all the cPanel and data access they will need to do their jobs well. |
| Review the security considerations of the listed access | Take time to research the potential security breaches associated with the access points that the users listed in the above step. You can Google this if you like or contact your hosting provider’s support team for guidance. |
| Implement the least privilege principle | Based on the users’ identified tasks and your research, only grant users the minimum level of access necessary to perform their tasks. Avoid granting unnecessary permissions or access to areas unrelated to their responsibilities. |
| Test user’s access levels | You can take this further by testing every user’s access before giving them their cPanel details. You can do this by logging into the account you created for them and testing the various privileges provided for the account. That way, you have a first-hand view of the amount of data that the user has access to. |
| Monitor and adjust regularly | Sometimes, users unintentionally overstate the cPanel access they need to get their job done. And since you don’t want users to have access to data that they don’t need, you must regularly monitor the users’ activity so that you can remove their access to such data. |
How to Give Someone Access to Your cPanel?
There are two ways of giving someone your cPanel details; you can either do it the trusting way or the cautious way.
The Trusting Approach
Let’s take a look at this approach first.
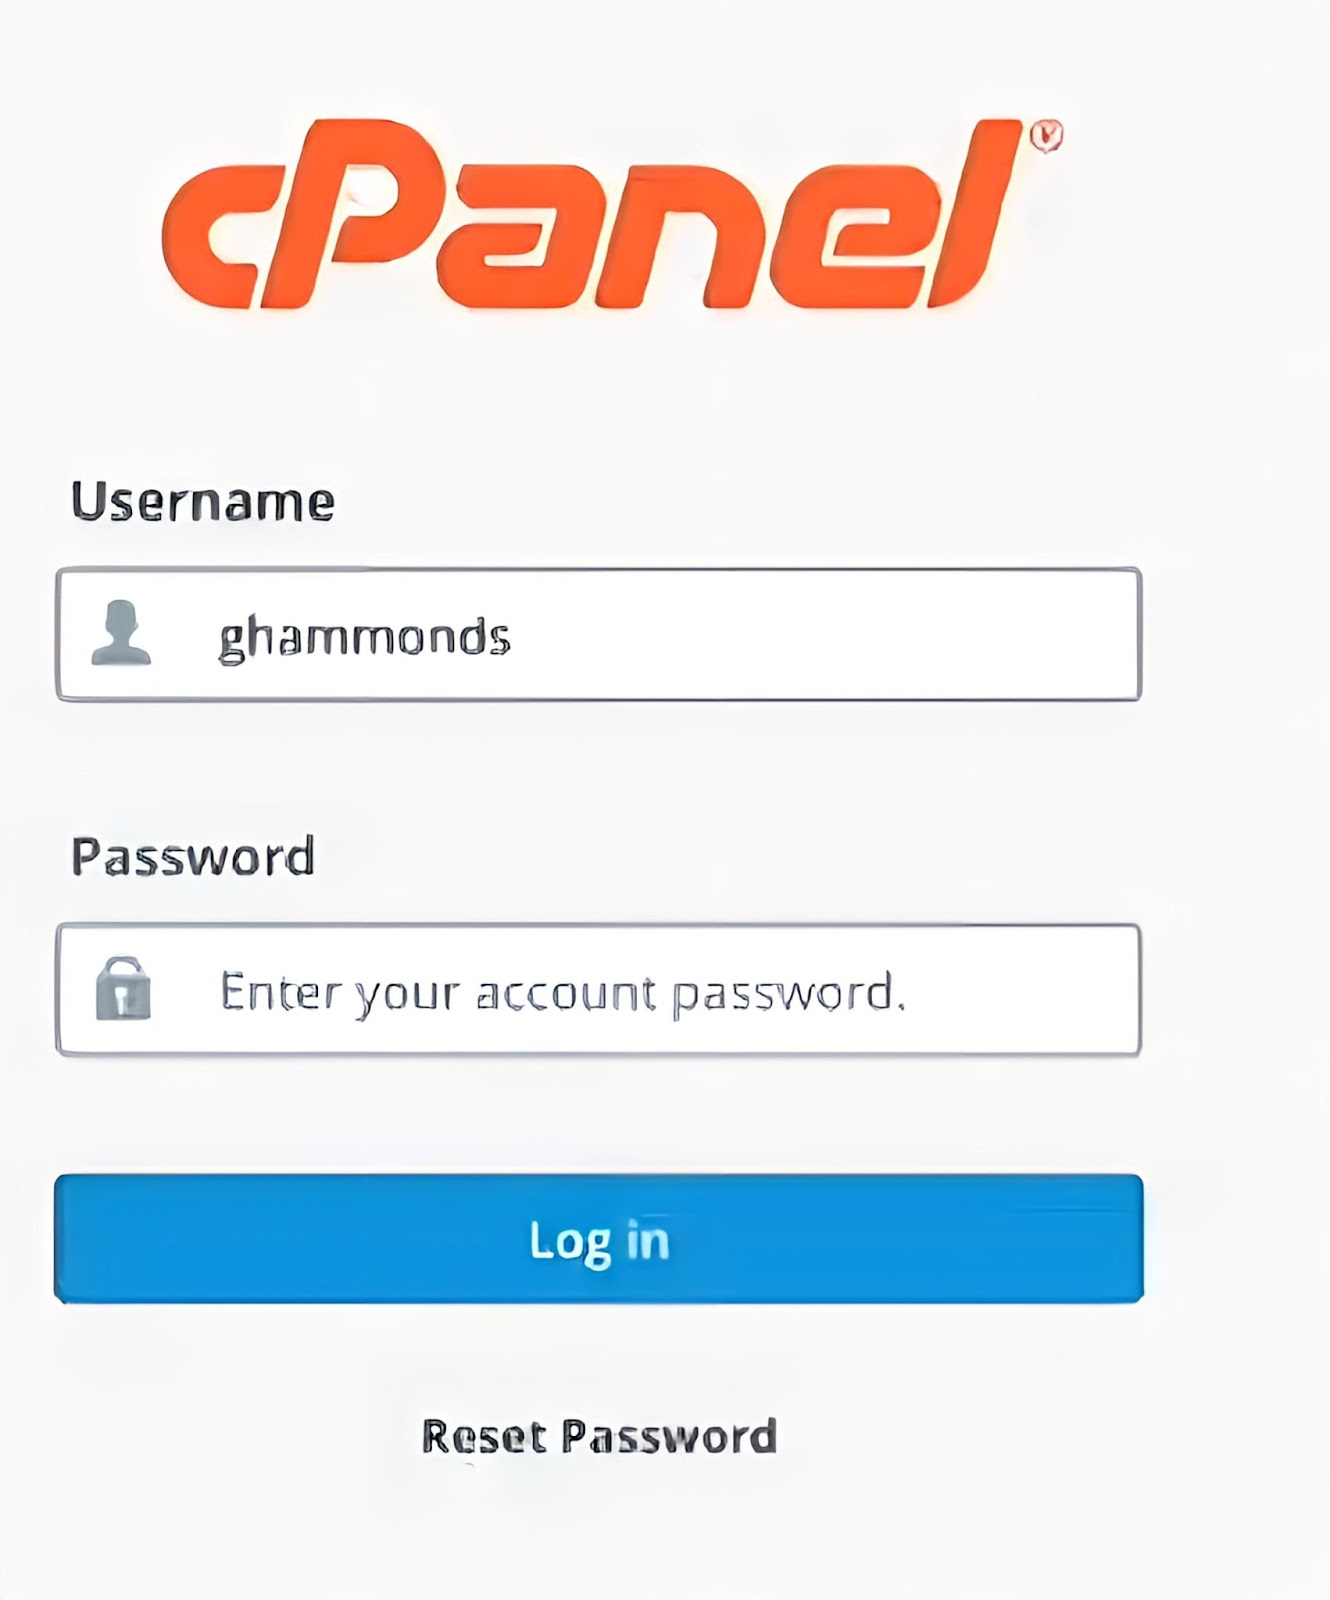
- Step 1: Log into your cPanel account. You can also learn how to access your cPanel from your web hosting platform. You can also read this simple guide to using cPanel to learn more.
- Step 2: Navigate to the “Preferences” section and select “User Manager”.
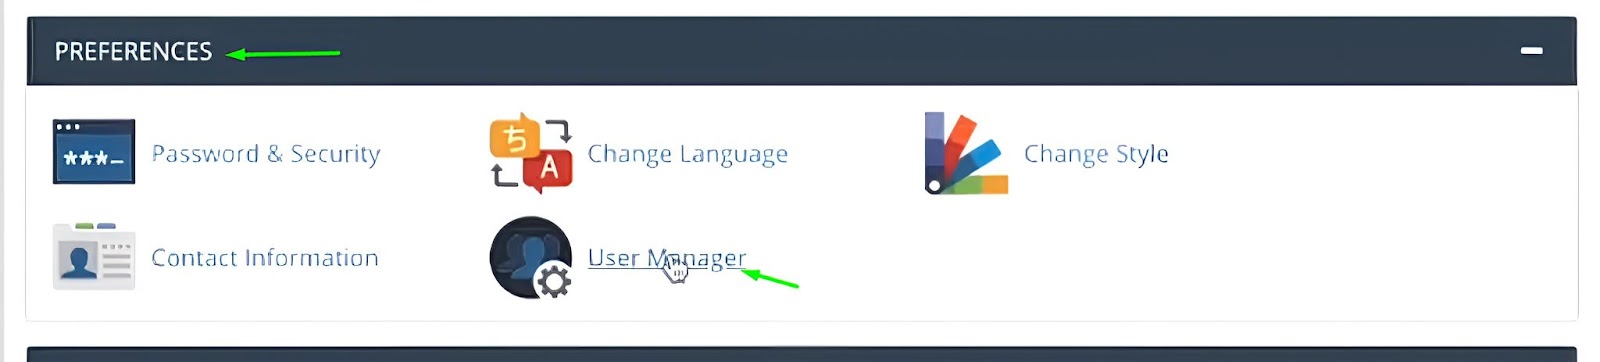
- Step 3: Click “Add User” to create a new user

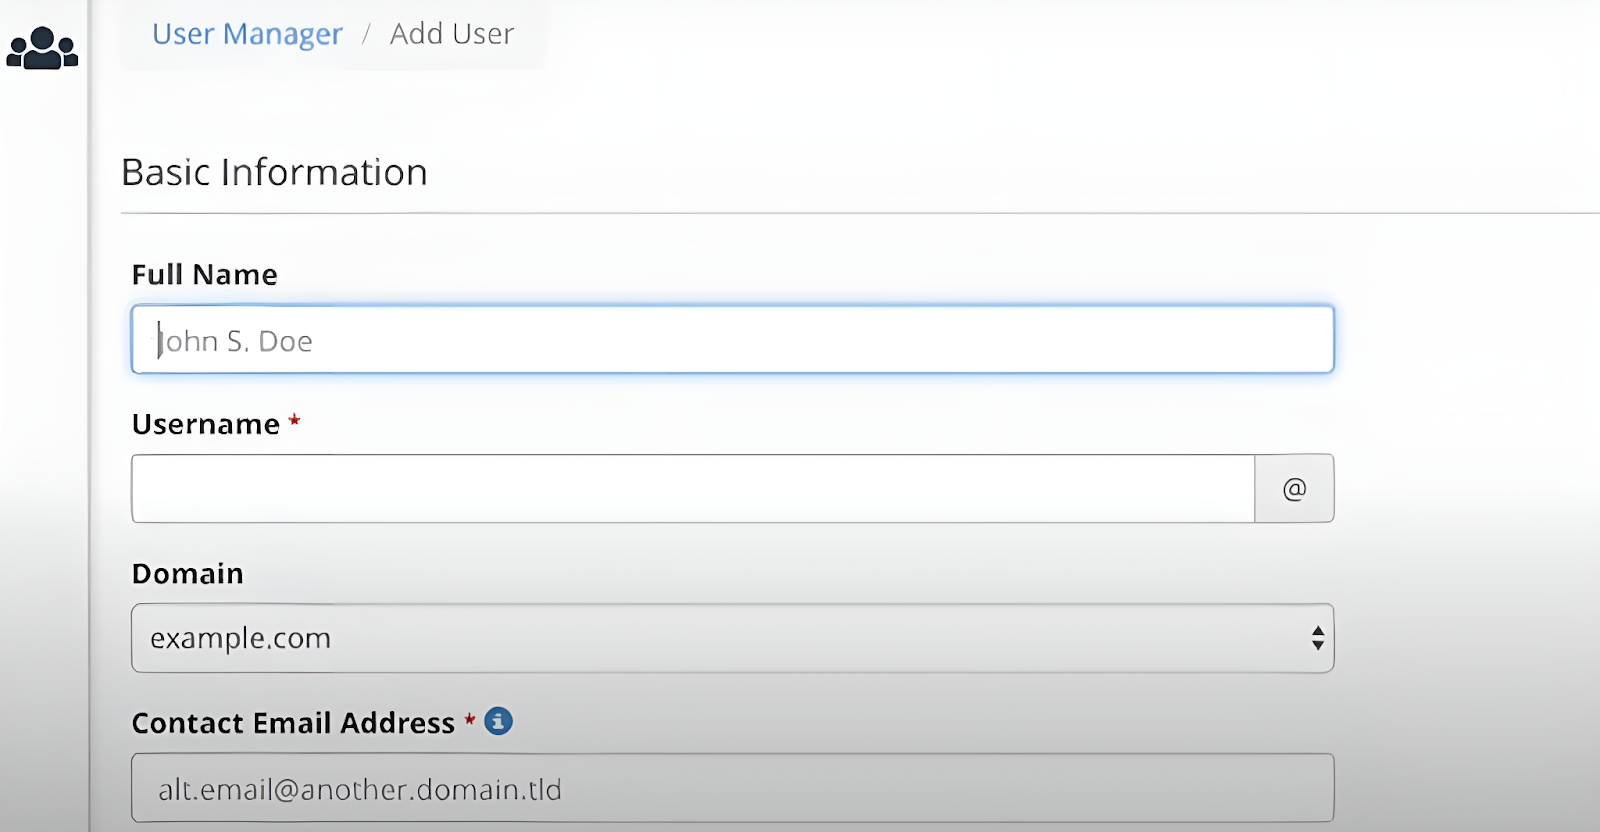
- Step 4: When the “Add User” interface opens, you’ll be asked to add the personal details of the new user. This includes the new user’s full name, username, email address, and the website domain you want the individual to have access to.
Remember that you can access the domain names of all your websites via your cPanel access. So, when creating a new user, you’ll be prompted to select the domain name to which the user will be added.
- Step 5: When you scroll down to the “Security Information” section, you’ll be given an option to either allow the user to set the password themselves or to you can set the password for the user.
Allowing the user to set the password themselves will help them easily remember their password, but they can be hacked if they set a weak and predictable password. On the other hand, you can set the password for them and ensure that it is strong.
Moreover, you can either manually or automatically set the password for your new user. Type into the “Password” and “Confirm Password” text bar to set the password manually, or click on “Generate” to set the password automatically.
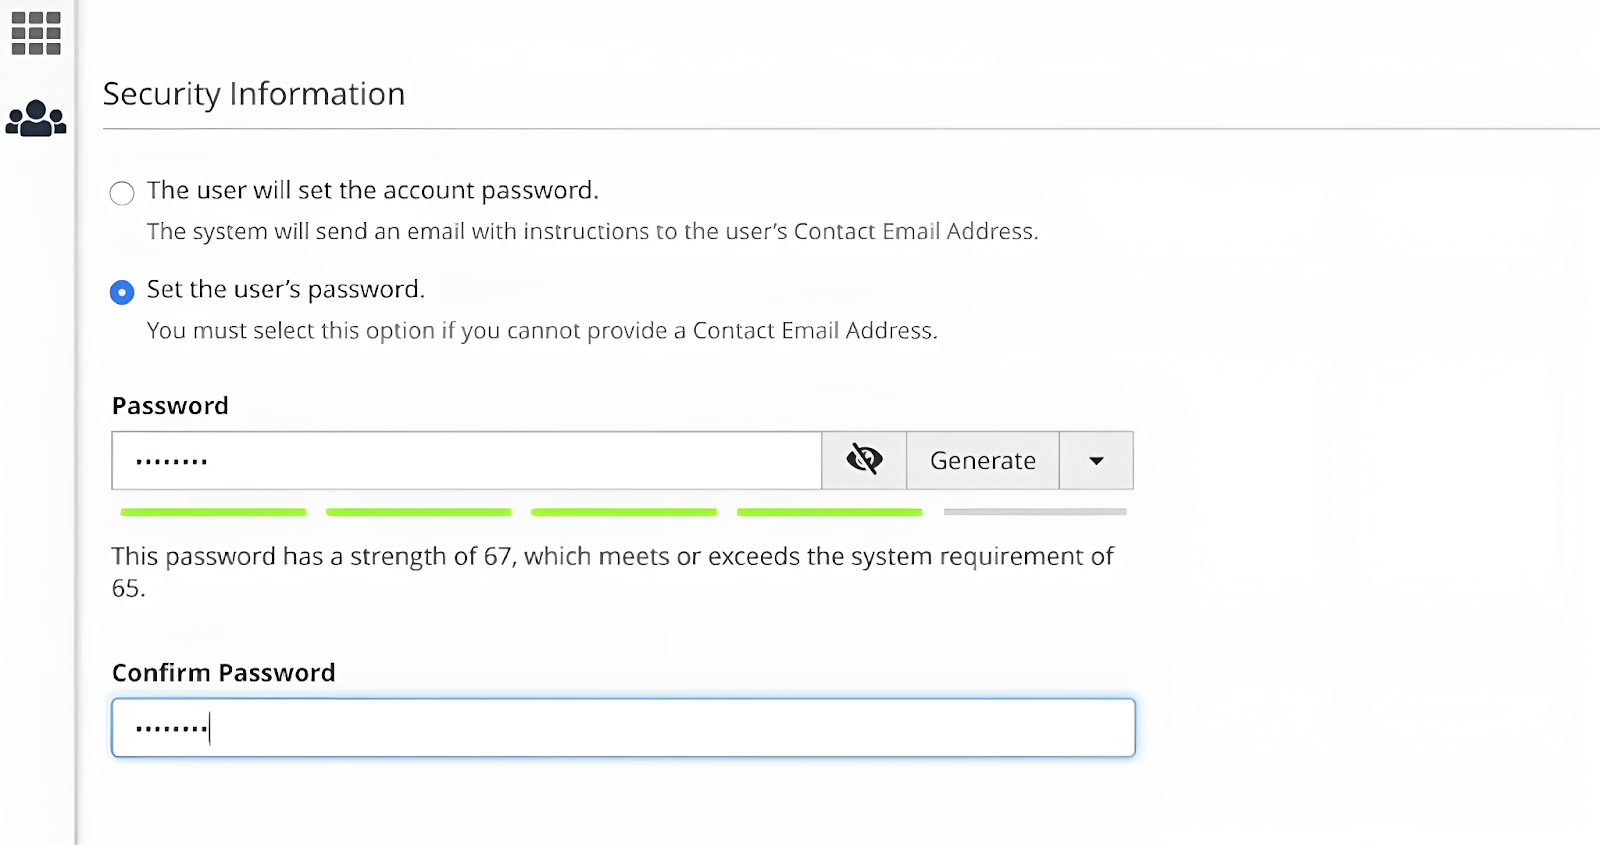
If you want to adjust the password’s strength requirements (which is not advisable, mind you), click on the drop-down menu beside the “Generate” button.
- Step 6: Next, navigate to the “Services” section. It is divided into three permissions: Email Access, FTP Access, and Web Disk Direct Access. These three subsections are turned off by default.
The “Email Access” section, when enabled, allows the user to have an email address associated with your website’s domain, for instance, newuser@yourwebsitedomain.com. Its “Quota” section allows you to designate the hard drive space that the new user may use to store emails.
When you enable the “FTP Access,” you’re giving the new user permission to upload files to your website. And like before, its “Quota” option defines how much hard drive space the new user may use to upload files to your website.
The “Home Directory” section shows the path where the new user can upload the file. If you want the new user to have access to all the files on the website, then you should leave the “Home Directory” text bar.
Enabling the “Web Disk” section allows the new user to access and work with files stored on your site’s server from different platforms and devices (including a computer, mobile phone, or certain types of software).
Through its “Home Directory” subsection, you can change the directory that serves as the starting point for the new user’s file management activities. Moreover, in the “Permission” subsection, you can determine how the new user controls the files on your site’s server. You can either choose the “Read and Write” option or the “Read Only” option.
The “Digest Authentication” subsection is for encryption. When enabled, it allows a user to access the Web Disk without encryption.
Note: You don’t need to enable this subsection if your domain has an SSL certificate signed by a recognized certificate authority.
- Step 7: Next, click “Create” or “Create and Add another user.”
You will be redirected to the “User Manager” interface with a message to confirm the creation and addition of a new user to your cPanel account. The new user will be listed on the screen.
The access levels of each user are indicated beside the usernames via three icons to indicate access to email”, FTB, and web disk. When the icons are highlighted in blue, it means that you granted that individual access to that particular option. But when it’s gray, it means that you disabled that option.
Note: You also have a choice between editing, deleting, or changing the password of each user as you see fit.
The Cautious Approach
How to Create a New User FTP Account?
Remember that in the “How to add a new user to your cPanel” guide above, a user can have access to your email, FTP, and web disk. But what if there’s a way to grant a new user access to only a specific task without adding them as a sub-account?
You can do this by adding them as an FTP user.
This is the best type of access to grant content managers, editors, and other employees whose jobs include uploading files to your website.
- Step 1: Type in your cpanel details to log in.
- Step 2: Go to the “Files” section and click on “FTP Accounts.”
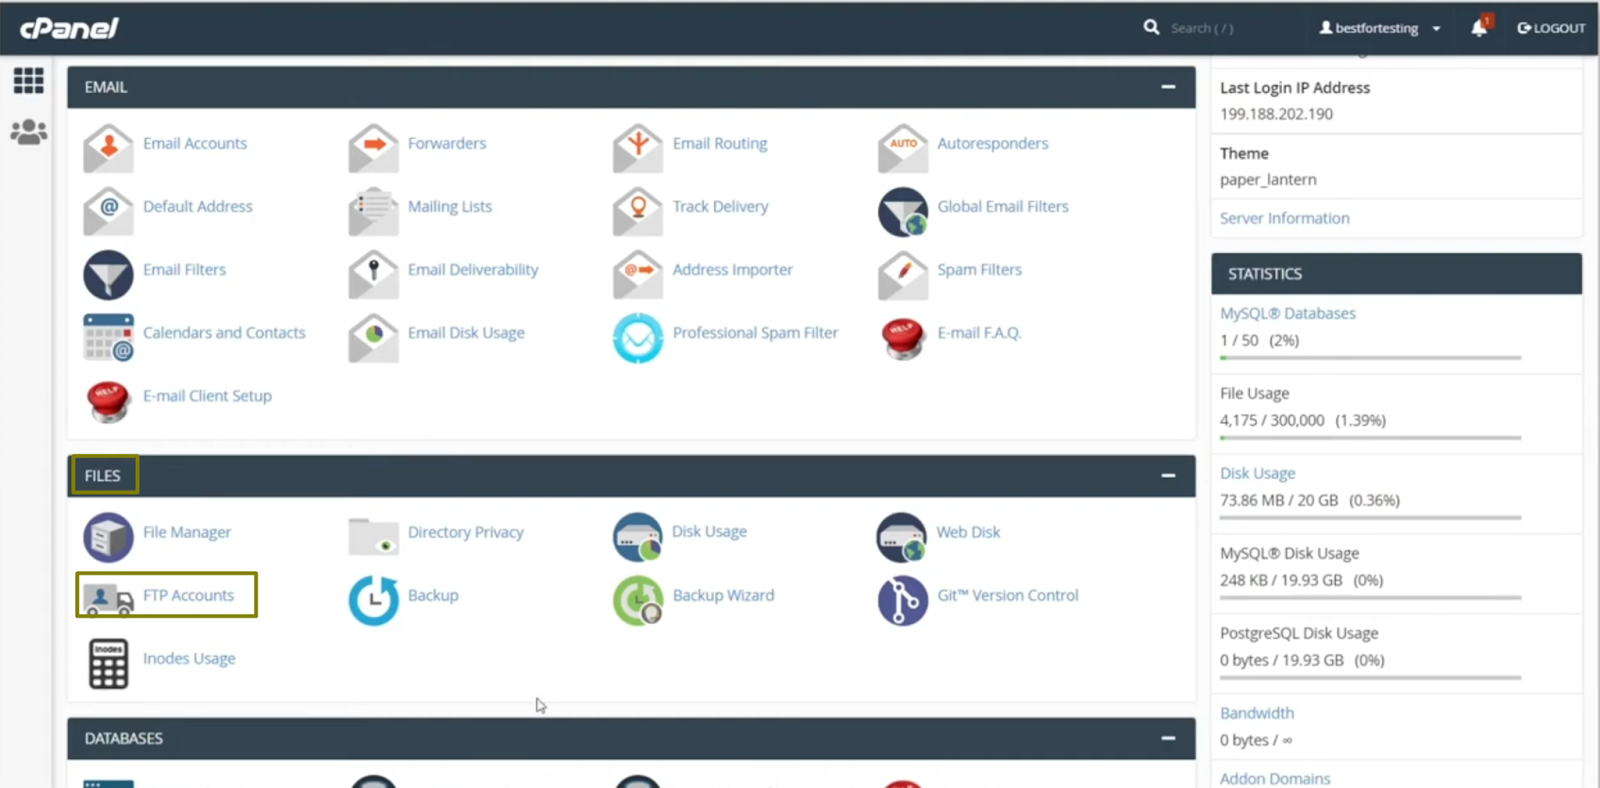
- Step 3: You’ll be redirected to the “FTP Accounts” interface, where you’ll be prompted to fill in the details of the new FTP user.
- Step 4: Type a user name for the new user
- Step 5: If you have multiple domain names in your cPanel, you’ll find a drop-down menu where you can pick the domain name you want to use. If you don’t, then you can skip this step.
- Step 6: Create a password for the new user. You can type this in manually or automatically using the password generator. To automatically generate a password, click the “Password Generator” button, and a small dialogue box will appear on your screen.
Copy and save the generated password. Check the “I have copied this password in a safe place” box, and click “Use password.”
- Step 7: Leave the “Directory” text bar empty if you want the user to have access to all your files. If not, then assign a specific directory to the new user using this format: public_html/directory_name.
- Step 8: The “Quota” subsection allows you to set the maximum amount of disk space that the new user should use. You can leave this to unlimited if you like, or you can set a specific disk space.
- Step 9: Click “Create FTP account.” You’ll immediately receive a notification about the created account. You’ll find the new user’s account below the “FTP accounts section.”
Now, the new user can use FTP clients like Filezilla, Cyberduck, Core FTP, etc, to access the files in your web server or to upload new files.
How to Add a New User to a Website Database Using cPanel?
If you want to give a database manager or an IT operations administrator your cPanel details, then they don’t need your email and FTP access. It’s best to directly add them to your database cPanel account.
For this guide, we’ll be using the MySQL database. Here’s how to do this:
- Step 1: Log into your cPanel account.
- Step 2: Navigate to the “Databases” section and select “MySQL Databases.”
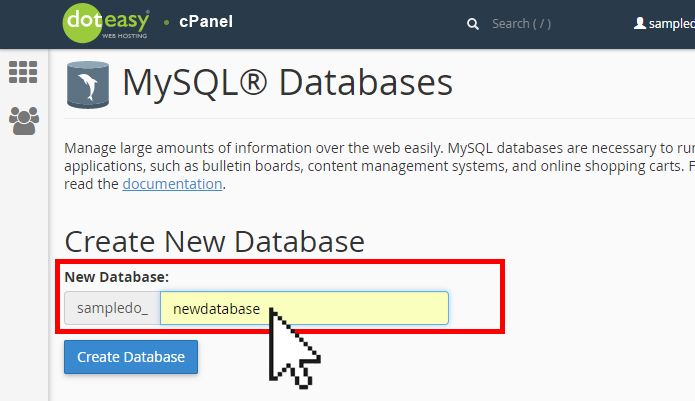
- Step 3: if you want to create a new database for the user, then type a new database name in the text box under the “Create Database section.” And then click the “Create Database” button.
But if you already have a database for this, then you can skip this step.
Once you’ve done this, you’ll be redirected to a page to show that you’ve successfully created a new database.

Click on the “Go Back” button to continue.
- Step 4: Navigate to the “MySQL Users” section to create the new user account.
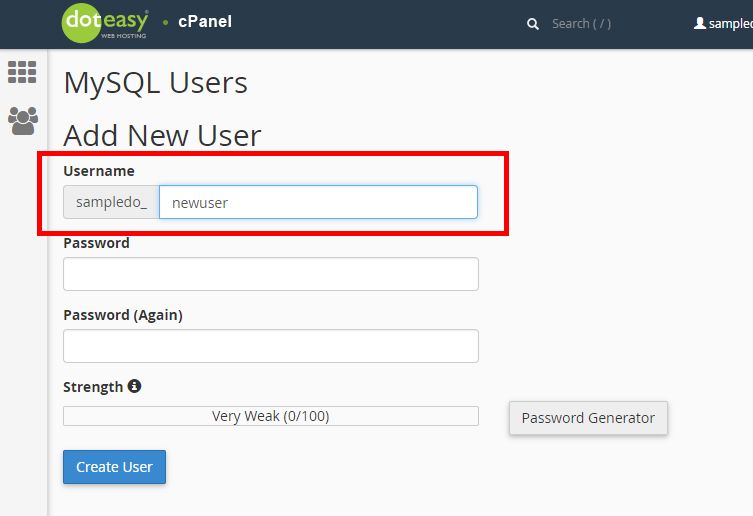
Insert a username and password (either manually or automatically), then click the “Create User” button. You’ll see a page that shows that you’ve successfully created a new user account.
Then click the “Go Back” button.

- Step 5: The next step involves adding a new user to a database. This could be a new one or an existing database if you skipped Step 2 above.
Navigate to the “Add User To Database” section at the bottom of the page, and in the drop-down menu, select the new user you just created and the database you want them to have access to. Then click “Add”.
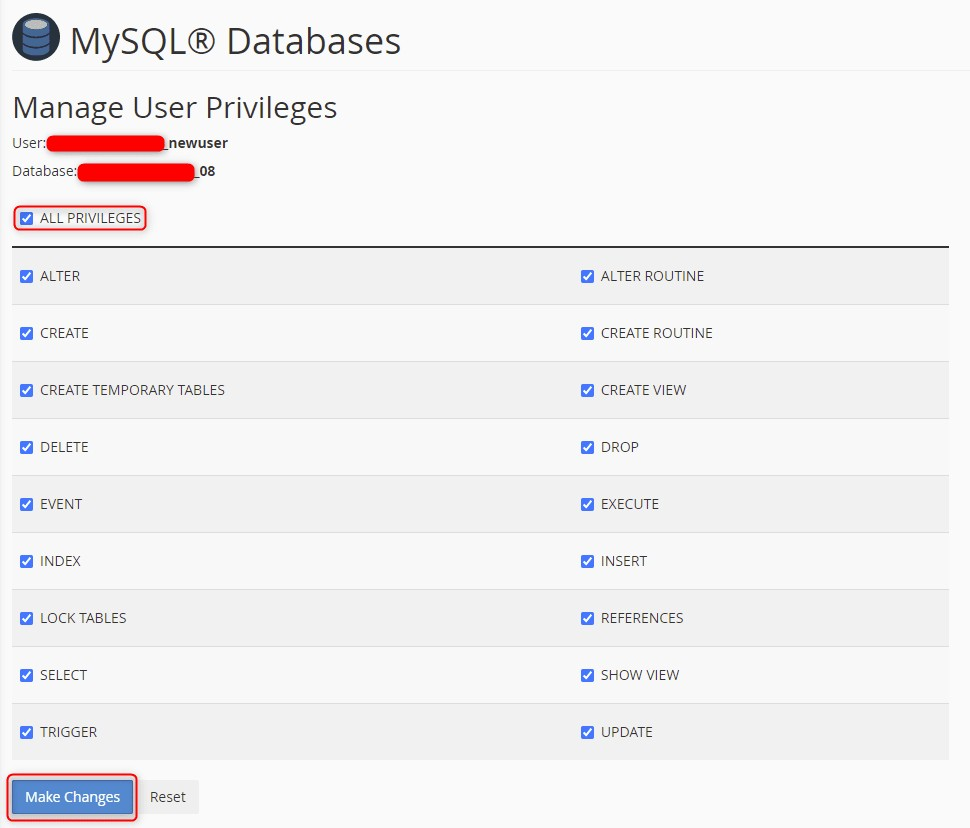
- Step 6: It’ll open to a “Manage User Privileges” page where you can select the database actions and access that the new user is permitted to have.
If you don’t know exactly the exact duty of the employee who needs the database, then we advise that you tick the “All Privileges” box. We advise that you continuously monitor the user’s activity and reduce the privileges when necessary.
Let HostPapa Help You Secure Your Website
Granting new users limited access to your cPanel details is not a hundred percent guarantee that your website won’t be hacked. There are still some other routes that hackers can take to illegally gain access to your company’s data. Some of them include cross-site scripting, brute force attacks, SQL injections, etc.
A good way to protect your website from attacks is by using our Protection Power website application firewall. We offer a complete website security package that allows you to focus on other important parts of your business. To this end, our Protection Power service blocks suspicious traffic, stops hackers in their tracks, and removes malware, among other functions.
Our Protection Power website application firewall is offered in four pricing plans:
- Basic plan: $2.99/month
- Starter plan: $4.99/month
- Pro plan: 9.99/month
- Protection plan: 24.99/month.
Contact us if you need more information on how to effectively protect your website.
Frequently Asked Questions
How Do I Add Another User to cPanel?
Here’s how to add another user to your cPanel. First, log into your cPanel account. Once logged in, click on “User Manager” and then select “Add User.” Enter the username, full name, email address, and password for the new user, and select the appropriate domain. You can then enable or disable access to Email, FTP, and Web Disk as needed. Finally, click “Create” to add the new user.
How Do I Delegate Access to cPanel?
You can delegate cPanel access by creating sub accounts, defining access levels, and setting permissions and privileges. Additionally, implementing security measures such as enforcing strong passwords, enabling two-factor authentication, and regularly monitoring user accounts and permissions ensures a secure and efficient delegation process.
How to Get cPanel Access?
To get cPanel access, you typically need to sign up for a hosting plan with a provider that offers cPanel as part of their package. Once you’ve signed up, the hosting provider will send you an email with your login details, including the URL, username, and password. Using this information, you can log into your cPanel account through your web browser. If you already have hosting but need cPanel access, contact your hosting provider to see if it can be added to your existing plan.