If you moved your WordPress site from another host or want to move your current installation to another directory, you’ll need to change your WordPress URL and site URL. Usually, these two settings are the same, but they can sometimes be different. For example, the settings would be different if you’ve installed the core application files in a subdirectory instead of the root directory.
- WordPress address (wp_home): This is the address of your core WordPress application files.
- Site address (wp_siteurl): This is the address that visitors enter in their browsers to view your site.
Changing the WordPress address and site address
There are two ways you can change your WordPress URL and site URL – in the WordPress dashboard or by modifying your wp-config.php configuration file.
Changing settings in the WordPress dashboard
Using the WordPress dashboard is the easiest and safest way to change your home and site URL settings.
- Log in to WordPress via the HostPapa Dashboard.
- Go to Settings > General.
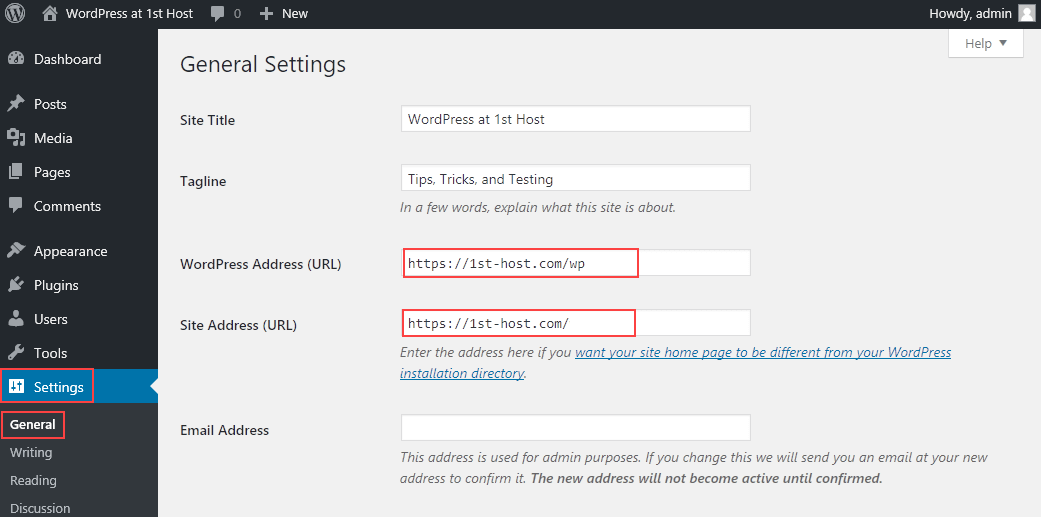
3. In WordPress Address (URL), enter the location of your core WordPress application files.
4. In Site Address (URL), enter the address of your public WordPress site. In our example, the core application files (WordPress Address) are installed in a subdirectory called wp, and the site address is the root directory.
5. Click Save Changes.
Changing settings in wp-config.php
Note: If you choose to change your WordPress address and site address in wp-config.php instead of in the WordPress dashboard, the WordPress Address (URL) and Site Address (URL) settings in the dashboard will be disabled.
Before you edit your wp-config.php file, you should understand that even a small error could make your WordPress site inaccessible, so we strongly recommend making a copy of the existing file before you make any changes.
There are two methods you can use to edit the wp-config.php file
- Download the file using an FTP client and then edit it using your preferred text editor. When you’ve made the changes in the file, save and upload it. For more information, see Downloading and using FTP software programs.
- Edit the file in the cPanel File Manager. For more information, see How to navigate in cPanel’s File Manager.
In this example, we’re editing the file in the cPanel File Manager.
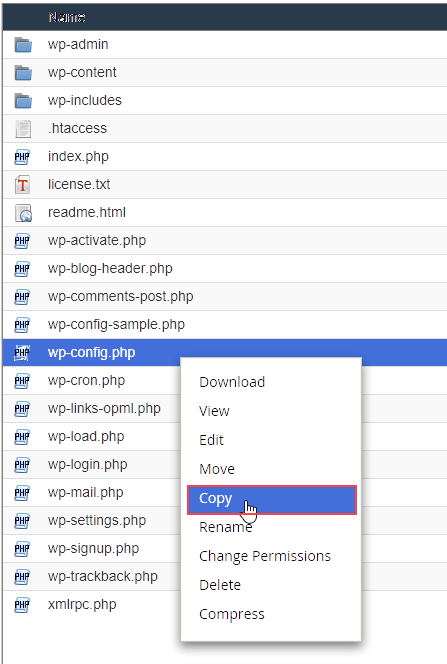
Copy and rename the wp-config.php file
- Log in to your HostPapa Dashboard.
- Go to cPanel > File Manager.
- In the root folder of your WordPress installation, locate wp-config.php.
- Right-click and select Copy.
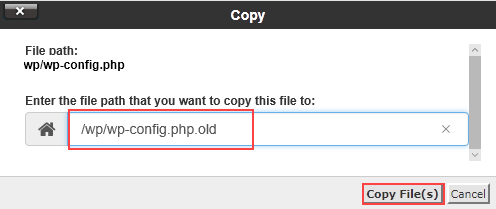
5. In the Copy box, type a descriptive name for the copy of the file and click Copy File.
Edit the wp-config.php file
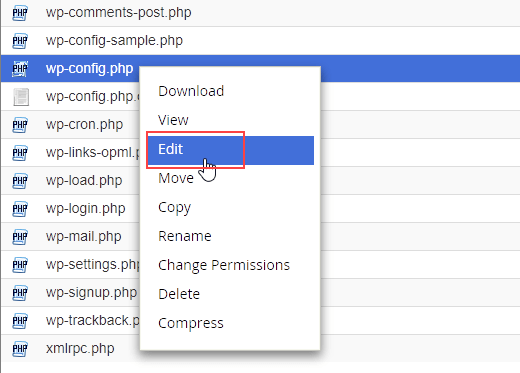
- In File Manager, right-click wp-config.php and select Edit.
- In the Edit box, click Edit.
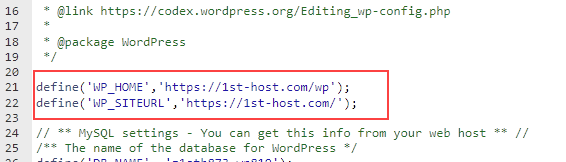
3. The file opens in the File Manager editor. Near the top of the file, add the following lines, replacing example.com with your domain name. WP_HOME is the location of your core WordPress application files, and WP_SITEURL is the address of your public WordPress site.
define('WP_HOME','https://example.com');
define('WP_SITEURL','https://example.com');
4. When you’re done, click Save Changes and Close the file.
In our example, this section of our wp-config.php file now looks like this:
5. Test your site by visiting the home page and logging in to the dashboard. If there are any errors, restore your original copy of wp-config.php and contact HostPapa support for help.
More information
For more information, see How to edit your WordPress wp-config.php file and How to transfer my WordPress site to HostPapa in the HostPapa WordPress knowledge base.
If you need help with your HostPapa account, please open a support ticket from your dashboard.
