You can use Jetpack’s backup feature for automatic backups and one-click site restoration. There’s also the opportunity to monitor every modification, revert as needed, and have confidence that your content remains secure.
Jetpack’s backup utilizes WordPress.com’s servers, ensuring your content, Woo products, and Woo orders are never at risk. You also have the ability to view your backups, explore and download specific files, and restore either a complete backup or select components.
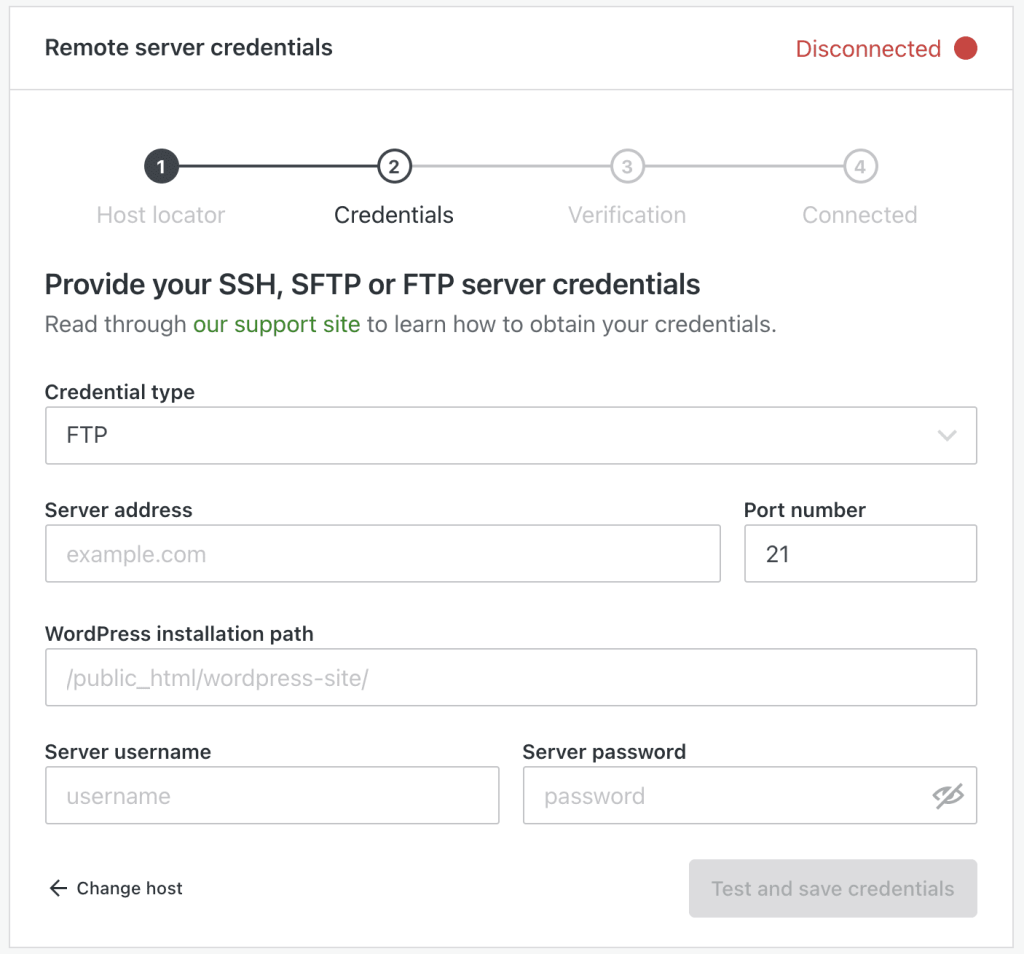
Add your remote server credentials
Upon getting a Premium plan with Jetpack VaultPress Backup, your site will be backed up immediately as long as Jetpack is correctly connected. However, remote server credentials are necessary.
First steps:
- Log in to your HostPapa Dashboard.
- Click on My cPanel.
To add your FTP remote server credentials:
- Obtain remote server FTP credentials from your web host settings. You can use your cPanel login information or create a new FTP account.
- Go to WordPress.com or Cloud.Jetpack.com.
- Select the Jetpack-connected site for which you want to add server credentials.
- Navigate to Settings → Jetpack on WordPress.com or simply Settings on Cloud.Jetpack.com.
- Click on your hosting provider if it’s listed. If it’s not listed, or you already have your server credentials, select I don’t know / my host is not listed here / I have my server credentials.
- On the following screen, input your credentials. Refer to the details below for more information about each field.
- Click Test and save credentials. Once the site is connected, Jetpack will initiate your first backup.
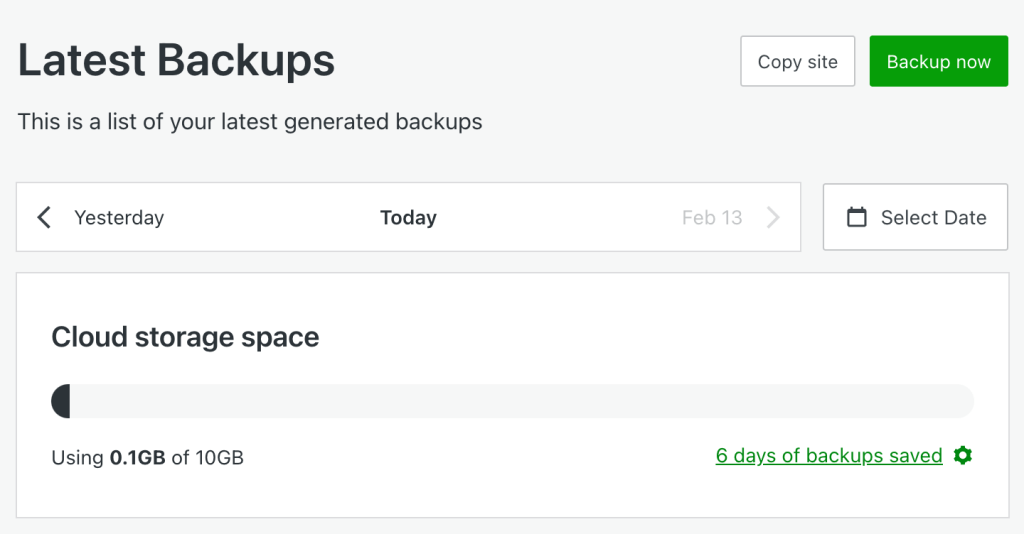
How to backup
- Begin by navigating to Jetpack → Backup in the WordPress.com dashboard, or visit Cloud.Jetpack.com/backup.
- There, you will find the latest completed backup, detailing the date, time, and contents of the backup. If today’s backup has not occurred, the upcoming schedule will be displayed.
- To initiate a backup immediately, simply click the Backup now button.
How to restore a backup
To restore with Jetpack VaultPress Backup, you will need:
- A working WordPress site.
- A healthy Jetpack connection.
During a restore, files with the same name will be overwritten, while those with unique names will remain untouched.
Please note: It’s important to understand that the website’s database will be entirely replaced with the one from your backup. Therefore, any new posts, pages, or content added after the backup date will be lost. To preserve this content, export it before initiating the restore, and then import it back to your site afterward.
Once a restore has begun, it cannot be interrupted or halted. If a restore is started by mistake, please allow it to finish before restoring to the preferred version.
The duration of the restoration process varies, depending on factors like the total number of files on your site.
To restore your website via Cloud.Jetpack.com, follow these steps:
- Navigate to Cloud.Jetpack.com and select the site you want to restore.
- Access the site’s Activity Log to locate a specific event or date range.
- Apply filters to narrow down by Date Range and/or Activity Type (such as Plugins, Posts, and Pages) for restoration.
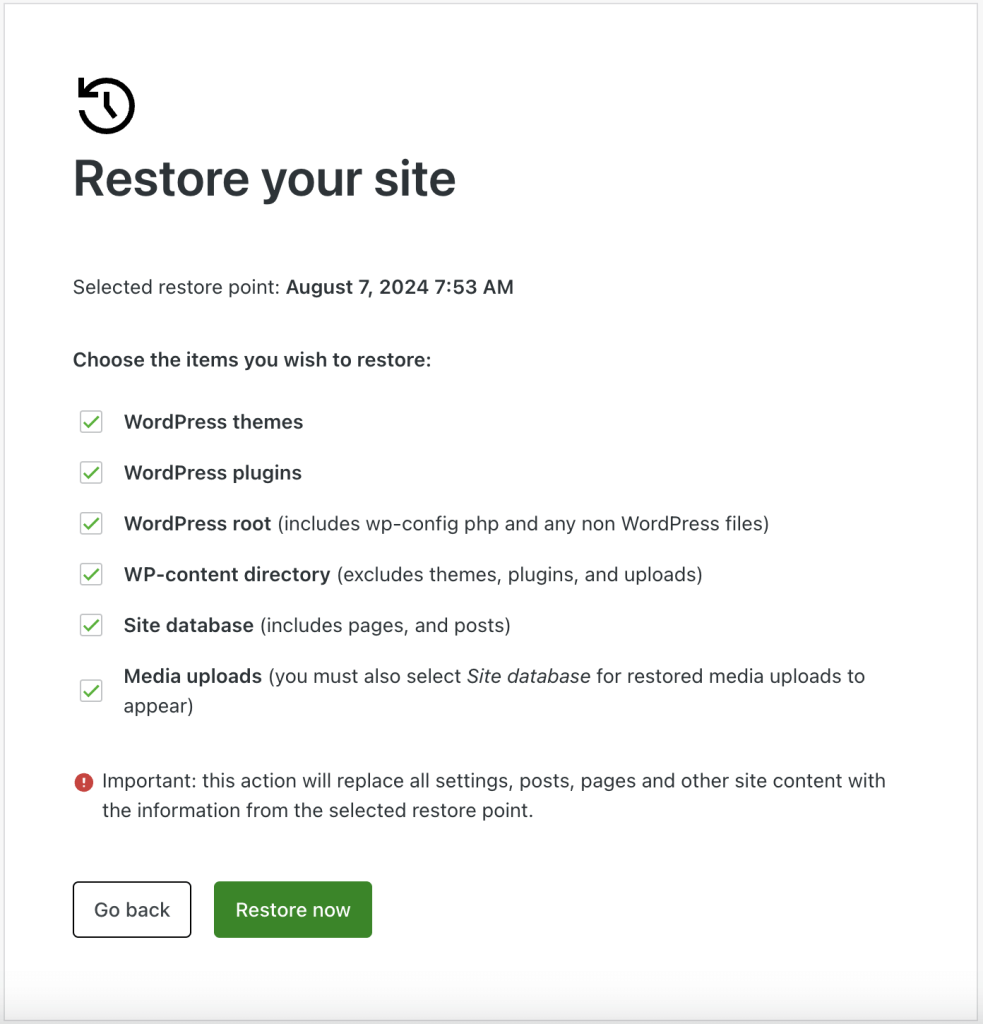
- Choose Actions > Restore to this point to open the restoration dialog box.
- Alternatively, visit VaultPress Backup to view the most recent backup or the next scheduled one.
- In the restoration dialog, deselect any items you do not wish to restore. To restore everything, ensure all options are checked and click Confirm restore.
The restoration process will commence, and a progress bar will be displayed on the page. Additionally, you will receive email notifications regarding the restoration’s progress. Upon completion, a confirmation message will be presented.
Restore when your site is completely down
If the website you wish to restore is down or displaying a fatal error, consider the following steps:
- Reinstall WordPress afresh. This option might be available in your hosting cPanel, or you may need to consult your host for the best method.
- Connect to Jetpack.
- Try performing a Jetpack Restore by following the previous steps.
Should these measures fail, a manual restoration will likely be necessary.
Download a backup for manual restore
If a one-click restore is unavailable, you can manually download a backup by following these steps:
- Navigate to Cloud.Jetpack.com or WordPress.com, whichever you prefer.
- Access the Activity Log of the site you wish to restore.
- Apply filters to find the specific Date Range and Activity Type for restoration.
- Select Download to initiate the backup download process.
Thank you for following our guide on how to back up your site with Jetpack VaultPress Backup.
If you need help with your HostPapa account, please don’t hesitate to open a support ticket from your dashboard.
