The Joomla! Global Configuration contains settings that apply to the behaviour and accessibility of your Joomla! website. Only users who belong to the Super Users group can change Global Configuration settings. All of the settings on the Site, System, and Server tabs are stored in the configuration.php file, which is stored in the root directory of your Joomla! site. Settings on the Text Filters and Permissions tabs are stored in the Joomla! database.
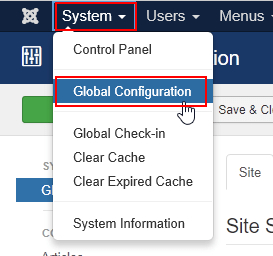
To access the Global Configurations settings, log in to your Joomla! administrator back-end and go to System > Global Configuration.
The Site tab
There are four sections on the Global Configuration Site tab:
- Site Settings – Control behaviour of public areas of the site.
- Metadata Settings – Control meta settings of each page, such as meta description and meta keyword.
- SEO Settings – Customize URLs for search engine optimization (SEO).
- Cookie Settings – Allow cookies to be customized for subdomains.
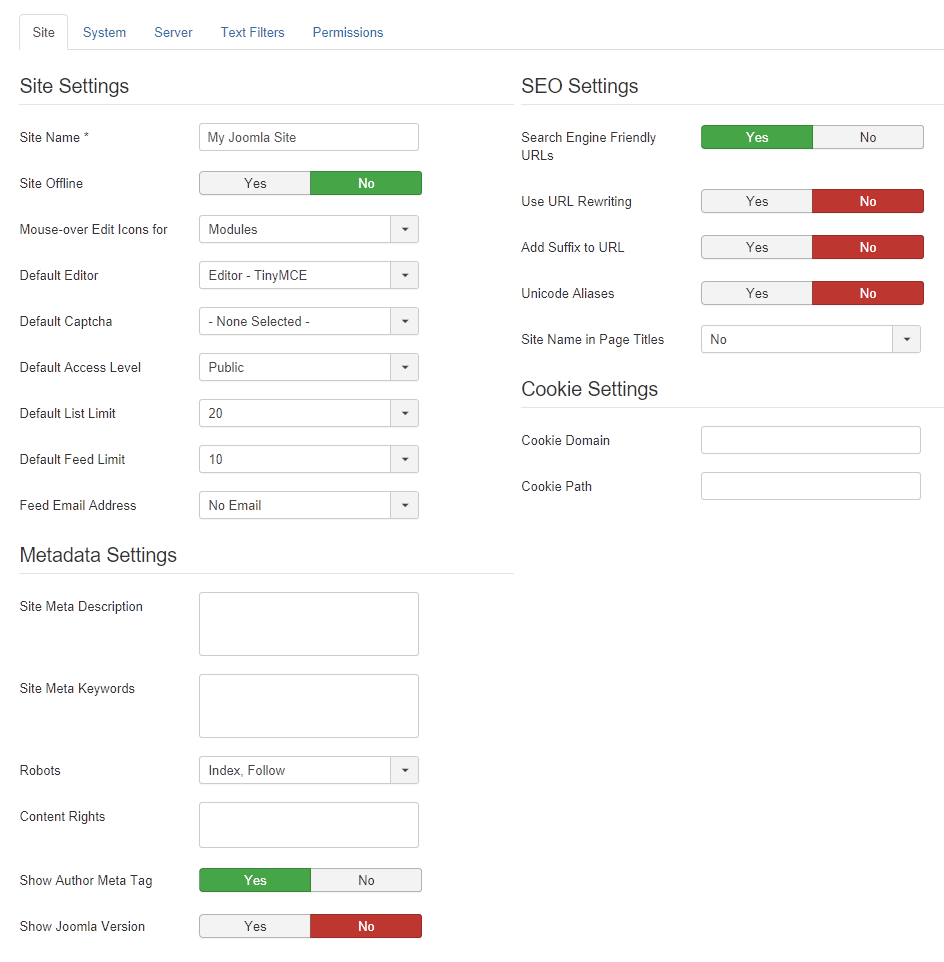
Site Settings
Site Settings include several behaviours that control how visitors and registered users see and interact with your website.
- Site Name – The name of your website. This is displayed in various places, such as the title bar of the back-end and in the header web pages.
- Site Offline – When set to Yes, the public pages of the site are replaced with the Offline Message.
- Offline Message – When the site is offline, choose to display no offline message (Hide), Use Custom Message, or Use Site Language Default Message. The default message is defined in the default language INI file. This setting is displayed only when the site is offline.
- Custom Message – Enter a custom message that will be displayed when the site is offline. This setting is displayed only when the site is offline and Offline Message is set to Use Custom Message.
- Offline Image – Select or upload an image to be displayed with the offline message. This setting is displayed only when the site is offline.
- Mouse-over Edit Icons for – Select whether to display mouse-over edit icons for Modules, Modules & Menus, or None.
- Default Editor – Select CodeMirror, None, or TinyMCE as the default text editor.
- Default Captcha – Select the default Captcha to use with forms on your site. The options depend on which Captcha plugin is installed.
- Default Access Level – Choose the default access level for new site content and items. Options are Guest, Public, Registered, Special, and Super Users.
- Default List Limit – Select the default length of lists displayed in the Control Panel.
- Default Feed Limit – Select the default number of content items displayed in feeds.
- Feed Email Address – Select the email address to include with RSS and Atom newsfeeds.
Metadata Settings
Metadata is information that describes your website.
- Site Meta Description – A short, general description of the website that will be read by search engines.
- Site Meta Keywords – A comma-separated list of keywords and phrases that describe the website.
- Robots – Instructions for search engine robots. Choose Index to allow robots to index the site, No index to disallow indexing, Follow to allow robots to follow links, and No follow to disallow following links.
- Content Rights – Describe the rights the general public has to use the content on the site.
- Show Author Meta Tag – Select Yes to show the author meta tag on articles.
- Show Joomla Version – Select Yes to show the installed version of Joomla! in the generator meta tag.
SEO Settings
Search engine optimization, or SEO, is the practice of increasing the traffic to your site through search engine results.
- Search Engine Friendly URLs – Choose Yes to use shorter, human-readable URLs, which are optimized for search engines.
- Use URL Rewriting – Choose Yes to use the web server’s rewrite engine to delete the index.php part of URLs. If you choose Yes, you must rename the htaccess.txt file in the Joomla! root directory to .htaccess. For information about .htaccess files, see What is .htaccess? in the HostPapa knowledge base.
- Add Suffix to URL – Choose Yes to add a document type suffix, such as HTML, to URLs.
- Unicode Aliases – Choose Yes to allow Unicode (that is, non-Latin character) aliases instead of the default transliteration.
- Site Name in Page Titles – Choose Before to display the site name before the article name in the web browser title bar. Choose After to show the site name after the article name.
Cookie Settings
Cookies are small text files that are stored on your site visitors’ computers. Cookies contain information such as when the site was visited, site preferences, and login details. In most cases, you can leave these settings blank.
- Cookie Domain – The domain to use when setting session cookies. If the cookies should be valid for all subdomains, add a period (.) before the domain. For example, .mydomain.com.
- Cookie Path – The site path the cookie is valid for. If entered, this path overrides the default path.
The System tab
There are four sections on the Global Configuration System tab:
- System Settings – Control log file location and system help language.
- Debug Settings – Control how debugging information is displayed.
- Cache Settings – Control system caching options.
- Session Settings – Control how system sessions are handled.
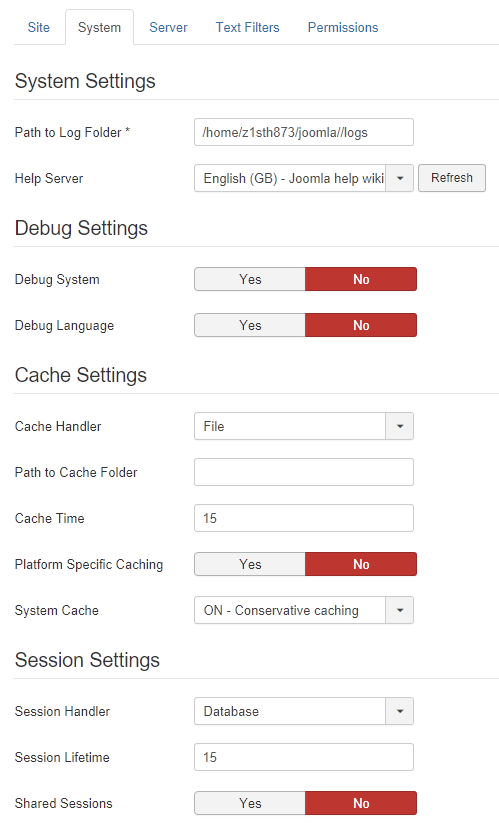
System Settings
The System Settings section includes the following options:
- Path to Log Folder – The path to the location of the Joomla! system logs and extension logs.
- Help Server – The language used for Help information.
Debug Settings
When enabled, debugging displays diagnostic information that can help find and fix errors on your site.
- Debug System – Choose Yes to display debugging information, such as language translation and SQL errors, at the bottom of each page on the site. Note that, if enabled, this information is visible to all site visitors, even if the site is offline, and could be a security risk.
- Debug Language – Choose Yes to display debugging information for language translations at the bottom of each page on the site. This option can be used when Debug System is enabled or disabled.
Cache Settings
Caching is a method of reducing server load and improving site speed by saving dynamic web pages for a specified period of time instead of recreating them each time they’re requested.
- Cache Handler – Choose the type of cache handler. Default Joomla! caching is file-based. Caching extensions may support other handlers.
- Path to Cache Folder – If you want to use a custom cache folder, enter the path here. Ensure that that cache folder is writable.
- Cache Time – The time in minutes that web pages will be cached before being recreated. The default is 15 minutes.
- Platform Specific Caching – Choose Yes if your site has custom HTML output for mobile devices.
- System Cache – Choose OFF to disable caching. Choose ON – Conservative to enable a small cache. Choose ON – Progressive to enable a large, faster cache (a large cache is not recommended for very large websites).
Session Settings
A session is a site visit by a specific user within a defined period of time.
- Session Handler – Defines how the system identifies a user connected to the site. Database is the default handler. Choose PHP to use the session.save_handler value in the PHP configuration.
- Session Lifetime – The number of minutes after which an inactive user is logged off the site.
- Shared Sessions – Choose Yes to enable sharing user sessions between the public front-end and administrator back-end sections of the site. This option is not available if Force HTTPS is enabled for Administrator Only.
The Server tab
There are five sections on the Global Configuration Server tab:
- Server Settings – Controls temp folder, error reporting, and other settings.
- Location Settings – Specifies the server time zone.
- FTP Settings – Controls whether FTP access is allowed.
- Proxy Settings – Controls whether proxy is enabled.
- Database Settings – Defines Joomla! database settings.
- Mail Settings – Defines website mail settings.
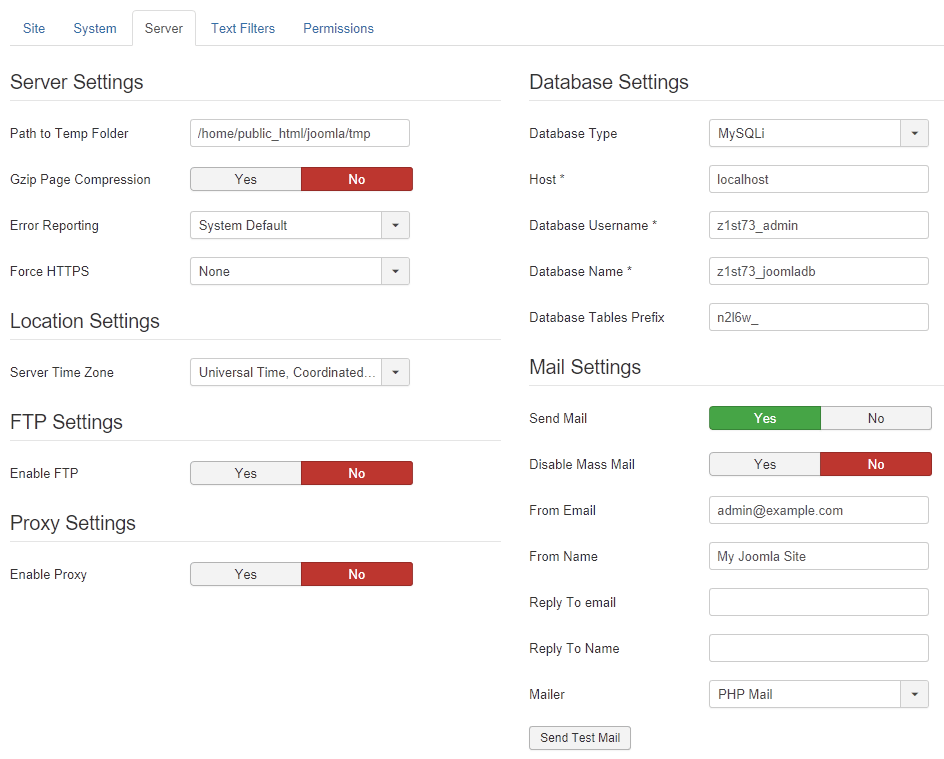
Server Settings
The Server Settings section includes the following options:
- Path to Temp Folder – The path to the folder where the site’s temporary files are stored. If you choose to use a folder other than the default, ensure that it is writable.
- Gzip Page Compression – Choose Yes to compress Joomla! pages and improve page load times.
- Error Reporting – Specify the level of PHP error reporting.
- System Default – This is the reporting level specified in the server PHP.INI file.
- None – PHP error reporting is disabled.
- Simple – Basic error reporting.
- Maximum – All errors are reported.
- Development – All errors are reported.
- Force HTTPS – Force site access to use the secure HTTPS protocol. Choose Administrator Only to force HTTPS for the Administrator back-end only or Entire Site to force HTTPS for all pages.
Location Settings
The location setting is used to specify the server time zone and time/date settings.
- Server Time Zone – Specify the time zone that the site will use to display dates and times.
FTP Settings
Enabling FTP (file transfer protocol) forces file uploads to the site to use FTP instead of the default PHP upload function. FTP is not required for Joomla! sites on HostPapa shared servers and should not be enabled.
- Enable FTP – Choose No.
Proxy Settings
A proxy is needed on some server environments. For Joomla! sites hosted on HostPapa servers, you can use the default No (disabled) setting.
- Enable Proxy – Choose No.
Database Settings
Joomla! database settings are defined during installation and shouldn’t be changed unless you’re migrating to a different server or hosting account. Contact HostPapa Support if you have any questions about your database settings.
- Database Type – The type of database used for your Joomla! site.
- Host – The hostname of the server the database is installed on.
- Database Username – The username that has permission to access the database.
- Database Name – The name of the database.
- Database Tables Prefix – The name prefix used for the Joomla! tables in the database.
Mail Settings
Mail Settings includes options for sending mail automatically generated by the Joomla! site, such as notifications and registration details.
- Send Mail – Choose Yes to enable sending mail from the Joomla! site.
- Disable Mass Email – Select Yes to disable the ability to send mail via the Mass Mail Users function, which is used to send mail to all users or all users belonging to a group.
- From Email – The email address to display in the ‘From’ field in emails sent from the site.
- From Name – The name to display in the ‘Sender’ field in emails sent from the site.
- Reply To email – The email address to use when the recipient replies to the email.
- Reply To Name – The name to use when the recipient replies to the email.
- Mailer – The program the site uses to send email. Choose the default PHP Mailer.
The Text Filters tab
Text filters allow you to control the type of HTML content that site users are allowed to include in their text. Filters can be customized for each user group, including public users, registered users, authors, and administrators.

Filter Type
Joomla! includes five filter types you can apply to your site content.
- No HTML – All HTML tags are removed from the text when it’s saved.
- Default Blacklist – The default blacklist includes a predefined list of HTML tags and attributes. You can add tags and attributes to the default blacklist.
- Custom Blacklist – The custom blacklist overrides the default blacklist. You can create your custom blacklist by specifying the filter tags and filter attributes you want to restrict.
- Whitelist – Select Whitelist to allow only the tags and attributes you specify in the Filter Tags and Filter Attributes fields.
- No Filtering – All HTML tags and attributes are allowed.
Filter Tags
For each filter group, you can specify HTML tags in the Filter Tags field. The specified filter tags are allowed or not allowed, depending on which filter type you’re using. Examples of filter tags are body, base, applet, and xml.
Filter Attributes
For each filter group, you can specify HTML attributes in the Filter Attributes field. The specified filter attributes are allowed or not allowed, depending on which filter type you’re using. Examples of filter attributes are action, background, and codebase.
The Permissions tab
You can assign and manage group permissions for several actions on your site. Each action has three possible settings – Not Set, Allowed, or Inherited. The Not Set setting can be assigned to the Public group and is functionally the same as Denied. The Calculated Setting shows the group’s effective permissions based on the combination of permission inheritance and explicitly set permissions.
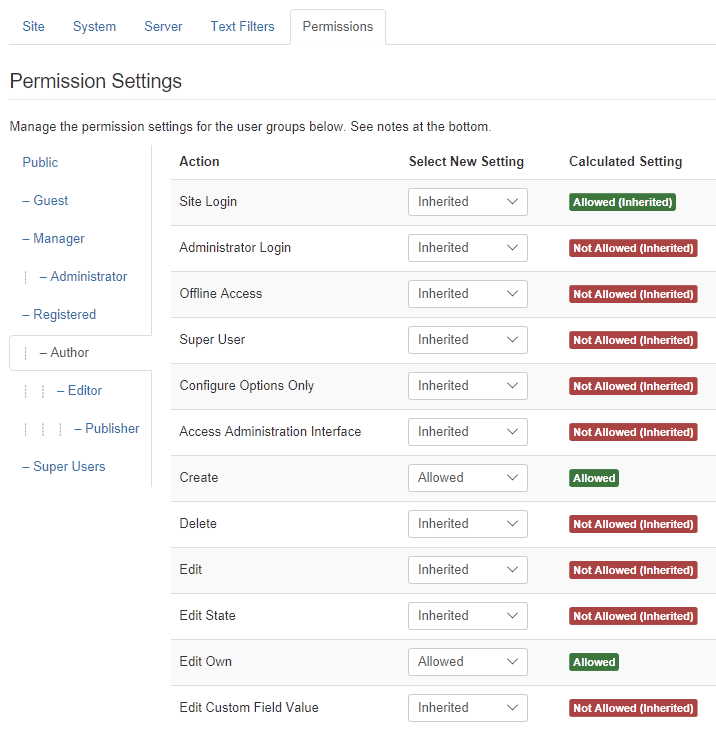
You can assign permissions for the following actions:
- Site Login – Allow or deny users in the group to log in to the site front-end.
- Administrator Login – Allow or deny users in the group to log in to the Administrator back-end.
- Offline Access – Allow or deny users in the group to access the site front-end when site is offline.
- Super User – Allow or deny users in the group to perform any action on the site regardless of any other assigned permissions.
- Access Administration Interface – Allow or deny users in the group to access all of the Administrator back-end, except Global Configuration.
- Create – Allow or deny users in the group to create any content in any extension.
- Delete – Allow or deny users in the group to delete any content in any extension.
- Edit – Allow or deny users in the group to edit any content in any extension.
- Edit State – Allow or deny users in the group to edit the state of any content in any extension.
- Edit Own – Allow or deny users in the group to edit any of their own content in any extension.
- Edit Custom Field Value – Allow or deny users in the group to edit any value of custom fields submitted in any extension.
More information
For more information about configuring Joomla!, see Getting started with Joomla! and Beginner’s Guide to Joomla! in the HostPapa knowledge base.
If you have any questions or need help, you can always contact HostPapa Support by opening a support ticket. Details about how to open a support ticket are here.
