This Knowledge Base article explains how to delete a WordPress site that was created with your Managed WordPress service.
To connect your domain to a Managed WordPress site, locate your DNS records in the Managed WordPress dashboard and update your domain’s A record (for apex domains like example.com) or CNAME record (for subdomains like [www.example.com](https://www.example.com)) at your domain provider. If your domain is registered with HostPapa, configure your nameservers to ns1-wp.servername.online and ns2-wp.servername.online to point your domain automatically.
Apex vs. Subdomain Overview
- Apex (Root) Domain: The primary name without a prefix (e.g., example.com).
- Subdomain: A domain with a prefix (e.g., [www.example.com](https://www.example.com), shop.example.com, or blog.example.com).
- Best Practice: Most site owners point both the apex and www versions so visitors reach the site regardless of how they type the address.
Point your domain
When your site is provisioned, a DNS records panel displays the required record types, names, and values.
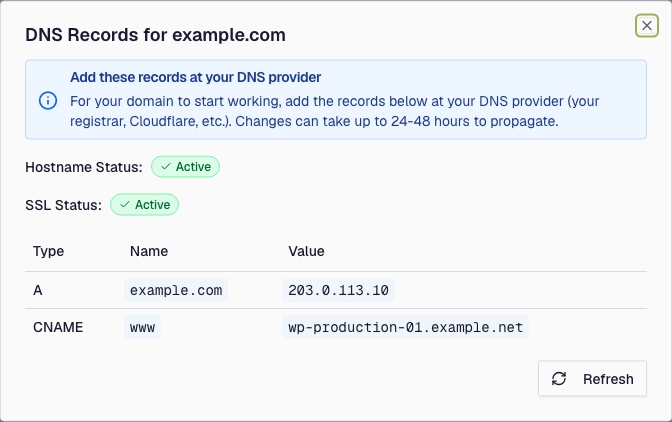
- An apex domain (example.com) gets an A record.
- A subdomain (www.example.com) gets a CNAME record.
To view these records at any time, go to the Domains list, select Actions, and click View DNS Records.
Configuring DNS Records by Provider
- HostPapa Registered Domains:
- No manual DNS record entries are needed.
- Set your domain nameservers to:
- ns1-wp.servername.online
- ns2-wp.servername.online
- Allow a short propagation window for automatic pointing to take effect.
Third-Party Registrars (GoDaddy, Namecheap, etc.):
- Log in to your registrar and open the DNS Management control panel.
- Add the recommended record (e.g., CNAME with Host: www and Points to: assigned target value).
- Save changes. Propagation typically takes anywhere from a few minutes up to 24–48 hours.
With Cloudflare
- Log in to Cloudflare, select your domain, and navigate to DNS Records.
- Add the corresponding A or CNAME record matching your dashboard details.
- Set Proxy status to DNS Only (grey cloud) until SSL certificate issuance is complete.
- Save changes and switch to orange-cloud proxy later if desired.
Monitor DNS and SSL Status
Check the DNS Status column under the Domains tab to track progress:
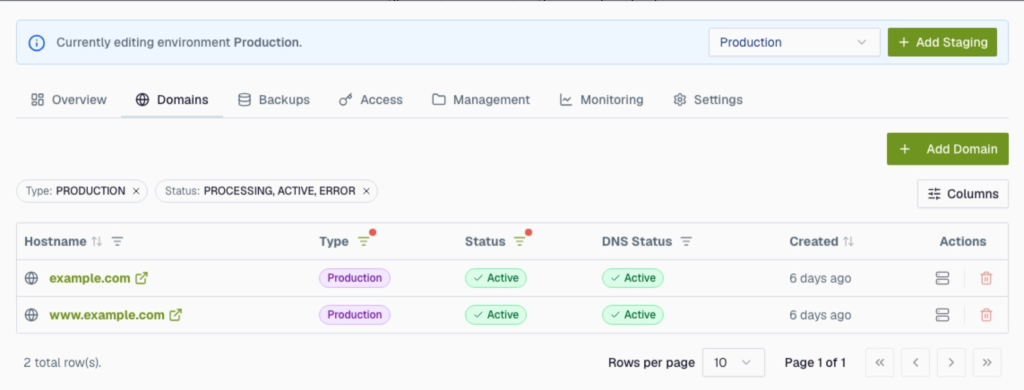
- Waiting for DNS: Changes are propagating globally. No action required.
- DNS Error: The domain is pointing incorrectly. Re-verify record type, target, and host prefix.
- Active: DNS is configured correctly and pointing to your site.
Note: Free SSL certificates are automatically requested once DNS resolves to Active. Temporary certificate warnings may appear until propagation and issuance finish.
If you need help with your HostPapa account, please open a support ticket from your dashboard.