WordPress Multisite (previously known as WordPress MU) allows you to create a network of virtual blogs on a single WordPress installation. It’s commonly used in schools, colleges and other organizations to provide websites to students, enrolled members or other individuals.
A WordPress super-administrator has management responsibility for the entire network, while each site owner has administration rights over their WordPress blog.
Understanding the differences between single and multisite WordPress installations
A WordPress Multisite installation is much the same as a standard, single-site installation. It uses the same folder structure, files and indeed, code. While you may have a network of hundreds, if not thousands of sites, server storage is optimized greatly – only a single copy of a theme and plugins are stored on your server, no matter how many sites are using them.
Under the hood, your WordPress configuration file (wp-config.php) will include additional lines that activate multisite features. In contrast, your wp-uploads folder will contain a subfolder for each site on your network (using the site’s ID as the folder name). Each site’s uploaded media files are stored in their respective subfolders.
Several changes are made to the WordPress database structure to support multisite installations. These are predominately duplicated tables required to support each site in the network. Large networks with many sites will result in large databases. Be sure to keep an eye on your server storage capacity and look to optimize your database tables regularly.
You’ll also see some differences when you log in to the administration dashboard, with additional features specifically used to manage the multisite network. We’ll encounter each of these features as we get up and running with WordPress Multisite.
Activating WordPress Multisite
If you have an existing WordPress site that you wish to convert to a multisite network, consider some configuration differences. Existing WordPress installations that transform to multisite must use subdomains, i.e. sites on the network will use https://mynewsite.mynetwork.com as the URL structure. This means you must have Wildcard subdomains enabled in cPanel.
Fresh installations can choose to use subdomains too, but you can also use subdirectories, where site URLs will be configured as https://www.mynetwork.com/mynewsite.
Add the following line to your wp-config.php file:
define( 'WP_ALLOW_MULTISITE', true );
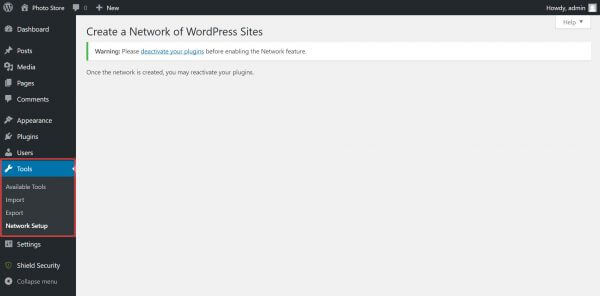
Save the file and log into your administration dashboard and visit Tools > Network Setup. Before activating Multisite, you will be asked to deactivate your plugins. Once Multisite is live, you’ll be able to reactivate them once again.
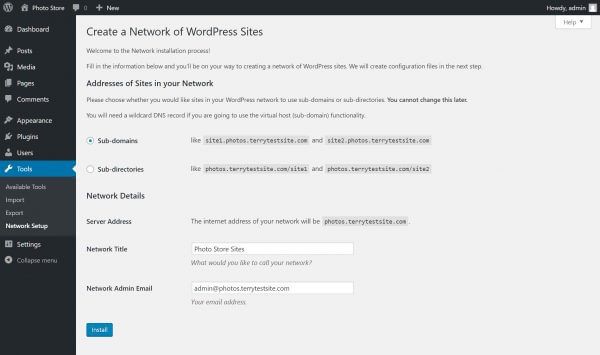
Deactivate your plugins and return to Tools > Network Setup. You’ll be prompted to choose subdomains or subdirectories for your installation: choose the one that works for your network.
Create your Network Title and Administration Email address, and hit Install to activate your Multisite network.
Creating a new site
When you’re getting started, you may prefer to create new sites on your network manually. However, as your network grows, you can choose to allow your users to create sites themselves via WordPress’ Site Registration settings. For now, we’ll start with manual configuration.
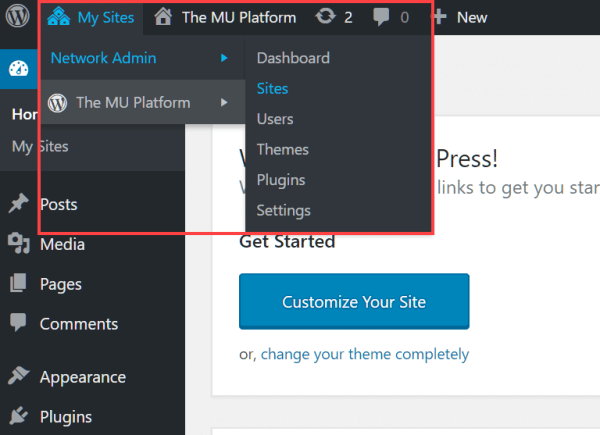
When you first log in to your Administration dashboard, you’ll notice a new My Sites menu at the top of the screen.
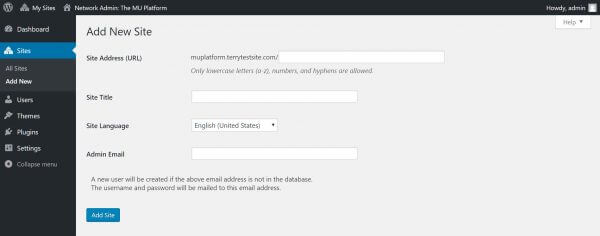
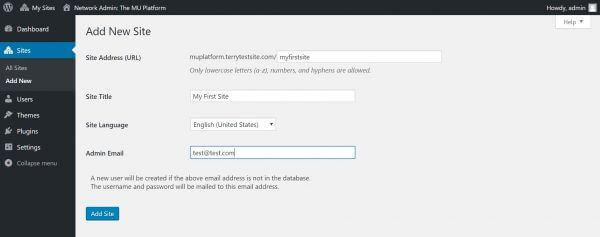
In this menu, select My Sites > Network Admin to manage your multisite network. Then, in the admin sidebar, select Sites > Add New.
Enter the site address (which will be a subdomain or subdirectory, depending on your configuration), the site title, and the site administrator’s email address.
Click the Add Site button to proceed, and the username and a randomly generated password will be emailed to the Admin Email address.
Select Sites > All Sites to view them in the administration dashboard as you build up your network.
Installing and activating themes
One significant difference between managing a single and multisite WordPress installation is in theme installation. Only a network super administrator can install and activate themes, making them available for sites to use. A theme must be network-enabled before sites can use it.
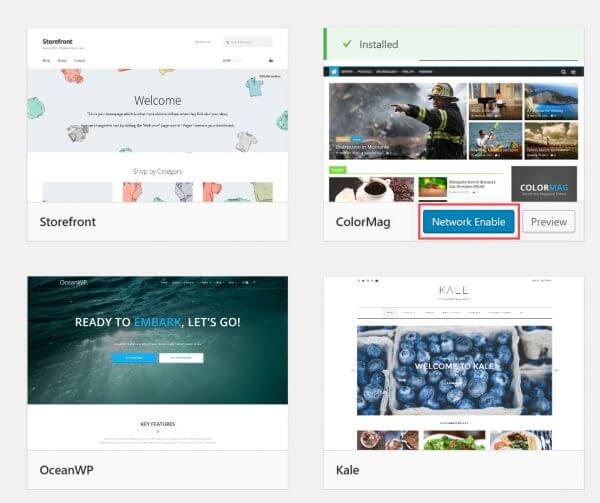
To make a theme available for your sites, first, visit Themes > Add New and install the theme in the usual way. Once installed, you’ll notice a Network Enable button appear on the theme entry. Click the button to make the theme available for network sites.
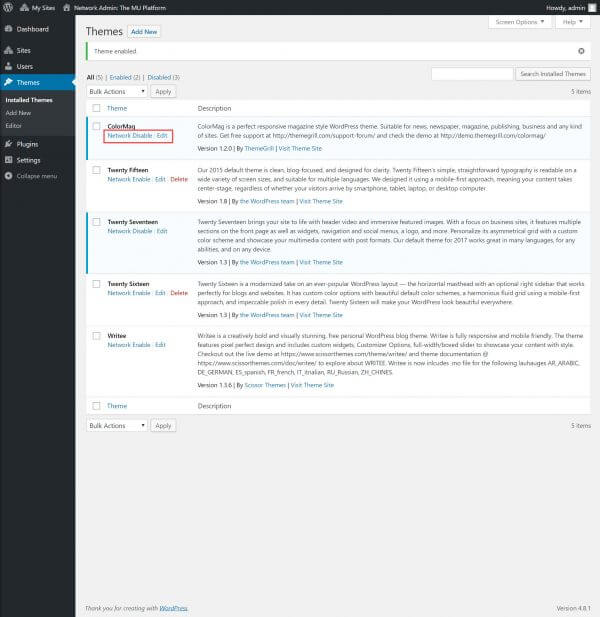
In your themes list (Themes > Installed Themes), note that each theme has a Network Enable/Disable link that toggles availability for sites on your network.
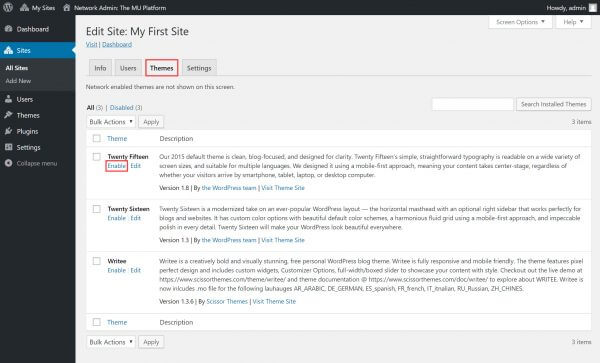
If you wish to set a theme for a site manually, you can visit All Sites and select the Edit link under the site you want to manage.
Click the Themes tab to view a list of available themes. Note that network-enabled themes are not displayed in this list. Click the Enable link under the theme you wish to select for the site.
Installing and activating plugins
Managing plugin availability for network sites is slightly different from themes. Plugins still must be installed by the super administrator, but you can’t manually enable a plugin for a single site. Your options are to network-enable a plugin to run on every site or simply install it so that it’s available for your network sites to enable if desired.
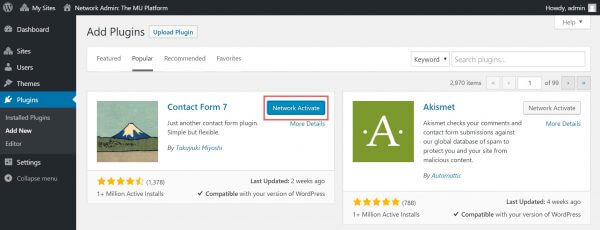
In your network administration dashboard, visit Plugins > Add New, then download/upload and install the plugin in the usual way. Once installed, you’ll see a Network Activate button appear in the plugin listing.
Click the button to install and run the plugin across your network. Network sites will not be able to disable the plugin in their administration dashboards. If you do not select Network Activate, the plugin will appear as available in your network’s plugin list, and site administrators will be free to activate or deactivate the plugin as required.
Managing users
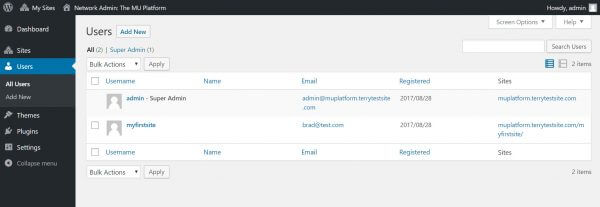
To add, edit or delete user accounts from your network, head to Users > All Users. You’ll be presented with a list of current network users.
Managing users in a multisite network is much the same as for a single site installation. Use the Add New button to create new user accounts and hover the mouse over existing accounts to expose Edit and Delete links. Any changes made to accounts will result in a notification being sent to the super administrator email address.
Managing settings
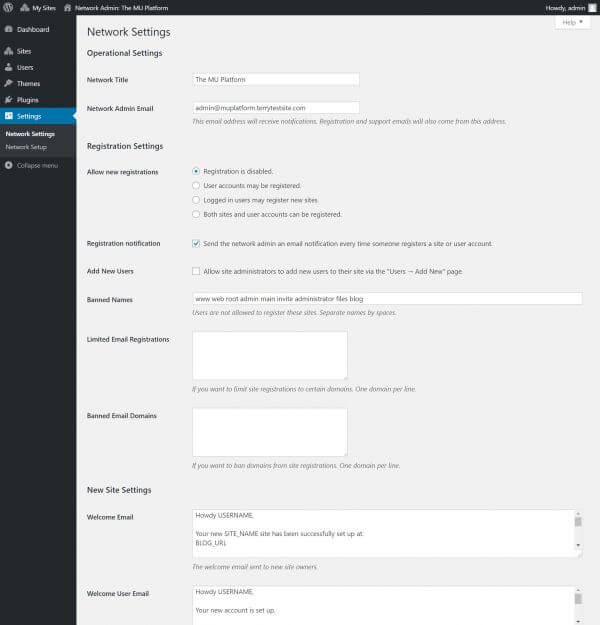
Use the Settings > Network Settings menu to tailor configuration options for your multisite network.
Here you can disable registration, allow users to register new sites, configure notification settings, manage communication options and more.
Managing updates
As a multisite super administrator, it’s your responsibility to manage aspects of your network, including core WordPress updates, theme and plugin updates, user account management and settings. WordPress makes it relatively simple to handle these tasks across your network, but there are some differences compared to managing a single site installation. For example, WordPress updates require you to install the update on your server, then push the update to sites across your network. You’ll be guided each step of the way, however, and once you’ve managed your first set of updates, you’ll find the process to be simple.
If you need help with your HostPapa account, please open a support ticket from your dashboard.

