This tutorial describes how to set up HostPapa’s Basic or Advanced email in Outlook 2013.
Please note that if you have not already done so, you will first need to configure and activate your HostPapa email service.
Open Outlook 2013, then click on File and choose Add Account.
The Auto Account Setup screen will appear:
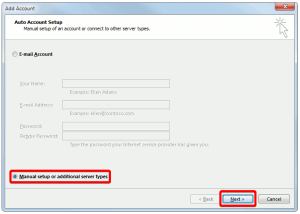
Choose the Manual setup or additional server types option, then click Next.
NOTE: For this tutorial, we will use setup@webtraining.cloud as our test email account. You will need to change some of the settings to match your setup.
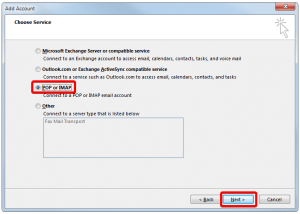
On the screen that follows, choose the POP or IMAP option, then click Next.
Next, fill in your account information. Each highlighted (yellow) field is required. Please reference the settings in the next image.
NOTE: For the server fields, use your domain name with “mail.” in front of it. For example, if your domain was hostpapa.com you would enter mail.hostpapa.com for the server.

NOTE: Be sure to leave the Require logon using Secure Password Authentication (SPA) option on the bottom left unchecked. If this box is checked, your connection will not work properly.
Once entered in full, with adjustments based on your actual account settings, click on the More Settings button. This step is important!
You will now be in the Internet E-mail Settings page.

Click on the Outgoing Server tab. Click the checkbox beside My outgoing server (SMTP) requires authentication, then choose Use same settings as my incoming mail server.
Click OK at the bottom of the window.
The settings here should be generally appropriate; however, it’s a good idea to click on the Advanced tab and double check the port numbers and encryption type, as shown below:

Once all the settings are confirmed, click OK to close the settings window.
You will now be back at the POP and IMAP Account Settings page. Simply click Next and Outlook will test the connectivity.
NOTE: If you are setting up a POP account instead of IMAP, you will need the following settings to be confirmed:
Incoming Port: 995
Outgoing Port: 465
When you see a message like the one that appears below, the account has been set up successfully:
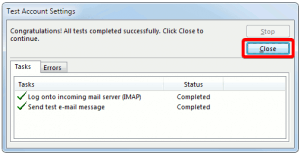
Click the Close button to complete the setup.
Default Email Account Settings (Basic and Advanced Email)
Secure SSL/TLS Settings (Recommended)
| Username: | Use the full email you are setting up. |
| Password: | Use the email account’s password. |
| Incoming Server: | mail.papamail.net
|
| Outgoing Server: | mail.papamail.net
|
| IMAP, POP3, and SMTP require authentication. | |
If you need help with your HostPapa account, please open a support ticket from your dashboard.
