Creating a WordPress staging environment lets you safely build, edit, and test updates on a copy of your site without affecting your live production website. You can set up a new staging instance directly from your Managed WordPress dashboard in just a few minutes by configuring your environment details and initiating the automated installer.
In this article, we’ll show you how to create a WordPress staging site through your HostPapa Managed WordPress Dashboard.
A staging environment is a separate, fully working copy of your website where you can test changes, such as plugin updates, a new theme, or custom edits to content and code, without touching your live site. When you are happy with the results, you can push the staging environment to production. Staging is not created automatically, but you can set one up by following these steps:
- At the top of the dashboard, click Add Staging.

- Fill out the configuration fields:
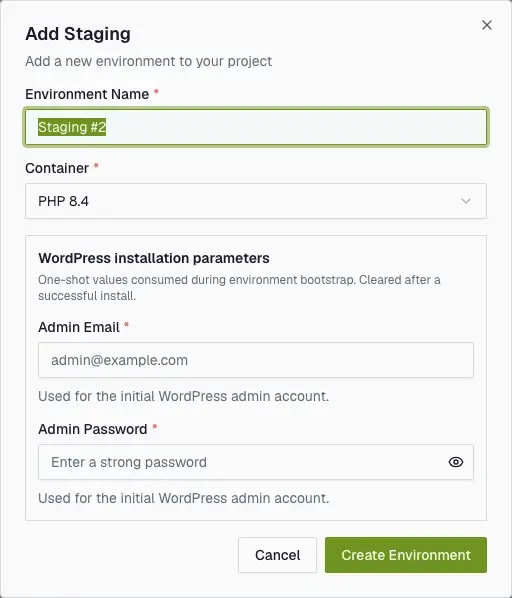
- Environment Name: Automatically pre-filled (e.g., Staging or Staging #2) and cannot be changed. It serves as an identifier in your environment selector.
- Container: Select the target PHP version. Match this to your production site’s PHP version (e.g., PHP 8.3) to ensure testing accuracy.
- Admin Email: Enter an email address you can access to receive the initial staging administrator setup email.
- Admin Password: Enter a strong password for your staging site’s initial admin account.
3. Click Create Environment.
What success looks like
Once submitted, the environment selector will temporarily display a Processing… status while setup completes (typically taking 1–2 minutes). When ready, the status updates to a green Active badge, and a welcome email is sent to your admin address. You can use the top dropdown menu to toggle between Production and Staging environments at any time.
Working with staging
- Switch to Staging in the selector, then click Log into WordPress from your dashboard to begin testing.
- A new staging site starts as a fresh WordPress installation. To duplicate your live site’s existing content or to push finished staging changes live, use the backup and restore tool to restore a snapshot from one environment into another.
If you need help with your HostPapa account, please open a support ticket from your dashboard.