To connect to your Managed WordPress site over Secure Shell (SSH), add your public SSH key on the Access tab of your dashboard, then run a single command from your own computer using your username, your host, and port 2222. WordPress SSH access uses key-based authentication only, so there’s no password to type and no shell to log in to.
This Knowledge Base article explains how to enable SSH access for a website created with your Managed WordPress service. These steps apply to our current plans: Core, Standard, Boost, and Turbo. If you’re on Start, Plus, Pro, or Ultra, follow the legacy-plan steps instead.
SSH lets you run command-line tools against your site, like WP-CLI (wp), Composer, and Git. Instead of a password, you authenticate with an SSH key pair. You add your public key in the dashboard, and your private key, which never leaves your computer, proves it’s you.
SSH on Managed WordPress is non-interactive. You don’t open a shell and type commands at a prompt. You run a single command from your own computer and get its output back, like this:
ssh wp-production-01@203.0.113.10 -p 2222 "wp plugin list"
Each connection runs one command.
What You’ll Need Before You Start
- Your environment must be Active.
- You need an RSA SSH key pair on your computer. If you don’t have one, create it with ssh-keygen, which is built into macOS, Linux, and recent versions of Windows:
ssh-keygen -t rsa -b 4096 -C "your-email@example.com"
RSA keys only. The dashboard accepts public keys beginning with ssh-rsa. Newer key types (ssh-ed25519, ssh-ecdsa) are rejected with “Only RSA (ssh-rsa) public keys are supported” — if that’s all you have, generate an RSA key with the command above and add that one instead. You can keep using your
other keys elsewhere.
Add your PUBLIC key only. The public key is the short one-line file ending in .pub. Your private key (it starts with —–BEGIN … PRIVATE KEY—–) is secret — never paste it into the dashboard or share it with anyone.
How to Add an SSH Key
- Go to the Access tab and open the SSH Keys sub-tab.
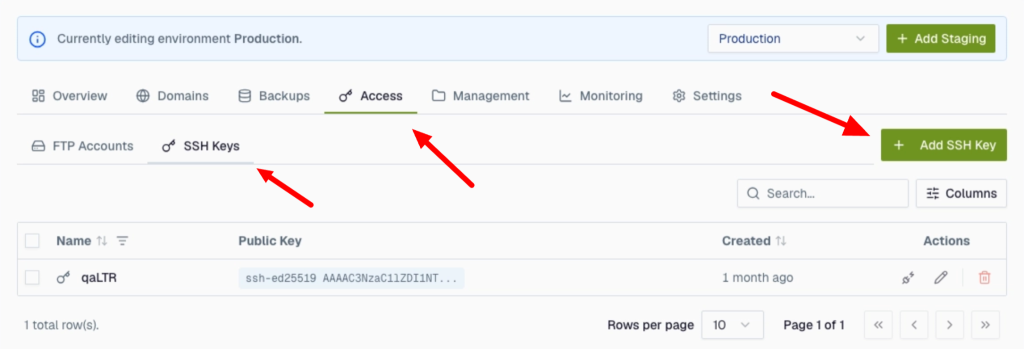
2. Click Add SSH Key.
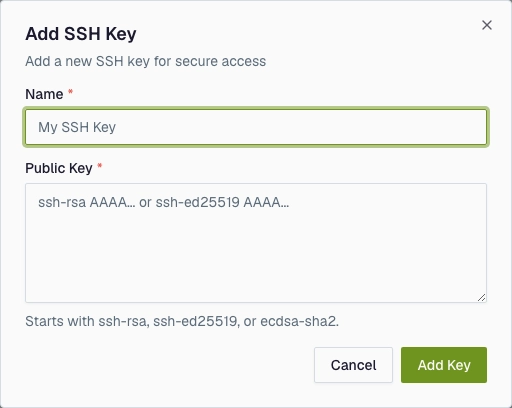
3. Fill in the form:
- Name: A label so you remember whose key this is (e.g. my-laptop).
- Public Key: Paste the contents of your public key file (~/.ssh/id_rsa.pub). It must start with ssh-rsa.
- Passphrase (optional): Only if your private key has a passphrase; this refers to the key on your own machine, not a server password.
4. Click Save. Your environment shows “Processing…” for a minute or two while the key is applied. Once it’s back to Active, your key is ready to use.
How to Run a Command Over SSH
Your connection details are on the Access tab and on the Overview tab under SSH Access:
- Username and host: Both are shown in your dashboard. Copy them from there, since we generate the username for you.
- Port: 2222.
- Password login: Disabled. Your key is the only way in.
Put the command you want to run in quotation marks after your connection details:
Which Commands You Can Run
Commands run through a safe allow-list. The available programs are:
wp · composer · php · git · mysql · mysqldump · scp · rsync · ls · cat · less · head · tail · pwd · mkdir · cp · mv · rm · touch · stat · file · wc · diff · zip · unzip · gzip · gunzip · grep · sed · awk · sort · uniq · cut · tr · curl · echo · date · whoami · id
A couple of things to keep in mind:
- Run one command per connection. Combining several commands in a single line (chaining) isn’t supported — run them as separate ssh … “…” commands instead.
- There’s no interactive shell, no scripting languages (Python, Ruby, Node), and no sudo. For everyday WordPress management, wp (WP-CLI) covers most tasks.
That’s it! You’re set up for WordPress SSH access on your Managed WordPress site.
If you need help with your HostPapa account, please open a support ticket from your dashboard.