To manage, upload, or download your website files securely using an FTP client like FileZilla, Cyberduck, or Termius, you can create a Secure File Transfer Protocol (SFTP) account directly from your hosting dashboard. Managed WordPress uses SFTP to ensure all file transfers and connections are fully encrypted.
This Knowledge Base article explains how to set up and use SFTP access for a WordPress site created with your Managed WordPress service.
FTP lets you connect to your site’s files from a desktop file-transfer program (an “FTP client” such as FileZilla or Cyberduck) to upload, download, and manage files. On this platform, the connection is always the secure SFTP variant — so although the tab says “FTP,” your transfers are encrypted.
Create an FTP account
- Go to the Access tab. You’ll land on FTP Accounts.
- Click Add FTP Account.
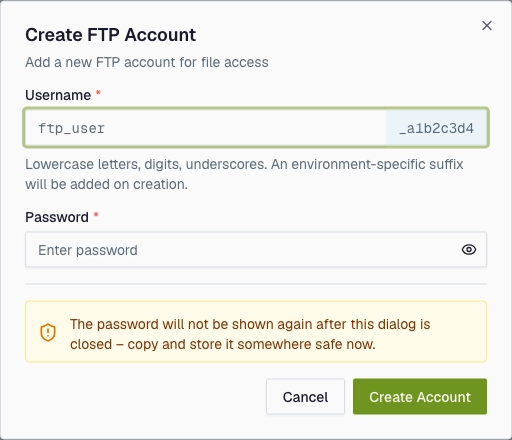
The Add FTP Account form
- Enter a Username (3–20 characters using lowercase letters, numbers, and underscores). Note: An environment-specific suffix (e.g., _a1b2c3d4) is automatically appended to your username.
- Enter a strong Password and immediately save it in your password manager, as it cannot be viewed again once closed.
- Click Create Account.
Note: Account creation applies changes to your environment. The status will briefly display Processing… before returning to Active (typically within 1–2 minutes). Wait for the Active badge before attempting to connect.
Connect with your FTP client
Your connection details are shown on the Access tab (and on the Overview tab under FTP Access):
- Protocol: SFTP
- Host: the address shown (e.g. 203.0.113.10)
- Port: 2223
- Username: your full username (with the suffix)
- Password: the one you saved when creating the account
- Folder: all accounts open in your site’s main WordPress folder.
Download a ready-made connection
To bypass manual setup:
- Locate your account row in the FTP Accounts list.
- Click the Download action icon to save a ZIP file.
- Import the pre-configured profile directly into Cyberduck, FileZilla, or Termius.
- Enter your saved password to connect.
Manage Accounts
- Change Password: Edit an account row to generate a new password if you’ve lost the original password.
- Delete Account: Remove an account row to revoke SFTP access immediately.
If you need help with your HostPapa account, please open a support ticket from your dashboard.