To help you manage your time, HostPapa created the Appointment Scheduler. The application allows your website’s visitors to easily arrange appointments with you. The process is convenient and can be used 24/7, meaning your business is always open.
To learn how to access your Website Builder to get started, please visit this article.
With the appointment scheduler, visitors can select the service they need from you. They are then able to book an available day and time. After submitting their contact details, the visitor’s appointment slot is booked.
Getting started
To enable the Appointment Scheduler for your website:
- Move your cursor to the left of your screen to bring up the left menu.
- Drag and drop the application to a position on a webpage that you are happy with.

When you have placed the Appointment Scheduler on a page, a menu will appear on the right side of the screen. The menu on the right allows you to configure the application.
Please click on the Setup icon.
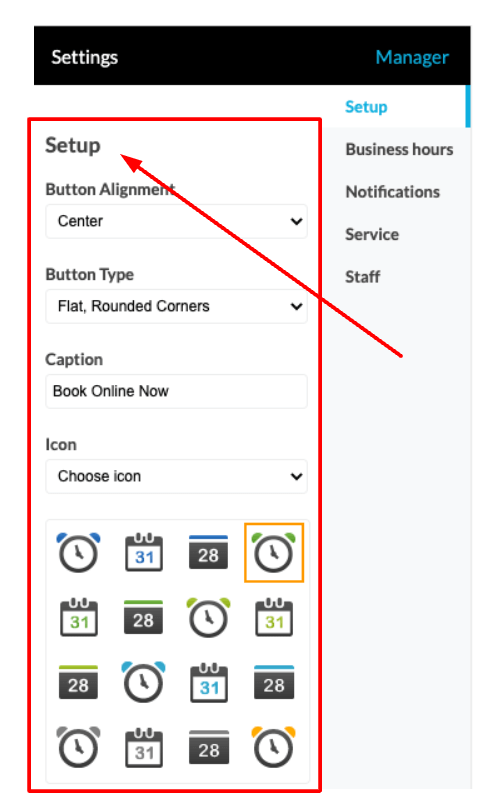
The Setup Tab
You can configure the Book Online Now button—which is visible and available to your website visitors—using the Setup Tab.
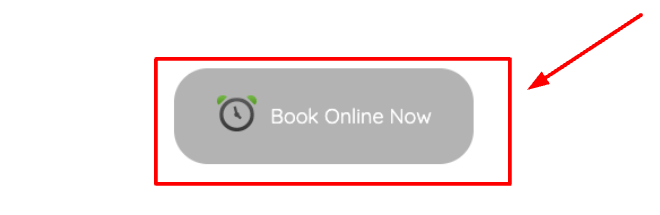
The options to configure your Book Online Now button include:
- Button Alignment: Alter your button’s alignment.
- Button Type: You can choose one of several readymade button types, or you may prefer to upload a custom image.
- Caption: This option allows you to define your button’s text caption. Please note that this course of action is not available for uploaded custom images.
- Icon: Select an icon of your choice to apply to your button.
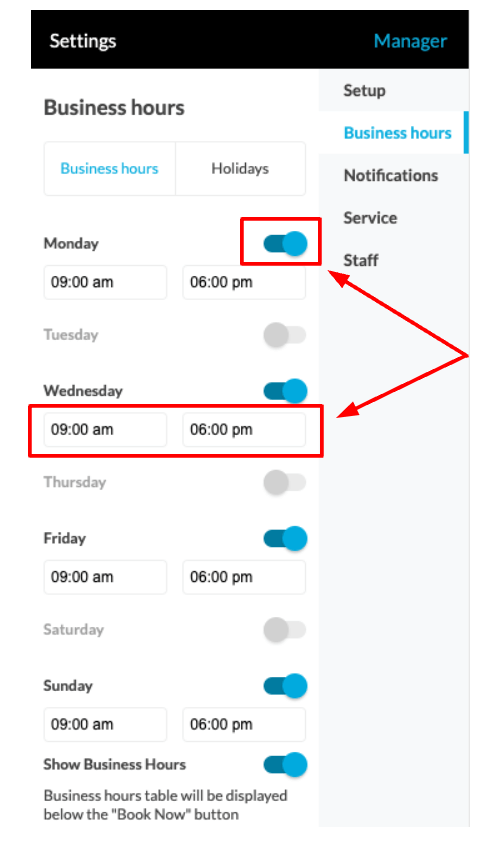
Your business hours
The Business hours tab sets the times and days when you will be available to meet with your clients and prospective customers. You can set out the hours that you work and let people know exactly when you’ll be available.
In the Business hours tab, you can:
- Move the slider against each day of the week to show the days you are available.
- Enter the start and end times of each working day.
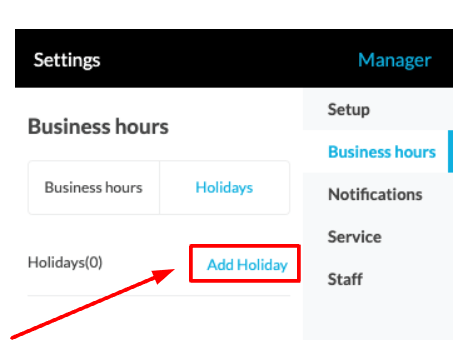
Taking a holiday
To let customers know when you will be away or closed for a festive period, there is a Holidays tab. This action will prevent people from booking appointments when you are away, but it will not affect the business hours you have set up. The Holidays tab allows you to:
- Add a holiday or create a list of holidays when you will not be available.
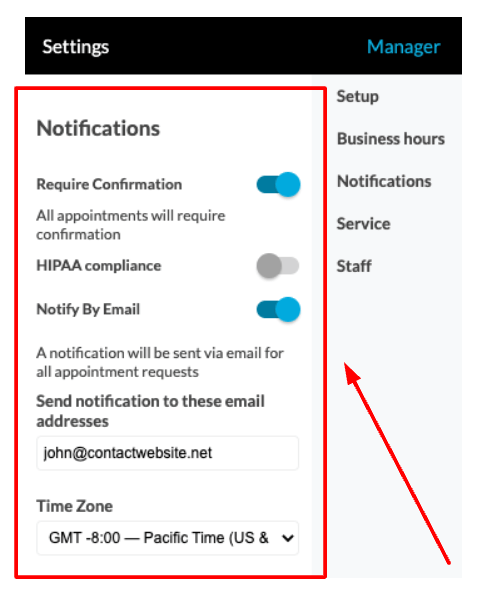
Notifications
You alter your notification settings in the Notifications tab. Upon opening the tab, you will be met with the following options:
- Require Confirmation: Once a visitor books an appointment, they can select the Require Confirmation option. This means that once an appointment is booked, you will be sent an email request to approve this action.
This will require confirmation via the Manage Appointments tool. The visitor who has asked for the confirmation will be sent an email asking them to await confirmation. Once the confirmation has gone through, an additional email notification will be sent.
- HIPAA compliance: If this option is chosen, it will disable any email notifications in accordance with The Health Insurance Portability and Accountability Act. This action will also apply to emails that are associated with confirming the appointment booking. Please note: If the HIPAA compliance option is selected, the Notify by Email option cannot be enabled.
- Notify by Email: If you decide to disable this option, please note that no emails will be sent out to you or your website visitors. In spite of this, if the Require Confirmation option is selected, a booking can still be confirmed or rejected.
Also, if Notify by Email is selected, email notifications will still be sent out to both
parties—even when Require Confirmation has not been enabled.
- Send notification to these email addresses: You can enter an email address where you would like to receive notifications. If you wish to add other providers of your service, please note that you can add extra emails but they will need to be separated with a comma.
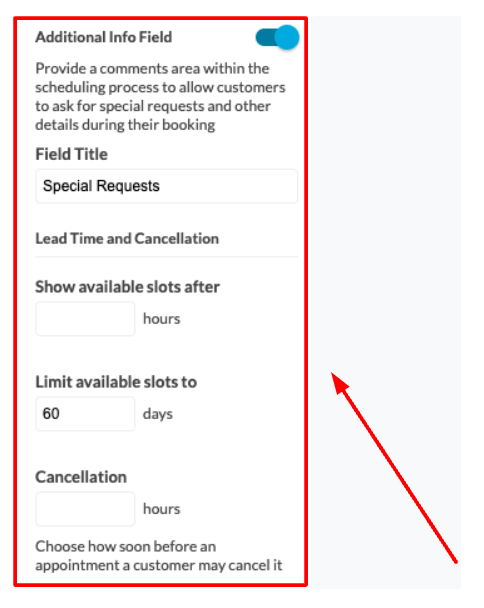
- Additional Info Field: This option allows website visitors to ask for special requests and other details during their booking. A comments area will be provided within the scheduling process, so that visitors can leave specific details.
- Show available slots after: You can use this setting to manage the booking options for website visitors. If it’s left empty, it will not affect the available slots. The purpose of this option is to allow you to specify time needed to process the bookings you have received. As an example, if you want to pause booking for 24 hours while you catch up, you can set this option to 24.
- Limit available slots to: Setting a number of days in this field would mark the days past the set number of days as not available for booking an appointment.
- Cancellation: You can set a time limit for appointment cancellations. Enter the number of hours prior to an appointment that it can be cancelled.
Services
You can add, manage, and edit as many services as you need in the Services tab.
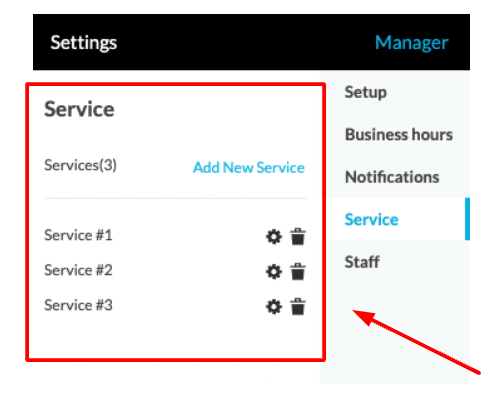
You can see that to the right of each service, there is a cogwheel icon. Please:
- Click a cogwheel icon to bring up the menu for editing the service.
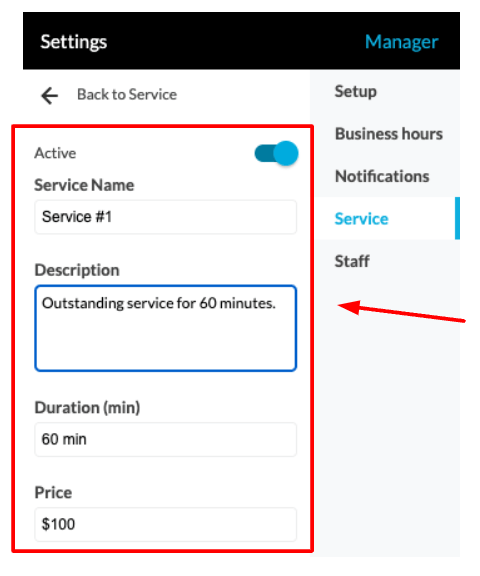
You now have the chance to use the following options:
- Active: You can quickly enable or disable existing services with this slider.
- Service Name: This field can give the name of the service that will be available for booking on your website.
- Description: You can enter a description of your service in this field. The text you enter will be shown below the Service Name when an appointment is booked.
- Duration: Please set a length of time for an appointment. This option will affect the time slots on your booking calendar.
- Price: If you wish to charge for an appointment, you can enter the set price in this field. The amount will be displayed during the booking process.
Staff
You have an option to select members of your staff that you would like available for appointments. You can simply:
- Click Add New Member to include staff members that the public can arrange appointments with.
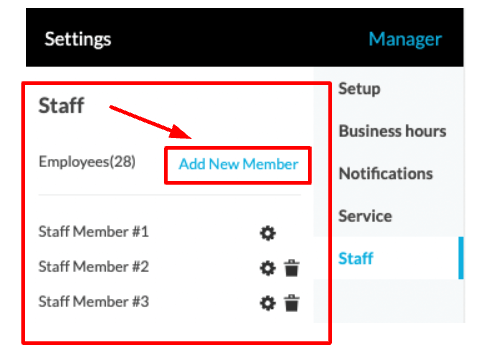
To the right of each Staff Member listed you will see a cogwheel icon. To edit staff settings, click the cogwheel icon for the relevant staff member. A menu will now appear with the following options:
- Name: Enter the staff member’s name in this field. Once a visitor selects a service, the staff member’s name will appear.
- Description: The description field allows you to give more information about a staff member to the public. Consider including the number of years they have been in service or their particular skill set.
- Available: This option allows you to make your member of staff available during your set business hours. Alternatively, you can create custom business hours for a staff member.
- Notify by Email: This slider allows you to send appointment notifications to individual staff members.
- Services: These checkboxes let you decide if a staff member performs all services or a fixed set of services.
- Vacation: This option helps your staff enjoy their vacation time without disturbance by temporarily removing them from appointments.

If you need help with your HostPapa account, please open a support ticket from your dashboard.
