HTTPS or Secure HTTP is an encryption method that secures the connection between a user’s browser and your server. This makes it harder for hackers to eavesdrop on the connection.
Each site is issued a unique SSL certificate for identification purposes. If a server is pretending to be on HTTPS and its certificate doesn’t match, most modern browsers will warn the user not to connect to the site. Once you have installed your SSL certificate on your server, follow the steps below to configure WordPress to use your SSL certificate.
How to setup WordPress to use SSL and HTTPS
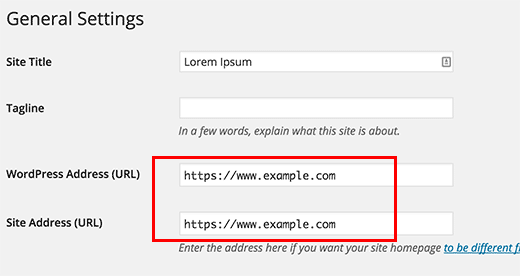
If you want to use HTTPS everywhere on your site, you need to update your site URL.
To do this, go to Settings > General, and update your WordPress and site URL address fields.

Now if you’re adding SSL to your existing site, then you need to set up WordPress SSL redirects from HTTP to HTTPS.
You can do this by adding the following code in your .htaccess file:
<IfModule mod_rewrite.c>
RewriteEngine On
RewriteCond %{SERVER_PORT} 80
RewriteRule ^(.*)$ https://www.yoursite.com/$1 [R,L]
</IfModule>
Don’t forget to replace yoursite.com with your site URL.
Lastly, you should use a search-replace plugin to update all the links on your site.
If you need help with your HostPapa account, please open a support ticket from your dashboard.
