In this HostPapa article, we show you how to use the Online Payments application. The application will allow your website to accept donations and payments via PayPal.
To learn how to access your Website Builder to get started, please visit this article.
Getting set up to collect payments online
First, you’ll need to set up the application with the following steps.
- Enable the application.
- Drag it from the left side of the menu to where you want it to show on your webpage.

- Hover over the Online Payments icon. You will now see an image of a cogwheel.
- Click on the cogwheel to bring up a configuration menu.
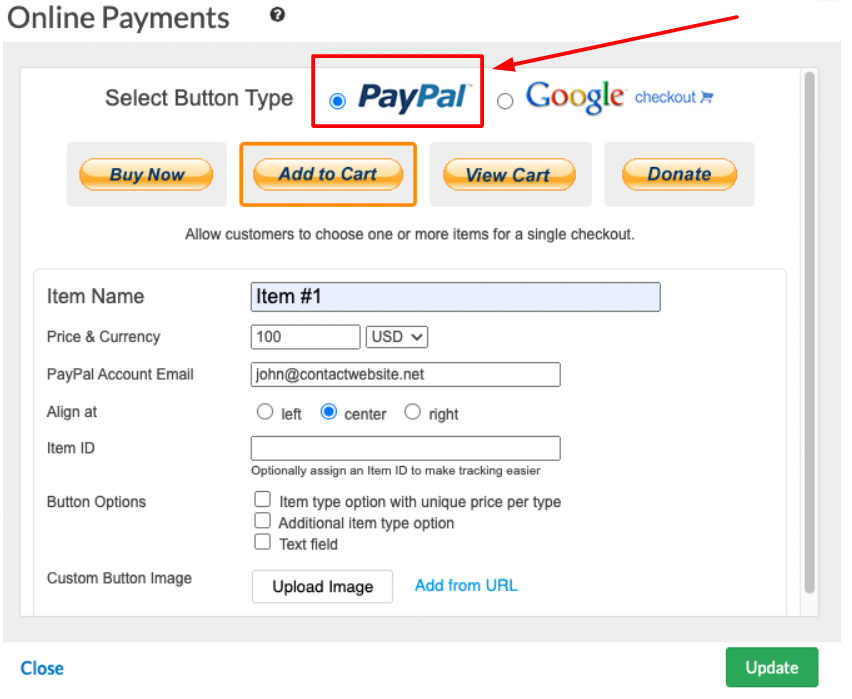
From the above menu, you can click on the Select Button Type option to choose PayPal. Please note that, for the moment, Google Checkout has been discontinued.
Choosing a button to collect online payments
Once you have chosen PayPal, you can select one of four button types:
- The Buy Now button allows your customers to click once to buy one of your items quickly.
- To create a fast method of paying for several items at once, there is an Add to Cart button. Visitors can add several items and pay for all of them in one checkout process.
- View Cart is a button which lets customers review all the items they have chosen.
- There is also a Donate button option, where visitors can pay a set amount or choose an amount of their own.
After you have chosen a button
- Enter the name of the item you are selling.
- Add the price and currency you are charging for the item.
- Decide how you would like your button aligned. Click the radio button for left, center, or right on the Align at option.
- Put a specific ID (if needed) for your item into the Item ID field.
- In the Button Options section, there are three unique options with radio buttons that you can check:
- The Item type option with unique price per type radio button gives you the option to offer alternative formats for your item—such as different sizes. You can also set a different price. For example, you can offer different-sized containers, and it will show various prices based on the item’s size.
- There is also the Additional item type option. Selecting this action will create an extra drop-down menu for the items you are selling. For example, let customers choose another color of the item they are buying. Please note that there is no price per type selection with this option.
- The Text field option creates two text fields, which visitors may type into, to supply details such as delivery requirements.
- Now, decide if you would like to add a Custom Button Image. To do so, locate an image file on your computer that you would like to use, and then click the Upload Image button to add the image to your PayPal button.
A note about the Online Payments application
Please be aware that the Online Payments application cannot be added inside a Text and Image element. It’s designed to be added as an individual element. When used with the Section Group element, you can create a layout very similar to what can be achieved with Tables.
If you need help with your HostPapa account, please open a support ticket from your dashboard.
