If you’re concerned about the security of the information you send and receive in email, configure your POP3 or IMAP account with SSL (Secure Sockets Layer). Using SSL encrypts your email data and prevents third parties from viewing your messages.
The difference between POP3 and IMAP is where your email is stored:
- Choose POP3 download email to your computer every time (you can also set your email software to leave a copy of messages on the server if necessary).
- Choose IMAP to leave your email on the server – a great choice if you travel often and need to access email from different devices and geographical locations, or when you don’t want to take up space on your computer.
For this article, we’ll be using Thunderbird 52.0.
What you need
- Access to your email software.
- Your Incoming (POP3) server name, provided in your Welcome email.
- Your Outgoing (SMTP) server name, provided in your Welcome email.
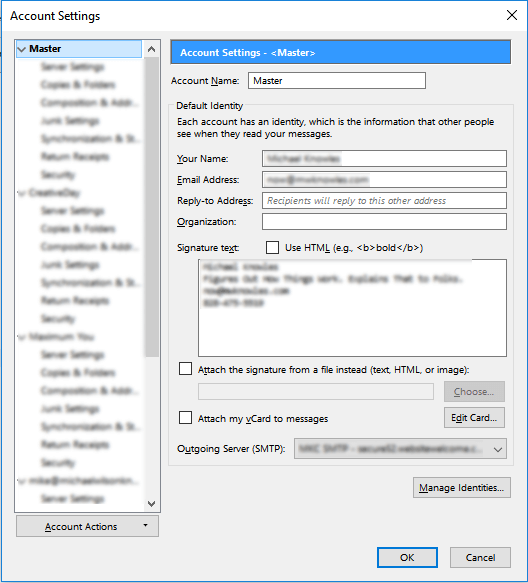
1) Click the Tools menu and select Account Settings to open the Account Settings window.
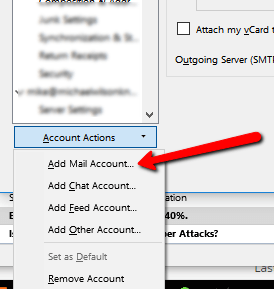
2) In the Account Settings window, open the Account Actions menu and select Add Account.
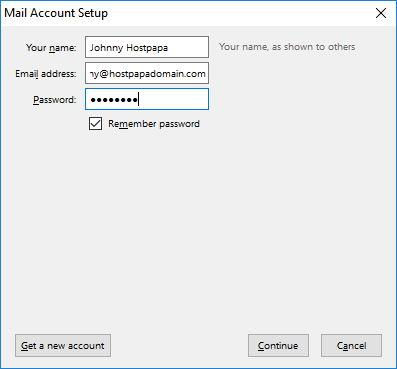
3) The Mail Account Setup window appears. Enter your name, the email address for the account you wish to set up, and the password used for your email account. Click Continue.
4) Thunderbird tries to automatically find your email settings in its database of email servers. If Thunderbird can’t find your email settings automatically, you’ll be prompted to enter the following information:
* Your email address.
* Your incoming (POP3 or IMAP) server name.
* Your outgoing (SMTP) server name.
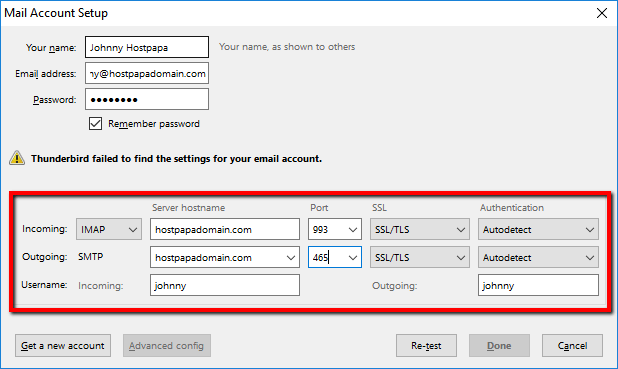
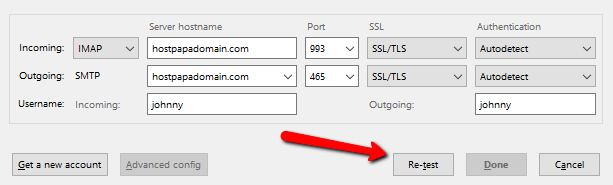
5) Set up the Incoming fields as follows:
* Select either IMAP or POP3 from the first dropdown menu.
* Enter your incoming server name in the Server Hostname field.
* In the Port drop-down menu, select 993 for IMAP and 995 for POP3.
* Set the SSL field to SSL/TLS.
* Leave the Authentication field set to Autodetect.
6) Set up the Outgoing fields as follows:
* Enter your outgoing server name in the Server Hostname field.
* In the Port drop-down menu, select 465.
* Set the SSL field to SSL/TLS.
* Leave the Authentication field set to Autodetect.
7) In the Mail Account Setup window, click the Re-Test button. Thunderbird will verify your settings to ensure they’re correct. If a problem occurs, check your settings using the instructions above. Contact Technical Support if you need assistance.
8) Once the re-test is successful, click Done. Your email has been created and set up to use SSL encryption.
If you have any questions or need help, you can always contact HostPapa Support by opening a support ticket. Details about how to open a support ticket are here.
