In this article, we will explain the Plesk upload SSL certificate process to keep your customer’s sensitive data safe.
For this, you will need to purchase an SSL certificate from a certificate authority. To purchase one through your Hostpapa Dashboard, follow these steps:
1. Log in to your HostPapa Dashboard.
2. Go to My Services.
3. Click on +Add Services.

4. Scroll down to SSL Certificates and click Add to account.

5. You will get redirected to the SSL Certificate order form.
Note: When purchasing an SSL certificate with HostPapa, your certificate will be installed, and you will no longer have to follow the steps below unless you want to manage it.
How to upload an SSL certificate in Plesk
There are different options to upload an SSL certificate in Plesk.
Uploading a .pem file
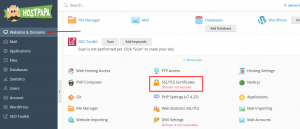
1. Access your Plesk control panel through your HostPapa Dashboard.
2. Go to Websites & Domains.
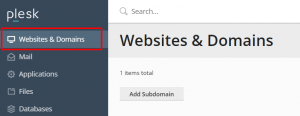
3. Click SSL/TLS Certificates.
4. Click on upload an already purchased certificate and then Upload.pem file.
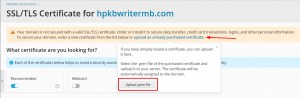
Uploading an already purchased SSL certificate
1. Access your Plesk control panel through your HostPapa Dashboard.
2. Go to Websites & Domains.
3. Click SSL/TLS Certificates.
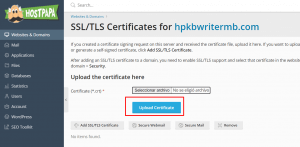
4. Go to Advanced Settings.
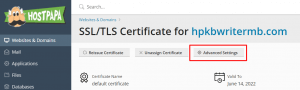
5. Click Upload Certificate and choose your purchased SSL certificate. If you haven’t purchased one, follow the steps to create a CSR to order a SSL certificate.
Creating a CSR to order a SSL certificate
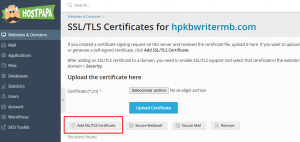
1. In the Advanced Settings panel, click Add SSL/TLS Certificate.
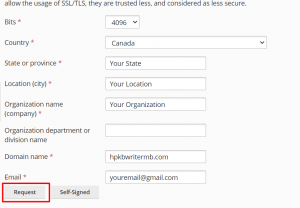
2. Fill the information in the form to request an SSL certificate.
3. Click Request. This will preload the KEY.
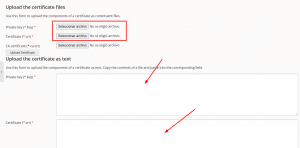
4. Upload the .CER/.CRT file either by file or by pasting the content on the Certificate (*.crt).
If you need help with Plesk, please open a support ticket from your dashboard.
