HostPapa’s Website Builder comes with a handy image gallery. This cutting-edge application helps you to easily add and manage images on your site. You’ll also be able to create intricate visualisations with simple drag-and-drop commands. In next to no time, Website Builder’s Galleries will upgrade the visual appeal of your website.
To learn how to access your Website Builder to get started, please visit this article.
Another great feature of Galleries is that it allows you to showcase your artwork, photos, and products in an organized and attractive manner. If you’d like advice on how to use images to get more website visitors, please check out HostPapa’s nine tips at the end of this article!
What the Galleries application can do for you
You can create multiple themed galleries with custom layouts like grids or slideshows. You can also upgrade images using:
- Captions.
- Hover animations.
- Lightbox effects.
The Galleries application makes sure your content looks great on any device, improving user engagement and making your site interactive, structured, and visually appealing.
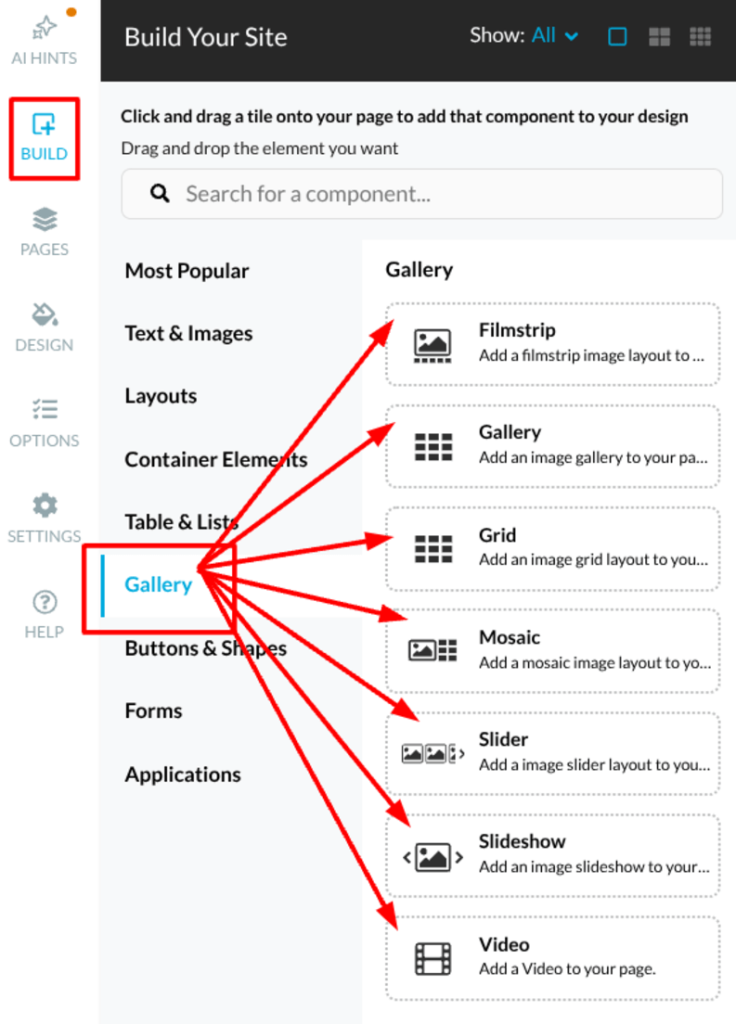
Creating a gallery
1. Click on Build in the left menu.
2. Select the Gallery tab.
3. Drag-and-drop one of the available gallery options on your webpage.
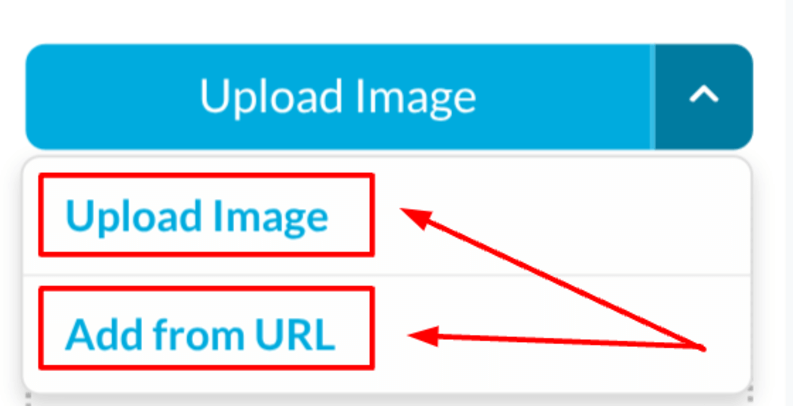
Uploading an image
- Select the Add New Image button.
- Choose Upload Image from the drop-down menu if you want to upload from your device.
- Click Add from URL if you’d like to upload from a URL. Please paste the URL of the image you would like and then click on Add Image.
An additional option is to use our Free Images gallery via the Image Picker button. This gallery offers a wide range of high-quality images that you can easily incorporate into your own galleries.
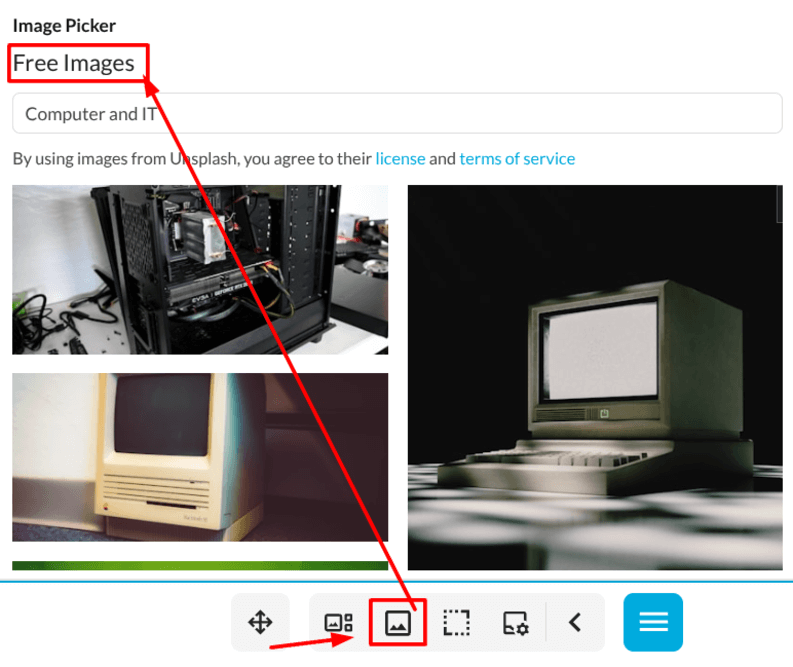
Image options
To alter your image, please click on the:
- Show properties button.
- The Properties box will now appear.
- You’ll now see a thumbnail of your image. Please click the small cog wheel icon that is visible in the top right corner of your image.
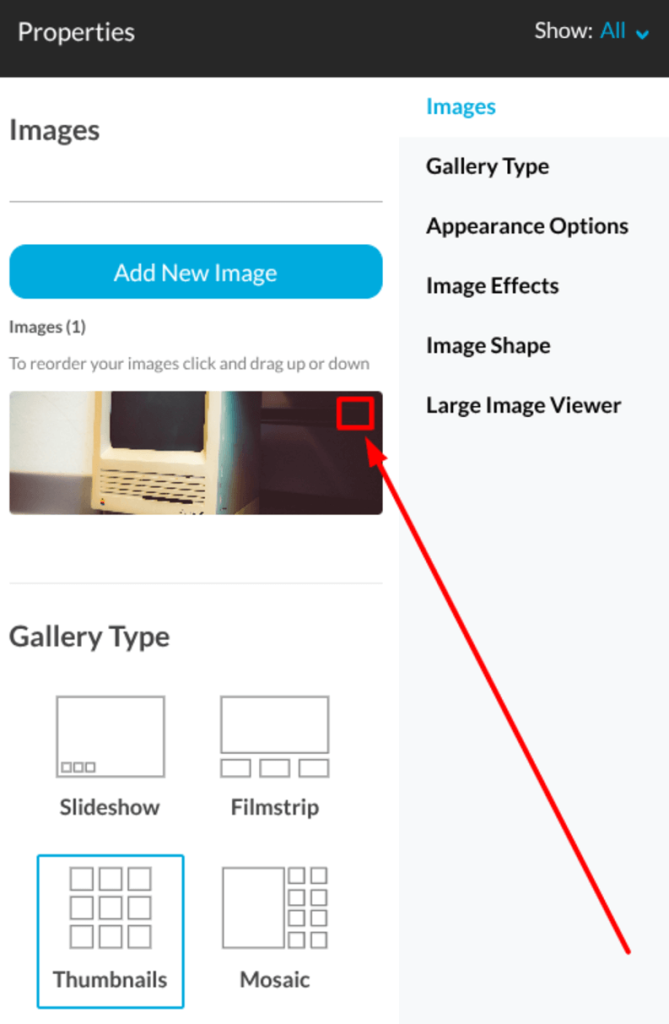
- You’ll now be in the Edit Image menu.
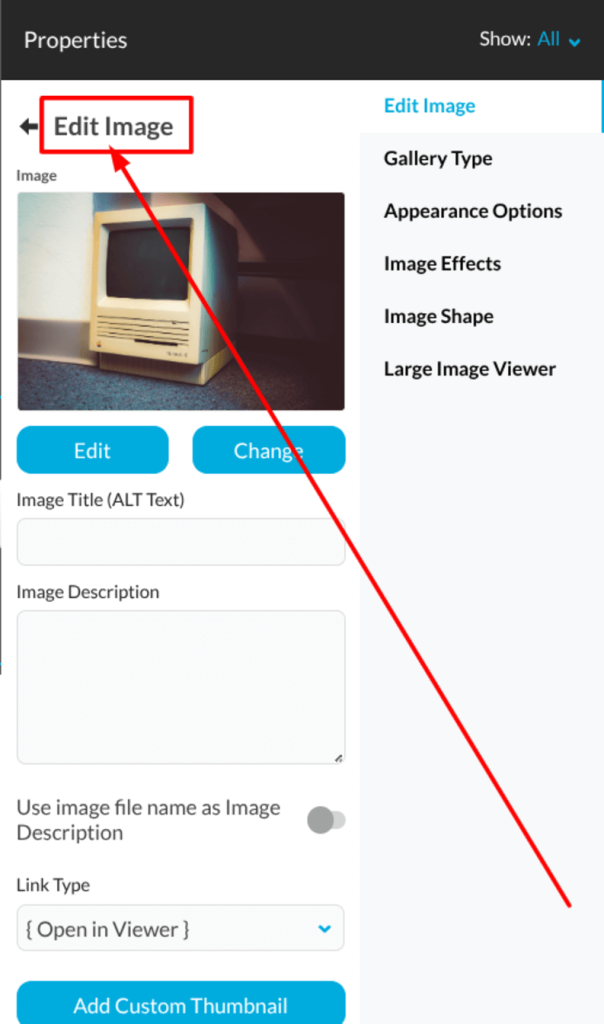
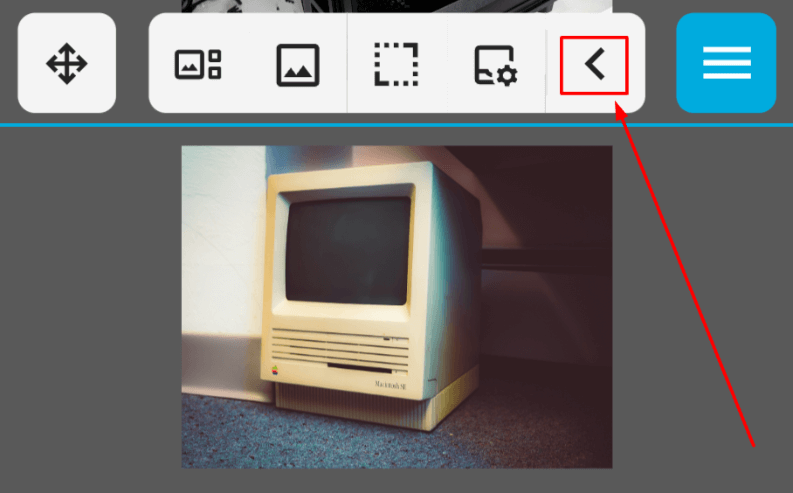
The first thing you’ll see is the back button, which allows you to return to the Gallery Options, along with a small preview of your image.
The other items available are:
- Edit button: Allows you to modify the image with the built-in editor.
- Change button: Replace your existing image.
- Image Title (ALT Text): Used by screen readers and search engines.
- Image description: A short description for the image and the image caption that is visible on the page.
- Use image file name as Image Description: This action will overwrite the Image Description option.
- Link Type: You can choose when the image is clicked to open the Large Image Viewer (the original image or a larger copy of the image), an Internal page, or an External page.
- Add Custom Thumbnail: Adding a custom thumbnail will change the preview image. The original image will only be visible in the Large Image Viewer.
If you scroll farther down the Properties menu, you’ll find options to change the gallery’s appearance. These choices include:
- Gallery Type.
- Appearance Options.
- Image Effects.
- Image Shape.
- Large Image Viewer.
To configure the different types of galleries
Thumbnails
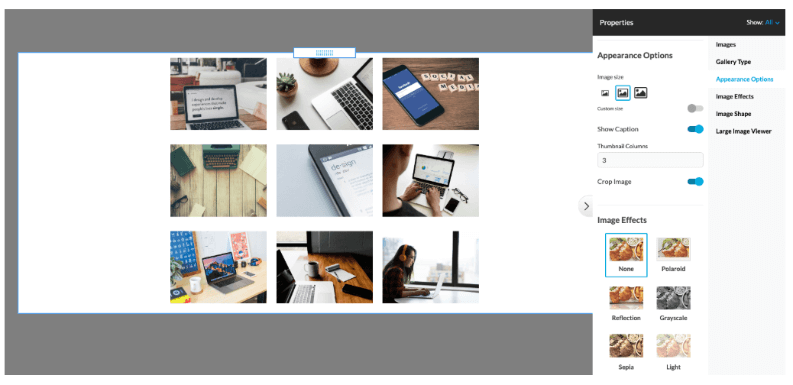
- Image size: You can choose from a predefined set of sizes (Small, Medium, or Large). You can also set a custom size that fits your design.
- Show Caption: Choose to see a caption/description below the image or not.
- You can select the number of Thumbnails Columns.
- Thumbnail Columns number 3 by default.
- Crop Image: When Crop Image is checked, the uploaded image will be cropped to the aspect ratio of the gallery image size before being resized. When this option is not checked, the uploaded image will preserve its original aspect ratio in the gallery.
Slideshow
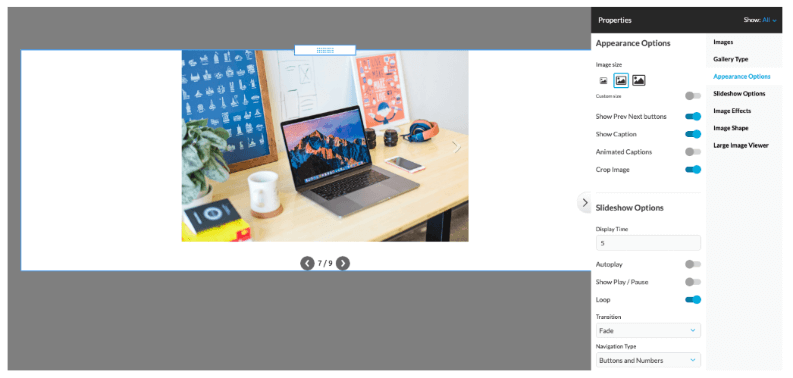
- Image size: You can choose from a predefined size (Small, Medium, and Large) or set any Custom size that fits your design.
- Show Caption: Choose to see a caption/description below the image or not.
- Animated Captions: Choose if the captions are to be animated or static (visible only when the Show Caption option is enabled).
- Crop Image: When Crop Image is checked, the uploaded image will be cropped to the aspect ratio of the gallery image size before being resized. When this option is not checked, the uploaded image will preserve its original aspect ratio in the gallery.
- Show Prev Next button: Navigation buttons that allow you to switch between gallery images.
- Timeout: The delay in seconds that takes for the images to automatically change.
- Autoplay: You can set the images to switch automatically.
- Show Play/Pause: The buttons allow you to pause or resume the Autoplay option.
- Loop: Enabling the option will tell the gallery to continue to autoplay, even after reaching the last image.
- Transition: You can choose between a Fade or a Slide effect, or have no transition effect.
- Navigation Type: You can add a navigation option below the image preview, such as buttons, numbers, or both.
Filmstrip
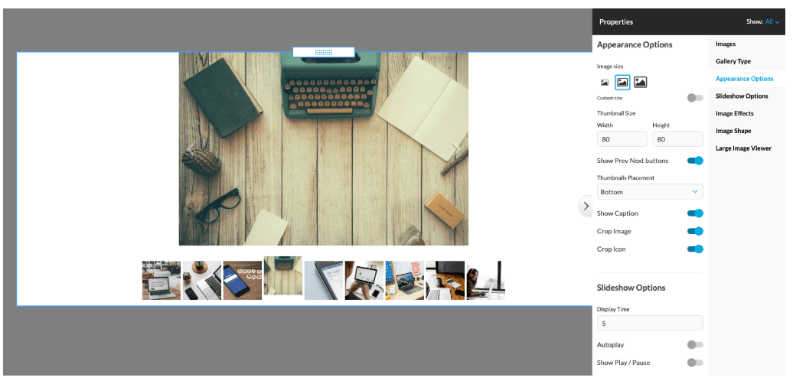
- Image size: You can choose from a predefined set of sizes (Small, Medium, or Large). You can also set a custom size that fits your design.
- Show Caption: Choose to see a caption/description below the image or not.
- Crop Image: When Crop Image is checked, the uploaded image will be cropped to the aspect ratio of the gallery image size before being resized. When this option is not checked, the uploaded image will preserve its original aspect ratio in the gallery.
- Show Prev Next button: Navigation buttons that allow you to switch between gallery images.
- Show Scrollbar: You can add a scrollbar to switch between images.
- Crop Icon: When Crop Icon is checked, the icons will be cropped to the aspect ratio of the Thumbnail Size before being resized. When this option is not checked, the icons will preserve the original aspect ratio in the gallery.
- Set thumbnails (image icon) size in pixels.
- Set thumbnails (image icon) position with Thumbnails Placement: Top, Bottom, Left, and Right.
- Timeout: The delay in seconds before the images automatically change.
- Autoplay: You can set the images to switch automatically.
- Show Play/Pause: The buttons allow you to pause or resume the Autoplay option.
- Loop: Enabling this option will cause the gallery to continue autoplaying, even after reaching the last image.
- Transition: You can choose between a Fade or a Slide effect, or have no transition effect.
Mosaic
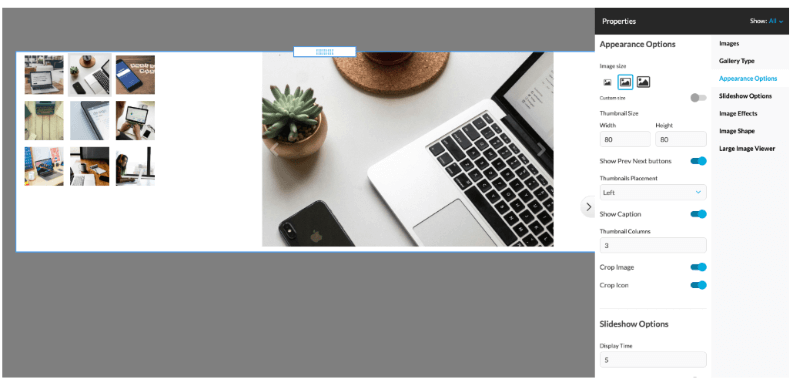
- Image size: You can choose from a predefined size (Small, Medium, and Large) or set any Custom size that fits your design.
- Show Caption: Choose to see a caption/description below the image or not.
- Crop Image: When Crop Image is checked, the uploaded image will be cropped to the aspect ratio of the gallery image size before being resized. When this option is not checked, the uploaded image will preserve its original aspect ratio in the gallery.
- Show Prev Next button: Navigation buttons that allow you to switch between gallery images.
- Show Scrollbar: You can add a scrollbar to switch between images.
- Enable or disable the Crop Icon option to shrink the image icon.
- Set thumbnails (image icon) size in pixels.
- Set thumbnails (image icon) position with Thumbnails Placement: Top, Bottom, Left, and Right.
- Autoplay: You can set the images to switch automatically.
- Show Play/Pause: The buttons allow you to pause or resume the Autoplay option.
- Loop: Enabling the option will tell the gallery to continue to autoplay, even after reaching the last image.
- Transition: You can choose between a Fade or a Slide effect, or have no transition effect.
Slider

- Image size: Small, Medium, Large, and Custom.
- Show Prev Next buttons: Navigation buttons that allow you to switch between gallery images.
- Show Scrollbar: You can add a scrollbar to switch between images.
- Show Caption: Choose to see a caption/description below the image or not.
- Autoplay: You can set the images to switch automatically.
- Show Play/Pause: The buttons allow you to pause or resume the Autoplay option.
- Loop: Enabling the loop option will tell the gallery to continue to autoplay, even after reaching the last image.
Grid
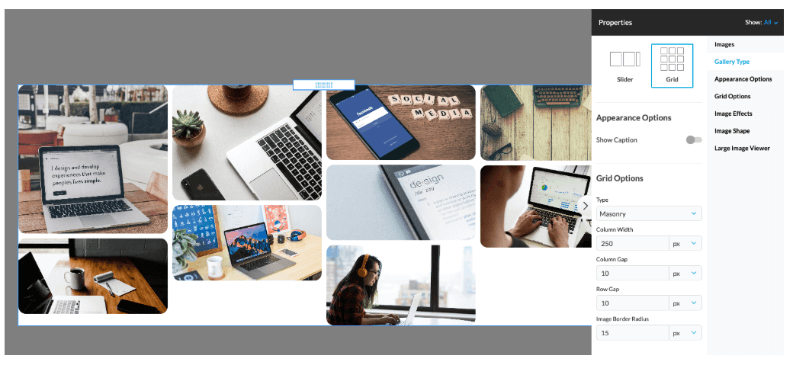
Responsive adjusts images to fit screen space, adapting to:
- Column width.
- Row height.
- Spacing.
This choice offers a flexible alternative to Thumbnails for a polished layout.
Masonry arranges items in an organic, brick-like flow, stacking vertically to minimize gaps. Guided by column width and spacing, it suits varied-height content, such as:
- Blog snippets.
- Cards.
- Photographs.
This system makes use of space while creating a cohesive, and visually appealing design.
Fixed Columns is a grid gallery type with a set number of columns that stay consistent across screen sizes. The layout is defined by the chosen column count and row height, outlining the gallery’s overall structure.
Each image can be customized to span more or less space, allowing items to vary in size. For example, an image may cover one column and two rows, making it larger than its surrounding items for visual emphasis and flexibility.
The following options are shared between all types of galleries
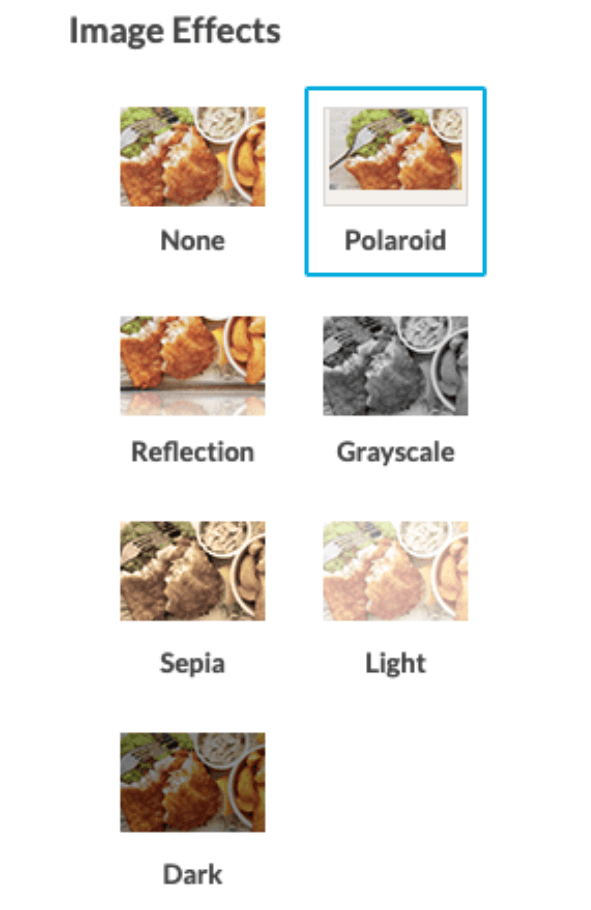
- Image Effects (not applied in Large Image Viewer).
You can change the image preview effect. The available options are:
- None.
- Polaroid.
- Reflection.
- Grayscale.
- Sepia.
- Light.
- Dark.
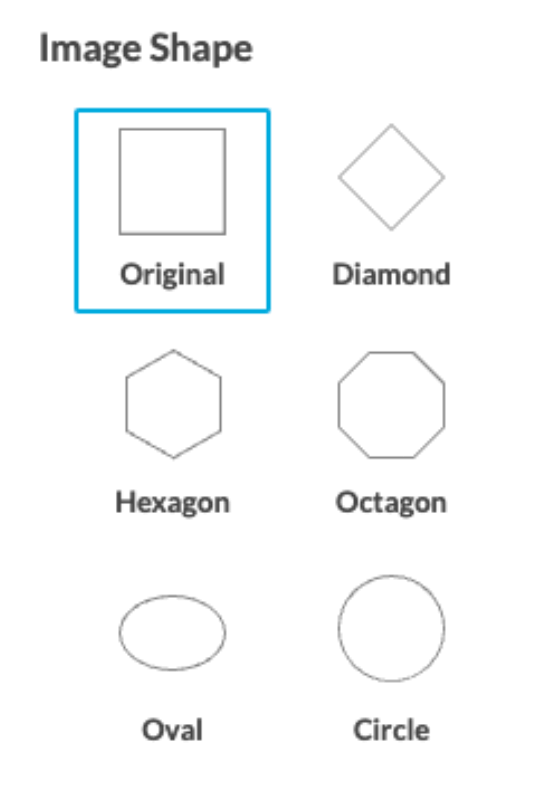
- Image Shapes (not applied in Large Image Viewer).
You can change the image preview shape. Available shapes for most galleries are:
- Original.
- Diamond.
- Hexagon.
- Octagon.
- Oval.
- Circle.
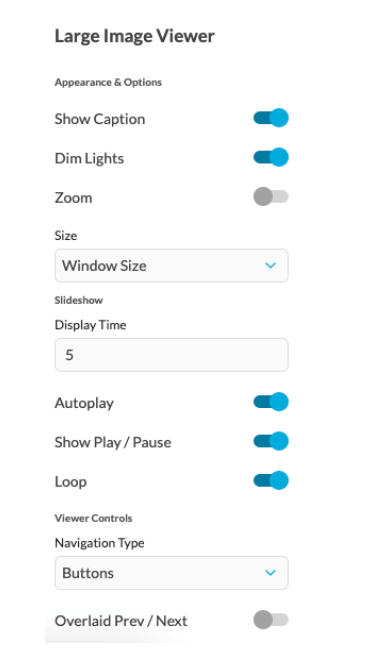
- The Large Image Viewer is triggered when a website visitor clicks on a single image.
- Show Caption option: To enable or disable Image Description text below the image in the large image viewer.
- Dim Lights: With this option enabled, the content behind the Large Image Viewer will be dimmed.
- Zoom: If you have a very large image, you’ll have the option to click on it to zoom.
- Size: The size of the Large Image Viewer.
Slideshow options
- Set timeout in seconds: Delay between changing images.
- Autoplay: You can set the images to switch automatically.
- Show Play/Pause: The buttons allow you to pause or resume the Autoplay option.
- Loop: Enabling the option will tell the gallery to continue to autoplay, even after reaching the last image.
- Set Navigation type to: Buttons, buttons & numbers, or none.
- Overlay Prev/Next arrow buttons to navigate between the images.
Notes
There is a limit of 200 images per upload, though this may vary depending on your internet connection.
Uploading compressed files, such as .zip or .rar, is not supported.
How to use images to get more website visitors
Images are a powerful tool for attracting visitors to your website. They capture attention quickly and communicate messages faster than blocks of text. Appealing visuals can increase engagement, encourage sharing, and establish brand identity. When used correctly, images can consistently increase website traffic.
Perfecting images for search engines
First, you must check that your images are well-suited for search engine results. Search engines read alt tags and file names for context and ranking. By adding descriptive metadata, you make your images discoverable in searches. This increases the chances of gaining traffic through image search.
Choosing high-quality visuals
Next, using high-quality images makes your website appear more professional. Blurry or pixelated visuals suggest poor design and reduce credibility. Visitors are more likely to share attractive clear media online. The better your imagery, the more positive first impressions are created.
Understanding stock vs. original images
Additionally, you can weigh the benefits of stock versus original images. Stock photos are convenient but may lack authenticity or uniqueness for impact. Original photos—though requiring effort—can highlight your brand’s individuality. Choosing a balance between both gives variety and saves time strategically.
Incorporating infographics
Moreover, infographics are a powerful way to communicate large amounts of data. They condense complex information into readable, engaging, and shareable visual formats quickly. People often prefer graphics to dense text, especially with technical subjects. Visual explanations attract backlinks, shares, and relevant referral traffic to websites.
Using images to evoke emotion
Furthermore, images can evoke emotional responses that increase engagement. Emotional connections encourage visitors to stay on your pages longer. A fitting image can spark inspiration, joy, curiosity, or empathy. As emotions influence actions, emotional visuals can drive desired audience behavior.
Building a consistent visual style
In addition, branding benefits greatly from using a consistent visual style online. Consistency across images fosters recognition, trust, and stronger customer loyalty overall. Audiences remember visual identities more easily than text-heavy marketing messages alone. Aligning with colors and themes establishes a recognizable and trustworthy digital presence.
Compressing for faster loading
Equally important, image size affects website loading speeds and overall performance. Slow-loading pages frustrate visitors and push them to leave your website. Compressed images load faster while still maintaining their clarity. Reduced loading times sharpen the User Experience (UX) and polish up search engine rankings.
Encouraging social sharing with images
Likewise, images are valuable tools for social sharing and promotion online. Social platforms prioritize posts containing compelling visuals in their algorithms. This increases the chances of posts appealing to broader networks successfully. By creating shareable images, you naturally fuel word-of-mouth advertising.
Leveraging visual call-to-actions
Similarly, call-to-actions become stronger when paired with intentionally appealing visuals. An attractive visual can highlight the direction you want visitors to go. Arrows, buttons, and graphics can lead users through web journeys. Combined text and imagery boost conversions more than plain words alone.
Using images in blog posts
Another smart practice is including images within your written blog content. Articles accompanied by visuals often get more views and higher shares. Images break text into manageable sections, tweak readability, and comprehension levels. With its appealing visuals, the article keeps visitors engaged throughout.
Structuring galleries or portfolios
Also, galleries or portfolios can showcase creative work in collections. These displays allow multiple visuals to shine in one useful location. Portfolios provide proof of skill, quality, and attention to appealing design. When users browse, they spend more time exploring your content.
Making use of numbered lists
Equally, numbered image lists attract attention in content through structure. For example, the top 10 galleries are very popular across publishing domains. Websites gain traction by presenting information visually in ranked formats. Visitors appreciate clear sequences that provide both clarity and entertainment simultaneously.
Upgrading eCommerce with images
Additionally, eCommerce websites rely heavily on visuals for customer confidence building. Product photos must be clear, accurate, and ideally show multiple angles. Images that replicate realistic experiences increase trust and reduce return rates. Customers who feel confident visually are more likely to purchase.
Creating interactive images
Furthermore, interactive images enrich engagement by introducing playful, clickable elements. Hotspots, zoom features, or rollovers maintain attention and increase curiosity quickly. These interactive designs create unique experiences that stand out among typical competition. Visitors stay longer and remember your brand.
Using icons and illustrations
Finally, consider adding custom icons and illustrations to boost website appeal. Illustrations can simplify ideas or reinforce brand character with personality. Icons can guide user attention without overwhelming visitors with additional text. Mixtures of both can strengthen communication and make site navigation better.
Actionable tips for using images
To make the strategies above easy to apply, consider the following lists:
Steps to streamline images
- Rename files with descriptive, keyword-rich text before uploading.
- Use alt-text with relevant phrases for search indexing.
- Compress files to instantly reduce site loading speed.
- Choose the correct file format, such as PNG or JPEG.
Types of images to include
- Original photographs of your team or products.
- Infographics highlighting useful information.
- Icons for clear navigation and guidance.
- Screenshots for tutorials or demonstrations.
- Illustrations to add creativity and uniqueness.
By applying these techniques consistently, your website stands out visually. Strong images spark emotional connections and amplify online reach.
Every image presents a chance to inform, inspire, and attract potential visitors. With a visual strategy, you create a lasting and magnetic digital presence.
If you need help with your HostPapa account, please open a support ticket from your dashboard.
