Note: This article is specifically for websites created using a Legacy version of HostPapa Website Builder. If you purchased the Website Builder + Business Email bundle, check this article for more information.
If you are unsure of what Website Builder version you have, please get in touch with our support team.
Get started with Website Builder’s Online Store by watching this informational video or following the written directions below.
Once you have signed up for the Online Store, you can start adding your products and customizing your settings.
The basic Online Store setup consists of three steps:
- Adding products
- Adding payment methods
- Adding shipping methods
In this article, we’ll go through each of these three steps.
Adding Products to the Online Store
Once you’ve logged into My HostPapa Website Builder, from the top left menu, choose Store. Then, in the setup screen, click on the blue Add new product button.
The product setup box provides a variety of options. For now, we’ll be adding a single product and include basic details, an image, inventory information, and product options. You can edit the product’s category, options, images, tax and shipping information later.
To add a new product, click New product in the top-left corner of the Products box.
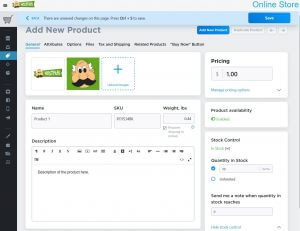
In the General window, you can enter the basic product details.
- Name: Your product’s name. You can change this at any time.
- SKU: Stock-keeping Unit. This is not a mandatory field, and if you don’t use SKUs for your products, you can leave it as is.
- Weight, lbs: Weight is necessary for shipping, as carriers calculate their rates by product weight. Shipping and handling are charged separately to the product. In addition to this, not assigning a product weight means that your online store will view your product as an intangible item (like a digital download), and won’t calculate or display a shipping rate at checkout.
- Upload images: Click the “Upload images” box to add images for your product.
- Description: Add a description of your product.
Click Save when you’re done.
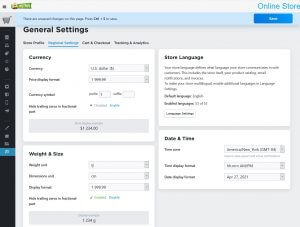
Follow these steps to change the weight of your products:
- Click Settings in the left panel.
- Make sure you’re in the General tab.
- Select Regional Settings.
- Under the Weight & Size, change the weight unit you’d like to use.
- Click Save.
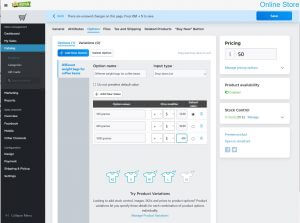
The Online Store also allows you to add a variety of options to your product. For example, if you are selling coffee beans, you can add options for the different size bags you sell. When customers click to buy a bag of coffee beans, they’ll be prompted to choose a size and see the price difference between the various options.
- Click on Options at the top of the Product box.
- Click on Add New Option.
- Describe your option (e.g., different weight bags for your coffee beans).
- Enter the price of each option.
- Select the display options from the Input Type menu.
- Click Save.
Adding payment methods
The Online Store integrates with many payment gateways. The most popular gateways are PayPal. Square and Stripe. To use it with the Online Store, you can simply sign up for a merchant account.
Once your account is set up, you can add a payment method or edit existing payment methods in the Payment tab.
You can also accept non-typical payment methods, such as a check or a fax order. Payment methods fall into two different categories:
Offline methods
Offline methods don’t charge customers right away. Instead, they just store the data provided by the customer, which you can then process manually. Offline methods include wire transfer, phone ordering, and cheques.
There are three different types of offline methods:
- Offline Basic: This processor doesn’t ask for any details; it saves the entered order data.
- Offline Check: Asks for an owner’s full name, chequing account number, and bank routing number.
- Offline Purchase Order: Asks for a PO number, company name, buyer’s full name, and job position.
You then need to process this information, and once payment goes through, you can fulfil the customer’s order.
Online methods
Online methods process payment immediately and would apply to methods such as credit cards and PayPal transactions.
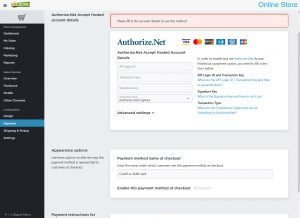
Adding a payment gateway
- Go to Payments > More options to accept online payments > Choose Payment Method and select one of the listed payment methods.
- Add the required information in the fields provided.
- Enable your gateway.
- Click Save.
Adding other payment gateways
- Go to System Settings > Payments.
- In the Payment Processor column of the method you would like to update, click Change.
- Choose the payment type you’d like to accept.
- Select the gateway you’d like to use and enter your account information as required.
- Enable your gateway.
- Click Save.
Adding customer instructions
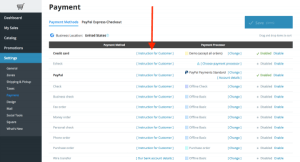
A customer note is always shown on the following line of the payment method name as a way of adding extra information to your payments. An excellent example of this is if you’d like to work on a Cash on Delivery (COD) basis. Because there isn’t a COD payment option, you can simply add this information underneath your preferred payment method.
You can only use plain text in your notes (no HTML is allowed). Click on Instruction for customer next to the appropriate payment method on the Payment page to add a note.
- Example: The first line, e.g. payment name: Check.
- The second line note: COD: Please pay on delivery.
If you’re using a shipping company, you need to contact them to confirm whether they offer a COD service. For example, UPS will collect a cashier’s cheque or money order on your behalf. For more information about this, visit the UPS COD page. Each shipping company works differently, so it’s best to contact them to confirm.
Store URL
The store URL is your store’s web address and can be added to business cards and email signatures. It’s an optional feature, although some features do rely on it.
Once you’ve published your site and logged into the Control Panel, you will be reminded that you should set your store URL. Enter the URL of the site to which you’ve added your Online Store. Click Save to finish.
Adding shipping methods
The Online Store supports shipping options worldwide and also gives you the flexibility to choose your shipping provider. There are many different shipping calculations available:
- Automatically calculated rates: Shipping rates are calculated based on the order’s details and retrieved from the carrier automatically. No additional setup is required.
- Free shipping: Set up free shipping if you include the shipping cost into the product prices or if you cover the expenses in other ways. Offering free shipping encourages customers to complete their orders.
- Conditional free shipping: For example, you could offer free shipping for all orders over $30.00, and charge $3.00 for orders under that amount. Or set your own rates and conditions.
- Flat rate: Set up a flat rate to charge a fixed shipping fee on all orders, no matter how many items are ordered.
- Custom rates: Set your own shipping fee on all orders, no matter how many items are ordered.
How to add a shipping method
- Go to Shipping & Pickup.
- Click the Add Shipping button.
- Depending on your country’s location, the Set Up Shipping box will list a few default shipping methods. For example, in the United States, it will display U.S.P.S, UPS, FedEx and Other carriers.
- Click Set Up.
- Complete the steps provided.
- To activate a shipping option, click Save & Finish.
If the carrier you want isn’t listed, you can set it up under Other carriers.
Shipping costs are generally calculated on weight and distance, so it is important to configure your product weight correctly if you are selling a tangible product. This will ensure you receive the correct carrier-estimated cost of delivery.
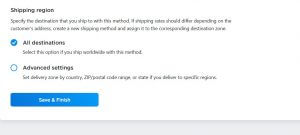
Set shipping region: Specify the destination that you ship to with this method. If shipping rates differ depending on the customer’s address, create a new shipping method and assign it to the corresponding destination zone.
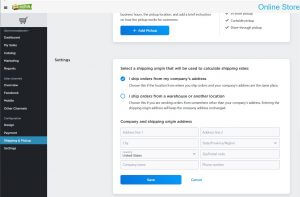
Shipping Origin: This is the address from where you ship your orders and is used to calculate real-time shipping rates. This may also be the location where the customers can pick up their orders.
- Go to Shipping & Pickup > Settings > Shipping Origin.
- Click Set Up Origin Address.
- Select one of the two options:
- a) I ship orders from my company’s address: Choose this you ship orders directly from your company’s public address.
- b) I ship orders from a warehouse or another location: Choose this if you send orders from somewhere other than your company’s address. Entering the shipping origin address will keep the company address unchanged.
- Fill in the required information under Company and shipping origin address.
- Click Save.
Once you’ve saved all your options, go to your site in the website builder. Drag and drop the Online Store Widget onto your page, and your online store will be displayed.
Take a look at our tutorial on Basic Customization to get started with changing your currency and adding product options. If you need help with your HostPapa account, please open a support ticket from your dashboard.
