Note: This article refers to the legacy version of the Website Builder. If you signed up to the HostPapa Website Builder after March 11 2020, you’re on the new version of the Website Builder. For help, go here.
Here is an overview of creating internet-compatible graphics, illustrations, and photographs.
DPI vs Pixels
72dpi (dots per inch) has only good for the scanned or printed image – it carries little importance for images viewed on-screen. Think in terms of pixels rather than dpi. It’s the pixel dimensions that will determine how large the image will be on the screen.
If you’re planning to scan images to use on your website, scan them at 300dpi and reduce the image size in your image editor to your preferred dimensions in pixels.
Keep in mind that your image will appear at different sizes on different computers with various monitors and screen resolutions. Try to choose a scale that doesn’t look huge on 800 x 600 monitor displays and doesn’t look tiny on 1024 x 768 monitor displays. For example, use a width of 350 pixels for landscape or horizontal pictures and a height of 250 pixels for portrait or vertical images.
Screen Resolution
The term screen resolution refers to the number of individual pixels that fit within a given space. For example, in a 800 x 600 resolution, 800 refers to the number of pixels that the monitor can display horizontally and 640 points to the vertical limit.
Monitor size and optimal screen resolution are interrelated. Screen elements appear smaller as you increase the resolution. Today, the most widely used screen size is 1024 x 768. All of our styles have been designed for optimum display on 1024 x 768 monitor displays.
Some things to keep in mind are:
- The display of key information should appear above the fold (the line beyond which a user must scroll to see more contents of a page) so visitors can see it without scrolling down. Try not to make your pages too long – two to three screens of information is plenty.
- Ensure that it’s easy to read the text in various columns.
- Type size should remain legible.
Image File Formats
On the web today, GIF, PNG and JPEG are the most common and widely supported image file formats. Cropping and resizing images is important to keep pages lightweight and quick to load. Here is how each of these file formats work, when to use them and why.
- JPEG format is intended for photo-style images only:
- Photographs
- Movie stills
- Computer game stills, etc.
- The GIF and PNG formats are ideal for compressing graphics that contain flat areas of plain colour as well as text. Examples of this include:
- Logos
- Line art
- Comic-strip style illustrations
- Files that require transparency
Pixel Pushers
Edit your images using Adobe Photoshop. (There are a number of alternate image editors available, one of the better-known options is Gimp).
Photoshop’s Save for Web tool is a simple and easy way to prepare your image files for use on the web.
Open an image and resize it to a small size to use on your website. Click Image > Image Size and enter the new width in the Pixel Dimensions box. Try a width of 150 pixels for thumbnail images and 400 for larger click-through images. Click OK and then on File > Save for Web to open the Save for Web dialog box.
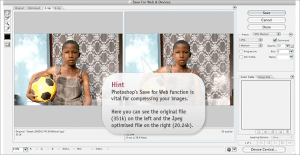
The tabs in the top left corner of the window allow you to switch between various views of your file. By clicking these you switch between a view of the original photograph (Original), your optimized photo (Optimized, with the Save for Web settings applied to it), or a comparison of two or four versions of the image (2-Up or 4-Up).
To compare the original photograph with the optimized image, click on 2-Up. The left frame will contain your original unedited photograph, and the right frame the optimized image. To alter the compression settings, select the image in the right frame and choose JPEG High from the Preset menu. Experiment with the quality settings and compare the two images. The lower the quality value, the muddier your optimized image will look. Notice the File Size and Loading Speed values beneath each photo – the higher the quality value, the larger the file size. The trick is to achieve the best quality image for the smallest file size.
Once you are happy with your photograph, click the Save button.
Copyright
It is important to remember that all creative work generates a new copyright by default, and the absence of a copyright notice does not mean it is in the public domain. Nonetheless, it may be wise to display a copyright notice on your website (usually in the footer of the page).
Also remember that images and photographs are subject to copyright, so be sure to use original or licensed material. In some instances, fair use guidelines may allow a photograph to be used. Only an explicit statement from the copyright holder can release their rights to the work and make it legally available for use. To be safe, unless it is made clear that the images are released by their respective copyright holders, assume them to be copyrighted and unlicensed.
Flickr images tend to fall under a traditional copyright or Creative Commons license. You’re forbidden to use Flickr images marked as copyrighted (or All rights reserved) for your own purposes unless you get explicit permission from the author. Non-copyrighted images on Flickr come under a different kind of license called Creative Commons. Each image is available under one of six customized licenses made to influence where and how each image can be used.
As per the Yahoo! terms of service, Flickr holds the license to use, distribute, reproduce, modify, adapt, publicly perform and display content for the purposes of providing and promoting the Yahoo! Group. This implies that the Flickr widget, owned by Yahoo! who also controls copyright of the material, allows you to display Flickr images in this manner.
If using images under the Creative Commons license and assuming you’re not using these images for commercial use, it is ideal to extend a basic courtesy by crediting the author(s) and providing a link to their website or profile.
Links & Resources
- Adobe Photoshop: https://www.adobe.com/products/photoshop/photoshop
- Image Editor: https://www.gimp.org
- A Dao of Web Design: https://alistapart.com/articles/dao
- Web Standards: https://www.webstandards.org
- Scanning tips/72 dpi: https://www.scantips.com/basics1a.html
- Alt text: https://en.wikipedia.org/wiki/Alt_attribute
- Copyright: https://www.masternewmedia.org/news/2004/06/25/publishing_images_online_myths_and.htm
- Yahoo! terms of service: https://info.yahoo.com/legal/us/yahoo/utos/utos-173.html
- Creative Commons: https://creativecommons.org
